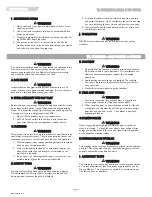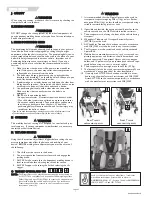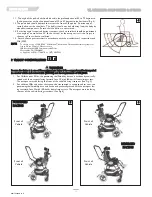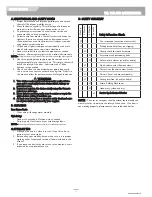
21
Z I PP I E XP R E SS
J. ANTERIOR TRUNK BUTTERFLY SUPPORT
WARNING
To avoid serious injury or issues with eating or breathing, the pelvic positioning belt is
required to be used in combination with the butterfly harness. Double-check all adjustments
to ensure there is no possibility of obstructing the airway or any other undesired constric-
tions. Do not use the butterfly harness without the pelvic positioning belt.
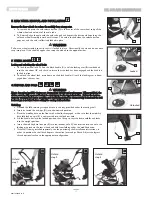
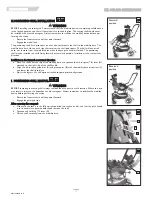
3-point Harness Adjustment
a. Place the child in the seating system and fasten the pelvic positioning belt.
b. Position the child's hips and tighten the belt to the proper position.
c. Connect the butterfly harness (two styles) to the straps already fastened to the posi-
tioning shell.
d. First, adjust the lower butterfly straps to keep the butterfly from riding up on the
child's torso.
e. Then, adjust the upper straps making sure there is enough room around the child's
neck for easy breathing and eating.
f.
Once the butterfly straps are adjusted, snap the lower straps into the plastic tri-glide
up against the quick release buckle.
39 40
IX. DEALER SERVICE & ADJUSTMENT
39
40
41
K. LATERAL TRUNK SUPPORTS (Optional)
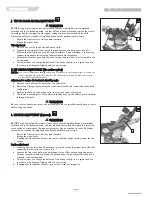
Assembly to the Seating Shell
a. From behind your unit, pull back upholstery and remove the
back pad to expose the plastic back shell.
b. Insert screws and washers (A) from the rear of the shell
through the adjustment slots.
c. Thread the bolts into the lateral nut plate (B) clamping the lat-
eral mounting plate to the backshell.
d. Seat the child and properly adjust the laterals for support and
comfort.
e. Tighten the screws.
41
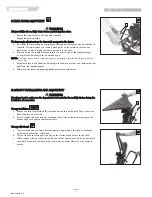
Lateral Swing-Away Operation
a. Depress the silver lever (C) allowing the lateral to swing inwards or outwards. This is
useful for storage or helping a child into or out of the seating system.
NOTE
- The laterals lock into the adjusted preset position which can be angle adjusted by following
steps in the next section “Lateral Angle Adjustment”.
42
42
A
B
C
9921700000 Rev. E


