background image


22

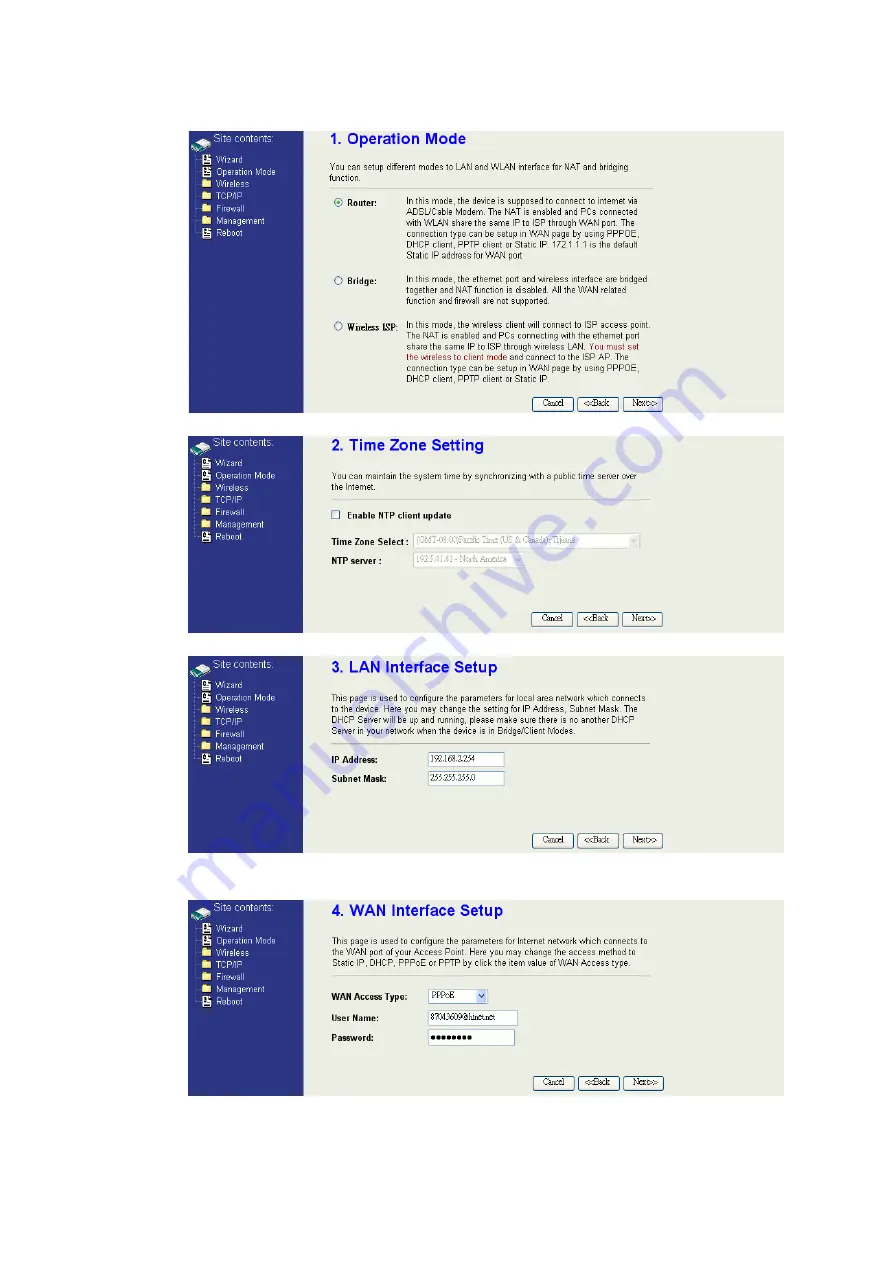
4.  Press “Next>>” button then set the “Operation Mode” to “Router” mode. 


5.  Press “Next>>” button then disable “Time Zone” function. 


6.  Press “Next>>” button then set the IP address of LAN interface. 


7.  Press “Next>>” button then select the “PPPoE” for “WAN Access Type” 

and fill in the “User Name” and “Password” fields. 


Summary of Contents for RAD 500

Page 1: ...Wireless LAN Device Series WLAN Outdoor AP RAD 500 User Manual Version 1 3 0 9a 2006 07 12...

Page 2: ...4 CONFIGURING AS WLAN CLIENT ADAPTER 47 QUICK START TO CONFIGURE 47 MAC CLONE FOR SINGLE ETHERNET CLIENT 49 CONFIGURING UNIVERSAL REPEATER 50 CH 3 CONFIGURING WDS 52 WDS NETWORK TOPOLOGY 52 WDS APPLIC...

Page 3: ...ITY OF SERVICE 70 STATIC ROUTE SETUP 74 DYNAMIC ROUTE SETUP 75 VPN PASS THROUGH 76 USING CLI MENU 76 THE SYSTEM MANAGEMENT 78 SNMPAGENT 78 MISCELLANEOUS SETTINGS 81 PING WATCHDOG 82 AIMING TOOL 83 CON...

Page 4: ...interference in a residential installation This equipment generates uses and can radiate radio frequency energy and if not installed and used in accordance with the instructions may cause harmful inte...

Page 5: ...pursuant to part 15 of the FCC rules These limits are designed to provide to provide reasonable protection against harmful interference in a residential installation This equipment generates uses and...

Page 6: ...l who installs and manages the RADMAX RAD 500 product hereafter referred to as the device To use this guide you should have experience working with the TCP IP configuration and be familiar with the co...

Page 7: ...ion RAD 500 Packing List Before you start to install the IA make sure the package contains the following items Wireless IA AP unit 1 Mounting Kit 1 Power Over Ethernet Kit 1 Ground Wire 1 2 5 U bolts...

Page 8: ...e showed in the following 1 You must mount the IA into the bracket first 2 You can use the 2 5 inches U bolt to mount on the pipe The two U bolts must be mounted tightly Be aware of not over tighten t...

Page 9: ...ormal operation under IEEE 802 3 standards When you plug the regular RJ 45 cable into the PoE device you should use the regular RJ 45 cable to plug into the DATA IN of Power Over Ethernet Kit to conne...

Page 10: ...n AP Client mode and scanning Wireless signal Off Wireless signal strength is 0 RSSI 20 On Wireless signal strength is more than 1 Off Wireless signal strength less than 21 RSSI 40 On Wireless signal...

Page 11: ...11 We recommend you refer to the following illustration as a guideline for hardware installation Internet Ethernet HUB SWITCH ADSL Ground Outdoor Indoor Power Injector Power Supply RJ 45 48V in...

Page 12: ...e signal strength About the detail please refer to Ch4 Advanced Configuration Aiming tool We recommend you refer to the following illustration as a guideline for hardware installation Internet Etherne...

Page 13: ...ed to make sure the IP address of your PC is in the same subnet as the device such as 192 168 2 X for LAN 172 1 1 X for WAN Please note that the DHCP server inside the device is default to up and runn...

Page 14: ...t of the device To use this mode first you must set the wireless radio to be client mode and connect to the AP of your ISP then you can configure the WAN IP configuration to meet your ISP requirement...

Page 15: ...the device The following table shows the supporting combination of operation and wireless radio modes Bridge Router WISP AP V V X WDS V V X Client V X V AP WDS V V X Hereafter are some topologies of n...

Page 16: ...isit Internet through DEV1 We assume all the devices keep the factory default setting To make sure that user can continuing press the rest button for more than 5 seconds to restore the factory default...

Page 17: ...on Mode to Router mode 5 Press Next button then disable Time Zone function 6 Press Next button then set the IP address of LAN interface 7 Press Next button then select the PPPoE for WAN Access Type an...

Page 18: ...tton then select the AP WDS for mode and change the SSID to DEV1 9 Press Next button then select None for Encryption then press Finished button 10 Wait for refreshing web page 11 Use WDS Settings page...

Page 19: ...d the BSSID of DEV2 to Current WDS AP List 13 Since we access the device by wireless connection it may temporarily disconnect when applying the WDS setting After re connecting to the device use the St...

Page 20: ...but different MAC addresses it may cause you not able to access the web server of device If the situation happens please try to clean the ARP table of your PC by DOS command arp d then you can access...

Page 21: ...set the IP address of LAN interface 6 Press Next button then select the AP WDS for mode and change the SSID to DEV2 7 Press Next button then select None for Encryption then press Finished button 8 Wa...

Page 22: ...27 9 Access the web server by new IP address 192 168 2 202 then use LAN Interface page to disable DHCP Server 10 Wait for refreshing web page 11 Use WDS Settings page to configure WDS...

Page 23: ...28 12 Enable WDS function and add the BSSID of DEV1 to Current WDS AP List 13 Use the Status page to check the settings...

Page 24: ...ult IP address but different MAC addresses it may cause you not able to access the web server of device If the situation happens please try to clean the ARP table of your PC by DOS command arp d then...

Page 25: ...30 4 Access the web server by new IP address 192 168 2 203 then use Basic Settings page to change SSID and CHANNEL 5 Use the Status page to check the settings...

Page 26: ...t different MAC addresses it may cause you unable to access the web server of device If the situation happens please try to clean the ARP table of your PC by DOS command arp d then you can access the...

Page 27: ...s of LAN interface 6 Press Next button then select the DHCP Client for WAN Access Type 7 Press Next button then select the Client for mode and change the SSID to DEV4 8 Press Next button then select N...

Page 28: ...ur PC to 192 168 3 x then access the web server by the new IP address 192 168 3 1 and use Status page check the setting 11 If the State of Wireless Configuration is not Connected or you want to refres...

Page 29: ...t different MAC addresses it may cause you unable to access the web server of device If the situation happens please try to clean the ARP table of your PC by DOS command arp d then you can access the...

Page 30: ...set the IP address of LAN interface 6 Press Next button then select the Client for mode and change the SSID to DEV5 7 Press Next button then select None for Encryption then press Finished button 8 Wa...

Page 31: ...36 9 Access the web server by the new IP address 192 168 2 205 and use LAN Interface page to disable DHCP Server 10 Wait for refreshing webpage 11 Use State page to check setting...

Page 32: ...37 12 If the State of Wireless Configuration is not Connected or you want to refresh the RSSI please use Site Survey page to re connect a AP RAD500...

Page 33: ...reless clients to join a wireless local network 2 Client Support Infrastructure and Ad hoc network types to act as a wireless adapter 3 WDS Wireless Distribution System this mode serves as a wireless...

Page 34: ...king must use the same SSID and channel for establishing the wireless connection PC 3 PC 2 AP Client 1 AP Client 2 AP Client 3 PC 1 In client mode the device can t support the Router mode function inc...

Page 35: ...ael and China 7 2442 Americas EMEA Japan Israel and China 8 2447 Americas EMEA Japan Israel and China 9 2452 Americas EMEA Japan Israel and China 10 2457 Americas EMEA Japan and China 11 2462 Americas...

Page 36: ...g will reduce the throughput of the device Authentication Type The device supports two Authentication Types Open system and Shared Key When you select Share Key you need to setup WEP key in Security p...

Page 37: ...ired Time The client expired time determines time interval the client need to re associate with the device while client is idle The default client expired time is 300 sec MTU Size Maximum Transmission...

Page 38: ...ion you need to have the user profile in these devices for the roaming station Block WLAN Relay Isolate Client The device supports isolation function If you are building a public Wireless Network enab...

Page 39: ...what security function you need WEP Encryption Setting Wired Equivalent Privacy WEP is implemented in this device to prevent unauthorized access to your wireless network The WEP setting must be as sa...

Page 40: ...ing The device supports external RADIUS Server that can secure networks against unauthorized access If you use the WEP encryption you can also use the RADIUS server to check the admission of the users...

Page 41: ...ed via WPA RADIUS Server You need a RADIUS or other authentication server on the network z Enterprise RADIUS When WPA Authentication mode is Enterprise RADIUS you have to add user accounts and the tar...

Page 42: ...ns Ad Hoc network type or Access Point Infrastructure network type and you don t need to install any driver Quick start to configure Step 1 In Basic Settings page change the Mode to Client mode And ke...

Page 43: ...select one of the SSIDs you want to connect and then press Connect button to establish the link Step 2 If the linking is established successfully It will show the message Connect successfully Then pre...

Page 44: ...ent mode the device supports WEP and WPA Personal Enterprise except WPA2 mixed mode data encryption About the detail data encryption settings please refer the security section MAC Clone for Single Eth...

Page 45: ...let user can link the network that they want Also the device working as AP and Repeater same time Following two ways describe how to make Universal Repeater effective 1 Enable Universal Repeater Mode...

Reviews: