background image


Zero 88 Series


Usk House, Lakeside, Llantarnam Park,  
Cwmbran, NP44 3HD. UK 
Tel: +44 (0)1633 838088   Fax: +44 (0)1633 867880 
Email: [email protected]   Web: www.zero88.com


Lighting Controls 

– 

FLX lighting console


Zero 88 FLX Quick Start Guide v1.2 

– Stock Code: 9850-000492-00 – Page 7 of 20 


Adding other fixtures (patching) 

 
If you have other fixtures, such as LEDs, moving lights, 
effect machines etc, these need to be patched too. This is 
done within the Setup window, which is displayed on the 
internal monitor by pressing  Setup . Once in Setup, 

press  

Patch Wizard

  on the left hand side of the display. 

The Patch Wizard window will appear and guide you 
through adding additional fixtures.


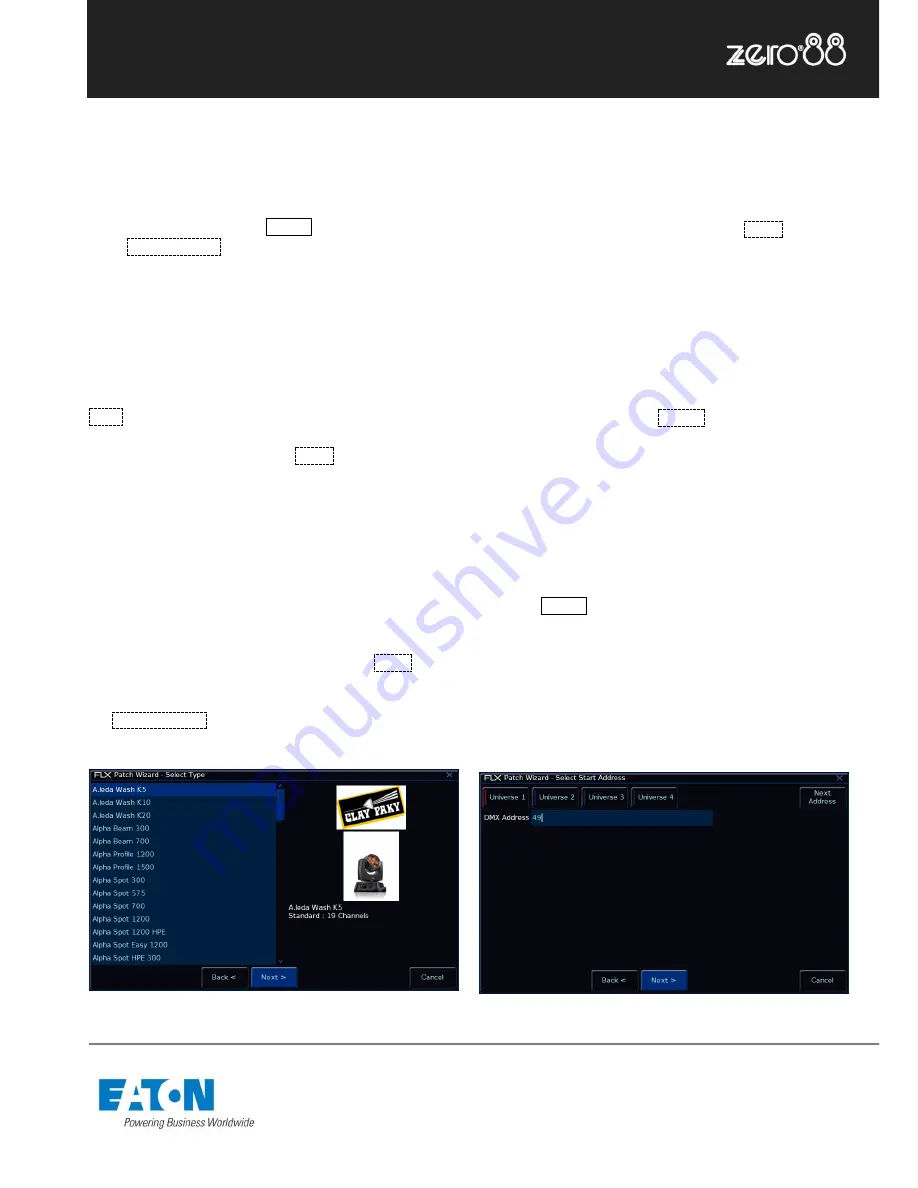
First, the wizard asks you to select the fixture

’s 

manufacturer. Scroll down (or use the curser keys) to 
select the required manufacturer (eg Clay Paky). If you 
have a keyboard connected, you can press the C key to 
jump straight to manufacturers beginning with C. Press the  

Next

  button to be shown a list of fixtures from your chosen 

manufacturer. Select the fixture type required (eg 

“A.leda 

Wash K5” – fig. 4) and press the  

Next

  button. 


Please note 

– fixture types 

If the fixture type you require is not in the library, you can 
import it - see 

zero88.com/software/library

 for more info. 

 
If the fixture 

has multiple “modes”, the next screen will 

allow you to select the fixture’s mode. It is important that 
the mode set here matches the mode set on the fixture - if 
in doubt, consult the fixture

’s operating manual for details. 

 
Once the mode has been selected, press the  

Next

  button 

to move on and enter the DMX address for the fixture. If 
you have not yet set this on the fixtures themselves, press  
the  

Next Address  

button and the desk will calculate a 

DMX address for you based on the existing patch (fig. 5). 
 

Figure 4 

– Selecting a fixture to add 


It is important here to ensure that the correct DMX 
universe is selected. 
 
Once the address is configured, press the  

Next

  button 

and enter the quantity of the fixture required. The monitor 
screen will tell you the number of fixtures and DMX 
channels remaining to ensure you do not exceed these 
limits. 
 
The final step in the Patch Wizard is to assign a channel 
number to the fixtures. The channel number is the number 
you will refer to the fixture as within the desk software, and 
defines where that fixture will be located on the faders.  
Enter the number and press  

Finish

 . 

 
The Patch Wizard is now complete and your fixtures have 
been assigned. The fixtures should now have moved to 
their “Home positions”. 
 
You can repeat the Patch Wizard for every group of 
fixtures you have. 
 
Once you have finished making changes to the setup, 
press the  Setup  button to leave Setup. The indicator LED 

on the button will go out to inform you that you have exited 
Setup mode.  


Figure 5 

– Setting the DMX address


Summary of Contents for FLX

Page 1: ...867880 Email enquiries zero88 com Web www zero88 com Lighting Controls FLX lighting console Zero 88 FLX Quick Start Guide v1 2 Stock Code 9850 000492 00 Page 1 of 20 FLX Quick Start Guide Version 1 2...

Page 2: ...2 Stock Code 9850 000492 00 Page 2 of 20 Your new FLX console runs ZerOS software ZerOS is regularly updated to bring new features and to keep your console stable and secure Software updates are free...

Page 3: ...wing areas each of which are described on the next pages along with some key terminology Quick start guide This Quick Start Guide is designed to get you up and running with the console but is not a su...

Page 4: ...nd Effects or accessing advanced functionality such as RemDim or Highlight Function keys The five function keys to the left of the touchscreen either perform functions themselves like Home and View or...

Page 5: ...strobe or focus Attributes Parameters are grouped together into four attributes for easy access and control These attributes are called Colour Beam Shape and Position A fifth attribute called Effect...

Page 6: ...View together The Programming desktop fig 1 shows the Output Window in the top half of the screen and either the Playback window or the Playbacks Summary window in the bottom half Which one is being...

Page 7: ...n will allow you to select the fixture s mode It is important that the mode set here matches the mode set on the fixture if in doubt consult the fixture s operating manual for details Once the mode ha...

Page 8: ...an orange box will be drawn around the channel number in the Output Window You can select multiple channels on the faders at the same time by pressing and holding the first button and then tapping th...

Page 9: ...ter selecting a fixture s press the Home key This will send the fixture s to its home values Figure 6 The colour window and parameters Choosing an attribute Each fixture has its own set of parameters...

Page 10: ...columns show the playback s name and then information about the currently active cue within each playback Figure 8 Playback Summary window Recording a cue To record a cue there are four possible meth...

Page 11: ...you lower a fader the playback is automatically released but you can also manually do this by holding Clear and pressing the Go button of the playback Figure 9 Playback window Updating cues In order...

Page 12: ...olour Palettes are displayed on the internal monitor just tap a palette after pressing the Name button to name that palette Using palettes When using palettes only the selected fixtures will move to t...

Page 13: ...oups can be named in the same way as palettes using commands or by pressing Name and touching the group Using groups to control intensities All the commands explained within the controlling intensitie...

Page 14: ...gle file on your storage device This file can then be reloaded at a later date to return the console to the same state as it was in when you saved it Saved files can be loaded onto any lighting consol...

Page 15: ...nam Park Cwmbran NP44 3HD UK Tel 44 0 1633 838088 Fax 44 0 1633 867880 Email enquiries zero88 com Web www zero88 com Lighting Controls FLX lighting console Zero 88 FLX Quick Start Guide v1 2 Stock Cod...

Page 16: ...nam Park Cwmbran NP44 3HD UK Tel 44 0 1633 838088 Fax 44 0 1633 867880 Email enquiries zero88 com Web www zero88 com Lighting Controls FLX lighting console Zero 88 FLX Quick Start Guide v1 2 Stock Cod...

Page 17: ...If you forget the passcode you ve set please send the serial number of your console to support zero88 com Front panel not responding Is the console fully booted check internal monitor for any errors w...

Page 18: ...heir consoles the cardboard box which FLX is supplied in is intended only for one or two journeys and should not be relied upon to keep the console safe for prolonged use Operating environments Always...

Page 19: ...Console is fitted with a Neutrik etherCON RJ45 Ethernet port and is capable of supporting various Ethernet protocols Kensington Lock A Kensington style lock slot is provided on FLX for securing the c...

Page 20: ...0mm D Weight 7 5 kg Operating temperature range 5 to 40 C Humidity 5 to 95 non condensing Notes Cooper Controls Ltd reserves the right to make changes to the equipment described in this manual without...

Reviews: