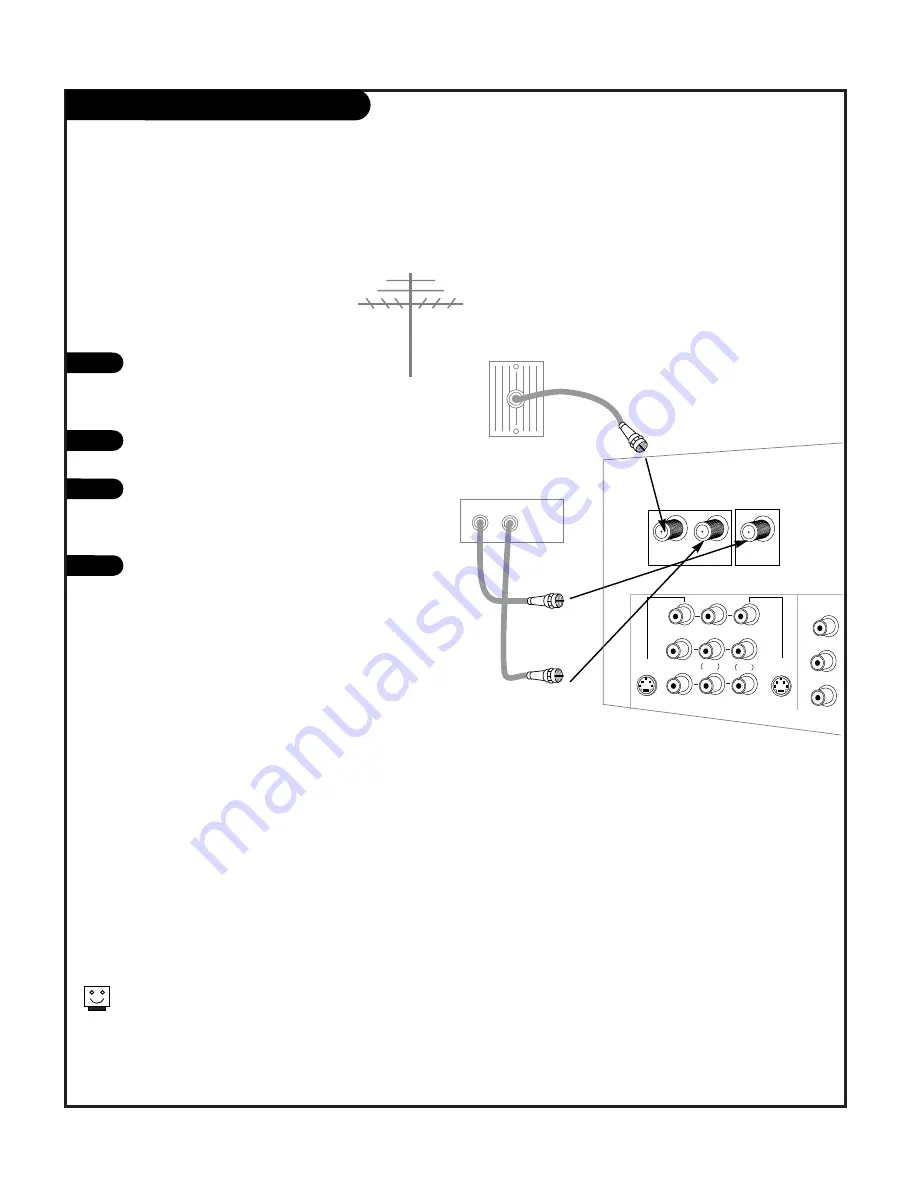
background image

Antenna

Rf coaxial wire
(75 ohm)

Cable box

In

Out

Cable TV
wall jack

CABLE BOX

Locate the Antenna/Cable 2 jack on the
back of your TV. Connect the cable that
runs from the wall directly to the jack.
Now find the the Loop Out jack.

Connect the cable from this jack to the
Input jack on the back of your cable box.

Locate the Output jack on the back of
your cable box. Connect this to the
Antenna/Cable 1 jack on the back of your
TV.

To view the premium stations, set the
channel number on your cable box to
HBO, CINEMAX, SHOWTIME, etc. Then
press the TV button on your remote and
select the other Cable source (Ant/Cable
1).

To view the non premium channels press
the TV button and select Ant/Cable 2. Then
run EZ Scan to check for all available
channels and store them in memory.

This can be combined with any other
equipment you may want
to hook up. Hook cable directly into the
TV, then to the cable box. From there, the
cable box goes to the next device, down
the line, until the last piece, which con-
nects back to the TV in the
Antenna/Cable 1 jack.

1

2

3

4

Some cable services require the use of a cable box to decode pre-
mium channels and pay-per-view. Using the Loop Out to Decoder
option, and programming your remote, you can connect your cable
box so that you only need your MBR remote to control all the
channels. By connecting cable directly to your Entertainment
Machine, then running it out to the cable box and back, you make
the cable box another source to choose from in the Source selec-
tion on your remote.

To receive premium channels, run
Auto Program on the second source
that is set to receive channels.

P A G E 1 0

206-3674

VIDEO 2

INPUT

VIDEO 1

INPUT

S-VIDEO

IN

MONITOR

OUT

Y

P

b

P

r

COMPONENT

ANT/CABLE2

INPUT

ANT/CABLE1

INPUT

R

L

R

L

R

S-VIDEO

OUT

 VIDEO

VIDEO

LOOP OUT

INPUT2

MONO

MONO

Summary of Contents for IQD61W20

Page 1: ...machine number IQD61W20 o p e r a t i n g g u i d e t a b l e o f c o n t e n t s p a g e 5 g l o s s a r y o f t e r m s p a g e 67 Toll Free Digital TV Hotline 1 8OO 243 0000...

Page 2: ...ee that interference will not occur in a particular installation If this equipment does cause harmful interference to radio or television reception which can be determined by turning the equipment off...

Page 3: ...anufac turer s instructions have been adhered to 11 Power Sources Operate product only from the type of power source indicated on marking label If you are not sure of the type of power supply to your...

Page 4: ...Unplug this product from the wall outlet and refer servicing to qualified service personnel under these conditions a If the power supply cord or plug is damaged b If liquid has been spilled or objects...

Page 5: ...up Menu Main Source 26 PIP Source 27 EZ Scan 28 Ch Add Del Surf 29 Ch Label 30 Guide Plus 31 36 EZ Focus 37 EZ Link 38 Video Menu 39 Audio Menu 40 Special Menu Aspect Ratio 41 On Screen Language 42 Ca...

Page 6: ...your surround sound system RF Connectors Antenna Cable 1 Antenna Cable 2 and Loop Out Used to connect analog cable or antenna signals to the television either directly or through your cable box Left...

Page 7: ...en Source menu Left Right Audio Used for stereo sound from various types of equipment Video Connects the video signals from any piece of equipment S Video A feature available with some very high end e...

Page 8: ...best performance have your Antenna professionally adjusted 2 If you receive your RF signal through an antenna that is several years old and connects with two small prongs you will need to pur chase a...

Page 9: ...urn on your Entertainment Machine Press the HELP key on the remote control Using the UP DOWN arrow select Hook up on your screen Press the RIGHT arrow or ENTER key then using the UP DOWN arrow to sele...

Page 10: ...any other equipment you may want to hook up Hook cable directly into the TV then to the cable box From there the cable box goes to the next device down the line until the last piece which con nects ba...

Page 11: ...a 120V 60Hz outlet Remove the back of the remote and put in two AA batteries Make sure batteries are properly installed check the signs With the remote control in hand press the POWER button to turn...

Page 12: ...o or the S Video cables to your Entertainment Machine Do not con nect BOTH the composite and the S Video cables In the event that you connect both composite and the S Video cables only the S Video wil...

Page 13: ...0V 60Hz outlet Remove the back of the remote and put in two AA batteries Make sure batteries are properly installed check the signs With the remote control in hand press the POWER button to turn on yo...

Page 14: ...1 2 Some high end DVD players use a picture reproduction system called component video If your DVD player has component output use the connectors marked DVD on the jack panel Please refer to your DVD...

Page 15: ...o a 120V 60Hz outlet Remove the back of the remote and put in two AA batteries Make sure batteries are properly installed check the signs With the remote control in hand press the POWER button to turn...

Page 16: ...tions provided with your equipment Connect these cables to your Entertainment Machine as shown 1 2 P A G E 1 6 206 3674 L DBS Receiver OR Computer Audio L R Dolby Digital Out VIDEO HD SETTOP 1080i 720...

Page 17: ...o a 120V 60Hz outlet Remove the back of the remote and put in two AA batteries Make sure batteries are properly installed check the signs With the remote control in hand press the POWER button to turn...

Page 18: ...ress the HELP key on the remote control Using the UP DOWN arrow select Hook up on your screen Press the RIGHT arrow or ENTER key then Using the UP DOWN arrow to select HD SETTOP or PC Make your connec...

Page 19: ...riable Audio Out jacks on the back of your Entertainment Machine and the Input jacks on the back of your stereo s amplifier Connect the two jacks making sure that the right and left chan nels are plac...

Page 20: ...r side of the set enhances separation The Entertainment Machine center mode in makes the dialog sound as thought it s coming directly from the Entertainment Machine The rear surround sound speakers pr...

Page 21: ...tainment Machine See the Operating Manual of the second TV or monitor for further details regarding that device s input settings 1 2 VIDEO 2 INPUT VIDEO 1 INPUT S VIDEO IN MONITOR OUT Y Pb Pr COMPONEN...

Page 22: ...direct channel selection and programming functions ENTER When in the menu system and other on screen displays selects high lighted items RECORD PAUSE Control the functions on your VCR REW FFWD PLAY ST...

Page 23: ...els FLASHBK Lets you tune to the last channel viewed PIP Activates the PIP screen MUTE Switches the sound on or off THUMBSTICK Allows you to navigate the on screen menus and to adjust the system set t...

Page 24: ...nnel If you are in a digital channel then the sub channel is listed on the right side of the dash Channel Label If channel label has been set then it will appear here PIP Display This display appears...

Page 25: ...on the panel Press the ENTER buttons as the ENTER buttons on your remote Use the Guide button as the GUIDE buttons on your remote Press the Source buttons as the SOURCE on your remote This is the Digi...

Page 26: ...return to TV view ing or press the LEFT arrow to save and return to the Setup Menu 3 4 1 2 3 4 5 6 7 8 9 0 tv mode light power tv video front comp1 xga vcr cable dvd sat mute vcr freeze flashbk pip me...

Page 27: ...press the LEFT arrow to save and return to the Setup Menu 1 2 3 1 2 3 4 5 6 7 8 9 0 tv mode light power tv video front comp1 xga vcr cable dvd sat mute vcr freeze flashbk pip menu record stop pause r...

Page 28: ...e UP DOWN arrow button to select the Setup menu Use the UP DOWN arrows to select EZ Scan Press ENTER or the RIGHT arrow to access the EZ Scan screen Your choices are ANT1 Air ANT1 Cable ANT2 Air ANT2...

Page 29: ...button on the remote control when a channel is highlighted in order to add or delete the channel Press the MENU button on the remote control then use the UP DOWN arrow button to select the Setup menu...

Page 30: ...the Label to the selected channel Repeat steps four and five until all chan nels are Labeled Press EXIT to save and return to TV view ing or press the LEFT arrow to save and return to the Setup Menu 1...

Page 31: ...way as to allow for an unrestricted path for the IR signals to be able to reach the front pan els of the VCR and Cable Box If necessary peel off the green protective strips from the front and back of...

Page 32: ...Use the Up Down Left Right arrows to pick a program on the Grid Guide you want to watch record Watch Press Blue Action Button to schedule the program to be watched Blue button Record Press Green Actio...

Page 33: ...screen instructions to set up your VCR Once the tests are complete you can use the GUIDE Plus fea ture to view schedule to watch and schedule to record the pro grams listed in the Program Grid Guide G...

Page 34: ...page of information on Program Grid Up Down Left Right Arrows Use to move within the Program Grid Guide MENU Provides direct access to the Menu bar with Grid on TV VCR Plus Enters the VCR Plus Recordi...

Page 35: ...etermined order which can be edited by using the Editor option on the Menu Bar Schedules programs for viewing and recording using the Program Grid Guide menu Current Time Shows current time PIP Pictur...

Page 36: ...channel order of appearance Activate Deactivate Channels Active channels appear in Grid Not Active channels do not appear in Grid guide Menu Bar Additional options Grid Displays program listings by c...

Page 37: ...e between Red and Blue Again press the RATIO button on your remote to toggle between Red and Blue Repeat step three for each color Press ENTER to toggle convergence mode and the RIGHT LEFT and UP DOWN...

Page 38: ...then press ENTER or the RIGHT arrow button Use the UP DOWN arrows to choose On or Off for the EZ Link Press the LEFT arrow button to return 1 2 3 4 1 2 3 4 5 6 7 8 9 0 tv mode light power tv video fro...

Page 39: ...to TV viewing 1 2 3 1 2 3 4 5 6 7 8 9 0 tv mode light power tv video front comp1 xga vcr cable dvd sat mute vcr freeze flashbk pip menu record stop pause rew play ff exit guide surf info vol ch pg up...

Page 40: ...original picture settings Movie Adjusts Video settings to enhance Movie viewing Contrast and Sharpness levels are lowered so that the picture looks warm and soft Video Game Sets the picture settings t...

Page 41: ...Mode Front Surround and Internal Speaker Use the LEFT RIGHT arrows to adjust your preferences and use UP DOWN select your preference and Press ENTER or the LEFT arrow to save your choices and return...

Page 42: ...olume level will be consistent whether you are watching a commercial or a regular TV program Audio Mode Lets you choose the default audio mode for conventional analog programs When you view a program...

Page 43: ...both sides to create a spectacular view Zoom1 Choose when you want to view the picture without any alter ation while filling the entire screen However the top and bottom portions of the picture will...

Page 44: ...UP DOWN arrow button to select the language you wish to view yours on screen menus Press EXIT to save and return to TV viewing or press the LEFT arrow to save and return to the Special Menu 1 2 3 4 1...

Page 45: ...viewing or press the LEFT arrow button to save and return to the SPECIAL Menu 1 2 3 4 1 2 3 4 5 6 7 8 9 0 tv mode light power tv video front comp1 xga vcr cable dvd sat mute vcr freeze flashbk pip men...

Page 46: ...choose EZ Demo then press ENTER or the RIGHT arrow button to activate EZ Demo Press any button on the remote to stop EZ Demo 1 2 3 4 1 2 3 4 5 6 7 8 9 0 tv mode light power tv video front comp1 xga v...

Page 47: ...arrow to activate the PBS time Your choices can be saved when Auto Clock is set Press EXIT to save and return to TV viewing or press the LEFT arrow button to save and return to the Time Menu 1 2 3 4...

Page 48: ...Manual Clock selection Your choices are Year Date and Time Use the digit buttons to set the Year Date and Time Press EXIT to save and return to TV viewing or press the LEFT arrow button to save and r...

Page 49: ...o choose On or Off Use the digit buttons to set the On Time options Press EXIT to save and return to the Time Menu or press the LEFT arrow but ton to save and return to TV viewing 1 2 3 4 1 2 3 4 5 6...

Page 50: ...arrows to choose On Time then press ENTER or the RIGHT arrow button to activate Off Time Use the UP DOWN arrows to choose On or Off Press EXIT to save and return to the Time Menu or press the LEFT ar...

Page 51: ...leep Timer Use the UP DOWN arrows to choose your Sleep Timer Press EXIT to save and return to the Time Menu or press the LEFT arrow but ton to save and return to TV viewing 1 2 3 4 1 2 3 4 5 6 7 8 9 0...

Page 52: ...t power tv video front comp1 xga vcr cable dvd sat mute vcr freeze flashbk pip menu record stop pause rew play ff exit guide surf info vol ch pg up ratio pg dn comp2 skip source enter 1 2 3 2 1 Lets y...

Page 53: ...guidance This program contains material that parents may find unsuitable for younger children TV 14 Parents strongly cautioned This program contains some material that many parents would find unsuita...

Page 54: ...ildren from watching certain TV programs among the programs intended only for children according to the ratings limit This rating does not apply to other TV programs Unless you block certain TV progra...

Page 55: ...ant to know about the highlighted item Information about the highlighted item will be displayed on the right part of the TV screen Simply press and hold to see the helpful information Menu Programming...

Page 56: ...ctive note about the Menu and the EZ LINK The EZ Help feature 1 Press the HELP button on the remote control to display the EZ Help screen 2 Scroll up and down to select EZ Help menu items by using on...

Page 57: ...the component First if you press the CH buttons repeatedly the code will change one at a time Second enter the code number using the digit buttons on the remote control The right code numbers for the...

Page 58: ...NERVA 088 MITSUBISHI 004 006 024 028 040 042 109 116 124 146 MTC 004 006 062 101 NAD 015 025 NEC 006 007 016 Brand Codes 019 024 040 056 130 132 134 NIKEI 043 ONKING 043 ONWA 043 OPTONICA 019 081 PADI...

Page 59: ...TA 013 020 MITSUBISHI 013 020 045 046 049 051 059 061 151 MTC 034 040 MULTITECH 024 034 NEC 012 023 039 043 048 NORDMENDE 043 OPTONICA 053 054 PANASONIC 066 070 074 083 133 140 145 PENTAX 013 020 031...

Page 60: ...PACE SKY SATELLITE 143 PANASONIC 060 142 PANSAT 121 Brand Codes PERSONAL CABLE 117 PHILIPS 071 PICO 105 PRESIDENT 019 102 PRIMESTAR 030 110 111 PROSAT 072 RCA 066 106 REALISTIC 043 074 SAMSUNG 123 SAT...

Page 61: ...064 079 MEMOREX 001 MOVIE TIME 028 032 NSC 015 028 038 071 073 OAK 016 031 037 053 PANASONIC 044 047 PARAGON 001 PHILIPS 006 012 013 020 065 085 090 PIONEER 034 051 052 063 076 POST NEWS WEEK 016 PRU...

Page 62: ...rva 088 Mitsubishi 004 006 024 028 040 042 109 116 124 146 MTC 004 006 062 101 NAD 015 025 NEC 006 007 016 019 024 040 056 130 132 134 Nikei 043 Onking 043 Onwa 043 Optonica 019 081 Padio shack 004 Pa...

Page 63: ...ent Machine on Use a quality wood cleaner and polish This will protect the Entertainment Machine from dirt and dust as well as keep the cabinet looking new If you leave your Entertainment Machine dorm...

Page 64: ...e single fixed images such as a photo CD player you should avoid setting the Brightness level too high If static images like network identification patterns are left sitting for too long they can leav...

Page 65: ...ainment Machine Are the Audio A V cables properly installed Are the wires for external speakers if you have external speakers properly installed Make sure your speakers turned on under the Audio menu...

Page 66: ...urce equipment has been turned on Make sure that the connections are secure on the back of your Entertainment Machine and on the source equipment Check to see if all the connections are secure Look in...

Page 67: ...andard television in the U S today is generally transmitted and dis played in a 4 3 aspect ratio High Definition television will normally be formatted in a wider aspect ratio assumed to be 16 9 CAPTIO...

Page 68: ...ailable with some programming Choosing SAP often refers to listening to audio in another language such as Spanish or French SIGNAL Picture and sound traveling through cable or on the air to your telev...

Page 69: ...8 mVrms fix Impedance output 2 kilohms Component input 2 Y 1 0 Vp p 75 ohms w sync PB 0 7 Vp p 75 ohms PR 0 7 Vp p 75 ohms RGB Inputs 1 15 pin Sub D Female Speaker output W 15W x2 Power consumption W...

Page 70: ...P A G E 7 0 206 3674 Notes...

Page 71: ...P A G E 7 1 206 3674 Notes...

Page 72: ...ultimately be used in digital or high definition television and which are still being established or refined by third parties The IQD61W20 may have limited capabilities with any such protocols designa...

Reviews: