

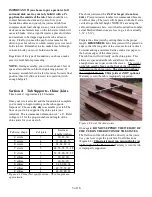


Figure 6.3 Make sure that the floor seam(s) are straddled by
staves on both sides.
I
f the last stave seems too big to fit
, it probably means
the staves have been driven too far inward prematurely or
there is too much accumulated gap between the staves.
To resolve,
close up any noticeable gaps between staves
to make more room. Do this by using the mallet on the
inside and your hand on the outside to tap the staves
sideways. Driving them inward only makes the circle
smaller and compounds the problem. Use your mirror to
find larger gaps and adjust as needed. It may seem
counter-intuitive, but loosen the staves by lightly tapping
out from inside first, then snug them together sideways to
close the excess gap. Check all around the tub with the
mirror and fix any problem areas. Now see if your last
stave fits in. Repeat if necessary. Your tub kit was
individually custom-fit in our shop and checked for
proper fit before shipment.
If this does not solve the problem, do not force things,
instead stop and email us at
or
give us a call for assistance 888-810-7717.
PRO TIP: At this point you can continue to retention band
placement (Section 7) or you can first apply the wood
finishing oil (Section 10). Choosing to apply finish now
will keep your stainless steel retention bands clean. This
may or may not matter to you. The choice is yours.
Section 7: Retention Bands Placement
Time needed: approximately 20 minutes
Once all the staves are in place then you are ready for the
bottom retention band.
But first,
let us stress once again
, if you aren’t
comfortable with your stave gaps,
DO NOT
force it and
just try it to see if it works. No gaps more than 1/16”!
Double check. Be sure. Don’t continue if it doesn’t seem
right. It’s much harder to fix later and can be the
difference in a tub that seals up quickly or a tub that has
persistent leaks for years. Take your time and get this part
right. You’ll thank yourself later.
Once you’re confident you’re ready, proceed as follows:
First, locate the stainless steel retention bands. They
supply the external support needed to keep the tub
compressed, directing the force of swelling to cause the
wood pieces to come together, instead of just outward.
Refer to the table below for the proper
number of bands
for your tub.
Tub Shape,
Size
Tub Heights
# of bands
4’ Circle
29 36 42 48
2, 2, 3, 3
5’ Circle
29 36 42 48
2, 3, 3, 4
6’ Circle
29 36 42 48
3, 3, 4, 4
7’ Circle
29 36 42 48
3, 4, 5, 5
8’ Circle
29 36 42 48
4, 5, 5, 6
4’ Ellipse
29 36 42 48
2, 2, 3, 3
5’ Ellipse
29 36 42 48
2, 3, 3, 4
6’ Ellipse
29 36 42 48
3, 3, 4, 4
7’ Ellipse
29 36 42 48
3, 4, 4, 5
8’ Ellipse
29 36 42 48
4, 5, 5, 6
Locate the large 8” x 5/8” bolts for the clamps. Remove
the nuts. We strongly recommend putting a little
anti-seize, grease, etc. on the nut threads so they will not
corrode and seize in the future. With your helper, fit the
first band around the tub at 4.75 inches measured from the
bottom of the staves to the top of the retention band.
This
measurement is crucial so that pressure is applied directly
over the floor’s edge.
The fit may be tight, but you will be
able to pull the ends close enough to slip the bolt in place
and get the nut started. See Figure 7.1. Use your 15/16”
socket wrench to take up a little slack so the band will
stay in place - only a few turns.
Figure 7.1 first retention band loosely in place.
Now install the other bands and position as shown in
Figure 7.2. The position of each bolt clamp should be
8 of 16


