ZEN Cedar Assembly, Installation & Maintenance Instructions Download Page 10

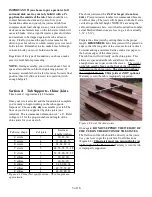
 Figure 8.1 Hitting staves directly on the band. 

 Double-check the vertical placement of the bands now 
 before things get too tight.  It is easier to move the bands 
 now.  Use a tape measure to readjust the bands so they are 
 placed as shown in Figure 7-2 and the table of band 
 heights. Step back and make sure that the bands look 
 level.  Adjust as needed. 

 Now do another round of rapping with the mallet while 
 tightening the bottom bolt.  Use the mirror continuously 
 to monitor any gaps as you go.  This time, hit each stave a 
 little harder - a good full swing on each one as your 
 helper tightens the bolts.   Alternate tightening each band 
 a little bit, so that you can keep some tension on the upper 
 bands so they stay in position. 

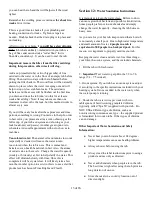
 Figure 8.2 Using a wrench or pliers to hold the blocks 
 straight as you tighten the bolt. 

 Turn your attention to the tops of the staves.  They should 
 be lined up nicely giving a smooth interior.  If any need 
 alignment, use the mallet to hit them inward or outward to 
 bring them into adjustment. Just light taps. You’ll likely 
 hear them pop into place. Do another revolution of hitting 
 each stave a little harder now as the bottom band is 
 tightened.   Don’t be afraid to hit pretty hard.  Continue 
 tightening with a wrench. At this point using the mirror, 
 any gaps should be virtually gone. If not, stop, back up a 

 few steps – loosen the bands a bit and distribute the gap 
 as described earlier. 

 Now do a final tightening - but don’t overdo it.  The 
 bottom band is pressing against the floor on the inside, so 
 it will reach a point where you can tell it is very tight - 
 don’t force it beyond that.  Use a wrench or pliers to 
 prevent the aluminum block that the bolt passes through 
 from twisting as you do the final tightening. 

 Stop  when 

 further tightening becomes significantly more difficult and 
 you see noticeable deflection of the aluminum blocks. 

 This indicates the bottom band is tight enough.   As you 
 tighten the upper bands check the staves from the top end 
 and make sure their bead to cove interfaces are all well 
 aligned. Lightly bumping it with your hand can release 
 tension if they aren’t. The upper bands don’t need to be 
 quite as tight as the bottom, but still quite snug.  If they 
 feel tight, they are. Do a final adjustment on the top of the 
 staves at this time.  Remember - the wood will swell to 
 tighten all joints further once water is introduced. 

 TIP: If you have a torque wrench – the bottom band 
 should be tightened to about 40 foot lbs. of torque 
 (similar to a lug nut on a vehicle), the next band up 
 should be at about 30 foot lbs. the upper ones to a lesser 
 amount - about 25 foot lbs. of torque. However sometimes 
 the bolt is too long for even a deep socket. Don’t sweat it. 
 A torque wrench is optional. Use the preceding 
 explanations to understand how tight to make things. 

 Next climb inside the tub and remove the temporary floor 
 braces. 
 Your tub is now ready for installation of the heating 
 system and any other accessories. 

 Section 9: System Components & 
 Accessories 

 Install any accessories 

 in this order 

 : 

 1.   Spa Control System - see separate instructions for 

 your type of system. 

 2.   Benches - see below 
 3.   Topside Controller Mount 
 4.   Tub Access Steps - see below 
 5.   Tub Cover - see below 

 Benches: 

 The bench system is simple.  These instructions are 
 specifically for circular tubs. 
 NOTE: The elliptical tub benches fit at the end(s), and the 
 larger ellipse tubs (6 or 7 foot) have one or two additional 
 side benches, respectively. 
 Each bench is one section of the circle.  See the table 
 below for the arrangement of benches for your size tub. 

 10  of  16 

Summary of Contents for Cedar

Page 1: ...ments Section 1 Packing List Locate the enclosed packing list to identify and con rm that all items are included A copy of the packing list is inside the packaging See Figure 1 1 to help identify the...

Page 2: ...actor is recommended 3 3 Another alternative is to use adjustable concrete pier blocks as a foundation This type of pier block is available at most home improvement stores and allows you to adjust the...

Page 3: ...t max lengths inches 4 circle 3 30 43 30 5 circle 4 33 48 48 33 6 circle 4 34 62 62 34 7 circle 5 48 72 78 72 48 8 circle 5 52 78 90 78 52 4 ellipse 3 20 40 20 5 ellipse 3 30 52 30 6 ellipse 4 34 62 6...

Page 4: ...pe in place OR change pipe lengths and or install any adapters or ttings you wish for a custom installation Use 1 schedule 40 PVC Figure 5 1 Drain assembly and silicone bead being applied to the reces...

Page 5: ...is level and oriented as you want it Reminder the oor seam needs to be perpendicular to the chine joists Also check that the ends of the chine joists are at least 2 inches inside the edge of the tub o...

Page 6: ...ay slightly increase these height di erences Either way you may wish to sand the top rim again after you have installed and tightened the retention bands However this does not a ect tub function or lo...

Page 7: ...Keep an eye on the oor seam in the process of installing staves It should stay closed If it spreads a bit rap the opposing sides of the oor with your mallet Make sure that the temporary plywood braces...

Page 8: ...try it to see if it works No gaps more than 1 16 Double check Be sure Don t continue if it doesn t seem right It s much harder to x later and can be the di erence in a tub that seals up quickly or a t...

Page 9: ...s to have any gaps between the bottom of staves be no more than 1 16 AND distributed evenly around the tub circumference NOT all in one section If necessary use your mallet to strike the staves from t...

Page 10: ...passes through from twisting as you do the nal tightening Stop when further tightening becomes signi cantly more di cult and you see noticeable de ection of the aluminum blocks This indicates the bot...

Page 11: ...re 4 3 for typical orientation of benches and drain See Figure 9 2 for the installation of bench blocks Once the proper location for all blocks is determined remove the benches attach bench blocks to...

Page 12: ...e staves and prolong the life of the tub Repeat the wax treatment on the end grain similarly to the teak oil schedule Often at rst Note There s no harm in over oiling or over waxing If the wood doesn...

Page 13: ...biweekly at rst to help clarify the water This e ect will diminish slowly with time Once this is complete it will be crystal clear It will likely take a few months Another option to assist in this is...

Page 14: ...ing the tub unused for extended periods of time If you need to leave the tub unused while on vacation or for other reasons that is ok The tub will not be permanently damaged by drying out but will hav...

Page 15: ...dation and chine joists under the tub If the foundation is uneven the tub will need to be drained and moved and the foundation problem xed 4 Once more substantial problems have been ruled out and if t...

Page 16: ...ed warranty of one year The warranties when valid will only cover replacement parts and materials Under no circumstances will Zen Bathworks be held liable for any cost of labor or damage Section 17 Pa...

Reviews: