


Tub Diameter
(feet)
Number of
benches
Bench
arrangement
4 round
1
One end
5 - 8 round
3
Full circle
4 ellipse
1
One end
5 ellipse
2
Opposite ends
6 ellipse
3
Opposite ends,
one side
7 & 8 ellipse
4
Opposite ends,
two sides
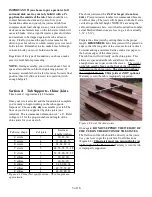
Figure 9.2 Aligning and attaching bench blocks – DO
NOT drive a screw into a seam between staves! This will
cause a leak.
A bench is typically held in place with four blocks, which
act as legs, which are screwed directly to the inside of the
staves with the included 3” stainless screws. The bench is
then screwed down to the top of those four blocks with 3”
deck screws. Place the benches in the tub on the floor.
Adjust them to the orientation you desire. Consider
placing the benches so the drain is accessible. Then set
the blocks on top of the benches to gauge where they will
be later after the benches are above and the blocks below.
This just makes it easier to see your alignment with gaps
in the benches (for vertical screws) and the stave seams
(for horizontal screws). The vertical screws will go down
through the bench braces (underside frame pieces),
between the seating surface boards, into the top of the
blocks. Don’t forget to adjust as necessary to eliminate
any screw to stave seam interferences. Then lightly mark
with a pencil where your bench blocks will go. See Figure
4.3 for typical orientation of benches and drain. See
Figure 9.2 for the installation of bench blocks.
Once the proper location for all blocks is determined,
remove the benches; attach bench blocks to the side of the
tub with 3” screws.
IMPORTANT: Do not drive a
screw into the seam between two staves! This will
cause a leak.
Consider using packaging foam or cardboard to protect
the floor of the tub if you decide to enter the tub for this
step.
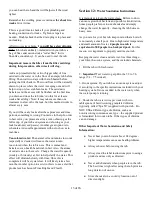
Finally attach the benches to the blocks by placing the
bench segments on top of the bench blocks, apply
downward pressure and then drive the 3” screws between
the bench boards, through the braces, and into the top of
the bench blocks. See Figures 9.3 and 9.4.
Figure 9.3 Attach benches to bench blocks with 3” stainless
screws between the bench boards, through the braces, and into
the tops of the bench blocks
Figure 9.4 Benches installed
Tub Access Steps:
If you purchased steps from us, they are intended to be
placed next to the tub and should be held in place with
two stainless screws. Drive the screws through the steps
and right into the side of the tub to provide stability.
Alternatively, you can build a set of steps that work best
for your site design.
Cover:
The vinyl and foam cover is the main insulation for your
tub. It should provide years of good service. Avoid
punctures or tears, which could allow water to get inside
the cover. If you live in a high wind area, you will need
to secure the cover so it doesn’t blow off. This can be
11 of 16


