


13
ZMW2131B-001_v01
The manufacturer does not accept any liability for any damages resulting from unintended use or
improper handling.
The manufacturer reserves his rights to modify the product any time in order to adjust it to law
regulations, norms, directives, or due to construction, trade, aesthetic or other reasons, without notifying
in advance.
Halfway through the cooking time, you can turn the food over in order for the food to be
cooked evenly.
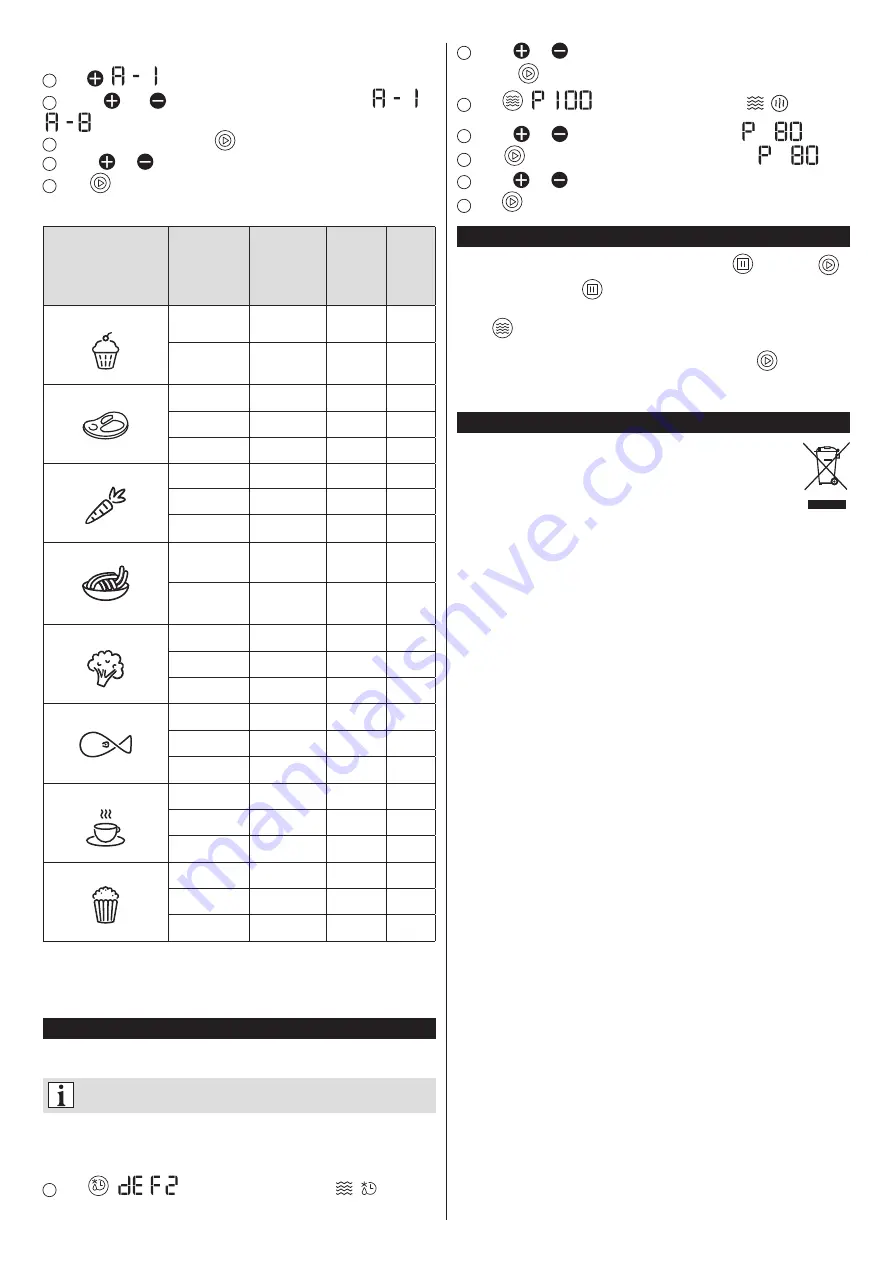
1
Press
. „
” will be shown on the display.
2
Use the
and
buttons to select automatic programmes „
” to
„
”.
3
When you select a program, press
to conirm it.
4
Use the
and
buttons to set the weight.
5
Press
, to start cooking.
AUTOMATIC MENU TABLE
MENU
PRODUCT
WEIGHT,
VOLUME
DISPLAY
TIME
[s]
POWER
A-1 (Dessert)
200 g
200
2:30
100%
400 g
400
4:10
100%
A-2 (Meat)
250 g
250
4:10
100%
350 g
350
5:10
100%
450 g
450
6:30
100%
A-3 (Soft Vegetable)
200 g
200
3:30
100%
300 g
300
4:20
100%
400 g
400
5:10
100%
A-4 (Pasta)
50 g (with 450 ml
cold water)
50
17:30
80%
100 g (with 800 ml
cold water)
100
20:00
80%
A-5 (Firm Vegetable)
200 g
200
4:40
100%
400 g
400
8:40
100%
600 g
600
10:10
100%
A-6 (Fish)
250 g
250
3:50
80%
350 g
350
4:50
80%
450 g
450
6:20
80%
A-7 (Beverage)
1 (about 120 ml)
1
1:25
100%
2 (about 240 ml)
2
2:25
100%
3 (about 360 ml)
3
3:30
100%
A-8 (Popcorn)
50
50
1:40
100%
85
85
2:25
100%
100
100
2:30
100%
The results of automatic cooking depend on the shape and size of foodstuffs, your cooking
preferences as regards particular products and the arrangement of products inside the
oven. Should you feel that the cooking results could have been better, you may need to
adapt the cooking time to your own needs.
Multi-stage cooking
You can set up to 2 cooking stages. When one stage is inished, a sound signal will be
heard and the next stage will start.
If defrosting is one of the stages, it should be set irst. Automated programs
may not be one of the elements of the multi-stage cooking.
EXAMPLE
You want to defrost for 5 minutes, then cook for 7 minutes at 80% microwave power. Follow
these steps:
1
Press
,
„
” will be shown on the display and
,
indicators will
come on.
2
Use the
and
buttons to set the defrost time to 5 minutes.
Do not press
, and set the second cooking stage.
3
Press
.
„
” will be shown on the display and
,
indicators will
come on.
4
Use the
and
buttons to set the microwave power to „
”.
5
Press
, to conirm microwave power. The display will show „
”.
6
Use the
and
buttons to set the cooking time to 7 minutes.
7
Press
, to start multi-stage cooking.
Additional information
Each started programme can be stopped by pressing the
button.
Press
to
resume. By pressing the
button twice you will end the programme.
When cooking with the use of microwave or combination cooking function, press
the
button. The current microwave power level will appear on the display for
3 seconds.
If oven door is opened during cooking, close the door and press
, to resume.
The correct pressing of a button will be signalled by a single sound. You will not here
a beep if a button is pressed incorrectly.
Disposal
Dispose of packaging in an environmentally-friendly manner. This appliance
is labelled in accordance with European Directive 2012/19/EU concerning
used electrical and electronic appliances (waste electrical and electronic
equipment – WEEE). The guideline determines the framework for the
return and recycling of used appliances as applicable throughout the EU.
Please ask your specialist retailer about current disposal facilities.
Summary of Contents for ZMW2131B
Page 14: ...ZMW2131B 001_v01 ...
Page 15: ...ZMW2131B 001_v01 ...