25
MO-003_v03
Grounding instructions
The appliance must be grounded. The microwave oven is equipped with a power cord with
grounding plug.
Connect the power cord to a properly installed earthed socket.
In the case of short circuit, grounding reduces the risk of electric shock.
The oven should be used in a separate electric circuit.
If an extension cord is used:
1
The extension cord must be three conductor and earthed type.
2
Arrange the extension cord away from hot and sharp surfaces so that it cannot get
accidentally pulled or caught.
Improper connection can result in the risk o� electric shock.
In case o� any doubts concerning the grounding or electric mains
connection contact a qualified electrician or service centre employee.
Both the manu�acturer and the seller do not accept any liability �or injury
or damage to the microwave oven resulting �rom �ailure to comply with the
instructions �or electrical mains connection.
Radio interference
Microwave oven operation may interference with radio, television or other communication
equipment reception.
Interference can be reduced or eliminated in the following way:
1
Clean the door and sealing surfaces of the oven.
2
Reorient your radio or TV receiving antenna.
3
Move the microwave oven away from the receiver.
4
Place the microwave oven as far as possible from the receiver.
5
Plug the microwave oven to a different outlet so that the microwave oven and the
receiver are on different mains circuits.
Cleaning, maintenance and operation
1
Switch off and unplug the microwave oven before cleaning.
2
Keep the inside of the microwave oven clean. If necessary remove food deposits or
spilled liquid from the oven walls with a damp cloth. Use a mild detergent to remove heavy
soil. Do not use spray cleaners and other strong cleaning agents as they may stain, tarnish
or leave streaks on the surface of the oven and door.
3
Clean the outside surface of the oven with a damp cloth.
In order to avoid damaging the components inside the oven make sure that water does not
penetrate the inside of the oven through the ventilation openings.
4
Regularly wipe both sides of the door and window, door seals and neighbouring parts
with a damp cloth to remove food deposits or spilled liquid.
�o not use abrasive cleaners.
5
Do not use abrasive cleaners such as emulsions, cream cleaners, polishes, etc. to
clean the housing. They may remove the graphic information symbols such as scales,
marks, warning signs, etc.
6
Do not allow the control panel to moisten. To clean it use a soft, damp cloth. In order to
avoid accidental starting of the oven open the door before cleaning the control panel.
7
If condensed water vapour begins to appear on the inside or outside of the door, wipe it
with a soft cloth.
Condensation may occur when the microwave oven is operating under high humidity
conditions. In such a case it is a normal situation.
8
From time to time, take out and clean the glass tray. Wash it in warm water with an
addition of dishwashing liquid or in a dishwasher.
9
Regularly clean the turntable ring and the bottom of the microwave oven to prevent
noise. Clean the bottom surface with a mild detergent. Wash the turntable ring in water with
an addition of dishwashing liquid or in the dishwasher. When replacing the turntable ring
make sure to position it properly.
10
In order to get rid of odours inside the microwave oven boil about 200 ml of water with
lemon juice and lemon peel in a microwave-safe bowl for 5 minutes.
Thoroughly wipe the inside of the microwave oven with a dry, soft cloth.
11
When it is necessary to replace the inside light bulb, call a service centre.
12
Regularly clean the microwave oven and remove food deposits.
Failure to follow the above instructions may lead to a degradation of the surface which may
affect the service life of the appliance and lead to a dangerous situation.
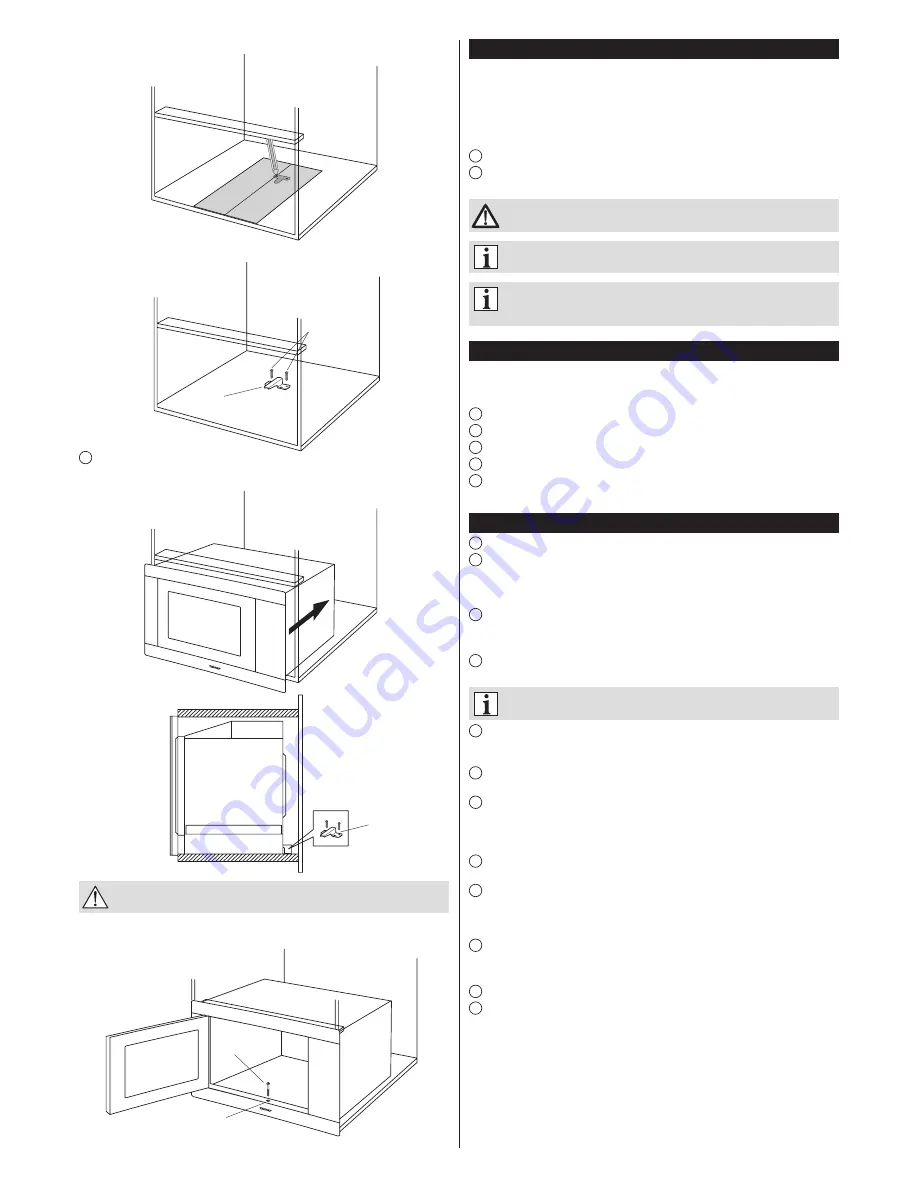
c) On the bottom of the cabinet make marks to be used for fixing the bracket.
d) Remove the template and fix the bracket with the use of screws A.
3
Installing the microwave oven in the cabinet.
a) Slide the microwave oven into the cabinet. Make sure that the rear of the microwave
oven is locked on the bracket.
Be care�ul not to bend or squeeze the power cord.
b) Open the door. In order to fix the microwave oven to the cabinet insert screw B into
the installation hole.
Bracket
Bracket
Screw A
Screw B
Installation hole


