


VICTORY RF OWNER’S MANUAL - NORTH AMERICA |
15
14
| VICTORY RF OWNER’S MANUAL - NORTH AMERICA
For the latest updates and information regarding our products, visit zeiss.com/us/sportsoptics.
DISPLAY SETTINGS
Display settings allow you to reference the data being displayed while
reading the rangefinder’s output. The output function is displayed in the
form of distance, equivalent horizontal distance, angle, and/or holdover – or
some combination thereof, as selected by the user.
(See Table 3)
Holdover can be displayed in the following units of measure: centimeters
(cm), inches (in), minute of angle (MOA), milliradian (MIL), and clicks. Clicks
reference the riflescope’s elevation turret adjustment value per click.
You can select the appropriate display settings in Menu 3. You may
choose between seven different display settings, which are labeled
consecutively
dl 1 – dl 7
(press the SET button for 2 s press
the SET button twice).
TABLE 3
Display in Your ZEISS
Victory RF
Function
dl 1
Distance
dl 2
Distance & angle
dl 3
Distance & equivalent horizontal distance
dl 4
Distance & holdover in cm/in
dl 5
Distance & holdover in MOA
dl 6
Distance & holdover in MIL
dl 7
Distance & number of clicks
In addition to the seven standard settings, you can add three more
personalized display settings to your ZEISS Victory RF. On your ZEISS Victory
RF, the curves are labeled
dIu 1 – dIu3
.
NOTE
the difference between
dl
and
dlu
.
dl
= Rangefinder’s default display settings
dlu
= Rangefinder’s user-defined display settings
(Further information can be found in the “Settings With the ZEISS Hunting
App“ section.)
Simply release the range-finding button
(Fig. 1/6)
on the appropriate
setting for you. The last display setting shown will then be saved. To check,
you can always display the saved settings in the menu.
UNIT (Selecting the unit of measure between meters or yards)
Choose the appropriate unit in Menu 4 (
See Table 1;
press the SET button
for 2 s press the SET button three times).
The distance can be measured in either meters or yards. You can change the
settings with the range-finding button
(Fig. 1/6)
. On your ZEISS Victory RF,
the units have the indicators unit
M
(for meters) and unit
Y
(for yards). To
check, you can always display the saved settings in the menu.
MEASURING MODE
This mode allows the user to select the preferred target to range, taking
multiple targets within the laser’s path into appropriate consideration. In
turn, this should allow for better data output based on the user’s preference.
You can select the preferred measuring mode in Menu 5 (
See Table 1;
press the SET button for 2 s press the SET button four times). You
can select whether you are shown the best measurement
(tA b)
or the
furthest measurement
(tA L)
. You can change the settings with the range-
finding button
(Fig. 1/6)
.
NOTE
the difference between
tA b
and
tA L
.
tA b
= Rangefinder’s best measurement
tA L
= Rangefinder’s furthest measurement
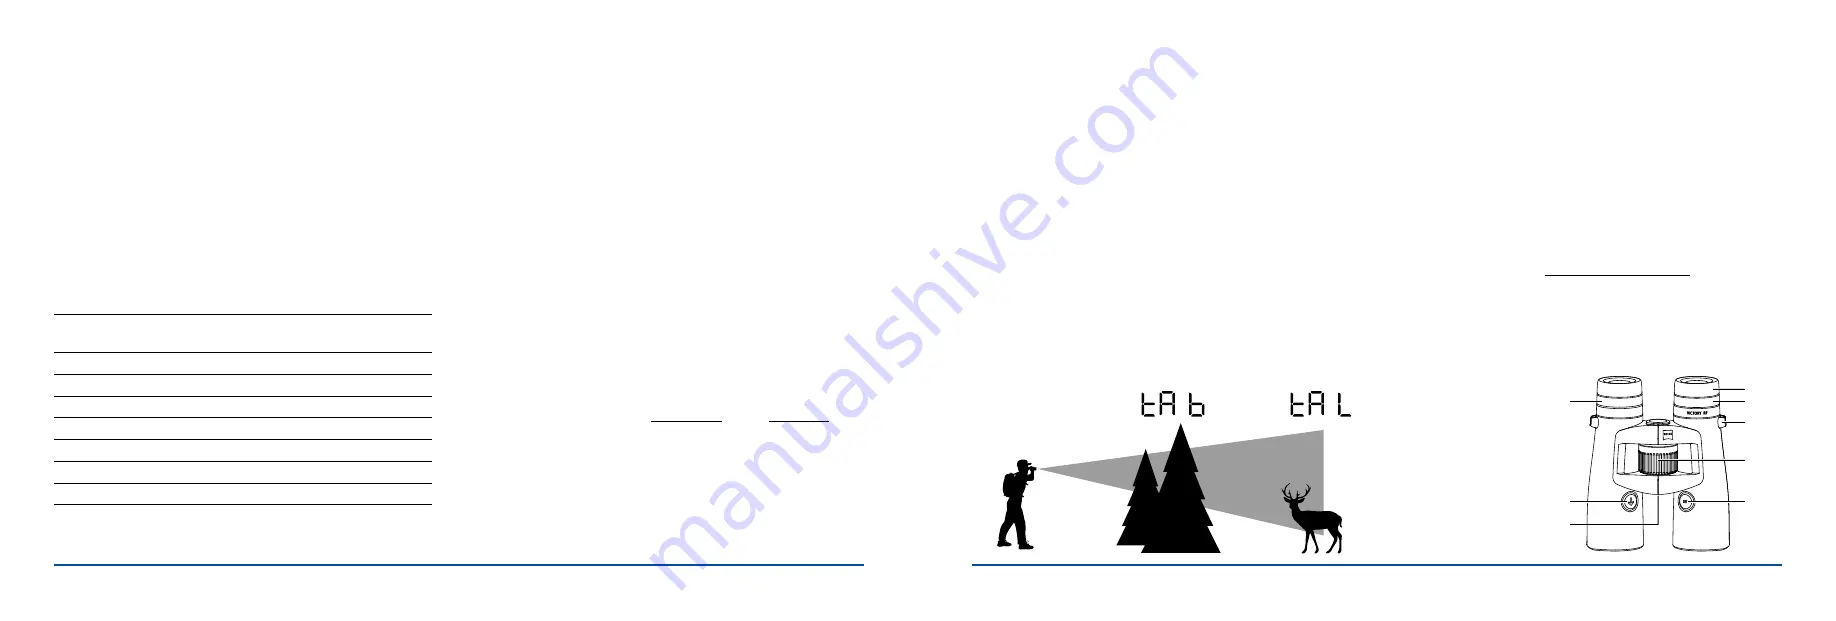
Fig. 9
is used to illustrate the options. The animal in the background is, in
this case, the furthest measured point
(tA L)
. Since a higher proportion of
the laser’s measuring points encounter the tree in the foreground, this point
is equivalent to the best measurement
(tA b)
. To check, you can always
display the saved settings in the menu.
KEY LAYOUT
(Control button configuration)
The user can configure/reverse the two control buttons, one referred to as
the RANGE button and the other referred to as the SET button
(See Fig.
1/6 and 1/7)
. This reconfiguration would allow the user to operate the
rangefinder in their preferred layout for the intended field application (e.g.,
left- or right-hand preference and/or single-handed bow hunting scenario).
You can select the most appropriate button configuration for yourself in
Menu 6 (
See Table 1;
press the SET button for 2 s press the SET
button five times). By pressing the range-finding button
(Fig. 1/6),
you
can choose between the standard setting, displayed as
(„5 _ _ °“)
, or the
reverse setting, displayed as
(„° _ _ 5“)
.
NOTE:
The ZEISS Victory RF control button default setting
is configured for
right-handed users. In this setting, the
RANGE
button is operated with the
right hand and the
SET
button is operated with the left hand. To check, you
can always display the saved settings in the menu.
Default Settings for Control Buttons
RANGE
= Right hand
(Fig. 1/6)
SET
= Left hand
(Fig. 1/7)
5 | 7
EN
Fig. 9
Ballistics Settings (BIS II)
You can select the appropriate ballistics curve in menu 2 (press the SET button for 2
s press the SET button once). As standard, you can choose between nine
different ballistics curves, which cover almost all calibres. The ballistics curves are
numbered consecutively in your ZEISS Victory RF and are labelled bA 1 – bA 9.
Choose the most appropriate bullet trajectory dependant on the calibre, bullet type
and bullet weight used. Knowledge of the ballistic data (bullet drop) for the load
used is a prerequisite for selecting the corresponding bullet trajectory.
In table 1 (below), on the basis of the bullet drop of the load, select the row with
the value that corresponds most precisely. By pressing the range finding button
(Fig. 1/6)
, you can simply select the appropriate ballistics curve for you. By releasing
the button, the ballistics curve is saved. To check, you can always display the saved
settings in the menu.
In addition to the 9 default curves, you can upload up to 9 additional personalised
ballistics curves to your ZEISS Victory RF. In your ZEISS Victory RF, the curves are
labelled bAu 1 – bAu 9.
(More information can be found in the „Settings with the ZEISS Hunting App“
section).
Simply release the range finding button
(Fig. 1/6)
on the appropriate setting for
you. The ballistics curve displayed most recently is then saved. To check, you can
always display the saved settings in the menu.
Caution:
Please note that the ballistic information system BIS II is not to be used as
a replacement for the hunter’s assessment of the situation, but rather to support and
increase hunting safety. We recommend shooting exercises from different ranges,
which can be used to check the correct match of the specifications with the actual
points of impact.
Table 2
Compensation for the bullet drop with ASV+ at distance, in meters and yards
Curve (Distance) m / yard
100
150
200
250
300
325
350
375
400
425
450
475
500
525
550
575
600
1
Corr. cm / m
0
-1,5
-4,0
-10,0
-21,0
-29,3
-35,0
-45,0
-56,0
-68,0
-81,0
-95,0 -110,0 -131,3 -148,5 -172,5 -198,0
Corr. Inches / Yards
-0,5
-1,4
-3,6
-7,6
-10,5
-12,6
-16,2
-20,2
-24,5
-29,2
-34,2
-39,6
-47,3
-53,5
-62,1
-71,3
2
Corr. cm / m
0
-1,5
-4,0
-12,5
-24,0
-32,5
-42,0
-52,5
-64,0
-76,5
-90,0 -109,3 -130,0 -152,3 -176,0 -201,3 -234,0
Corr. Inches / Yards
-0,5
-1,4
-4,5
-8,6
-11,7
-15,1
-18,9
-23,0
-27,5
-32,4
-39,3
-46,8
-54,8
-63,4
-72,5
-84,2
3
Corr. cm / m
0
-1,5
-8,0
-17,5
-30,0
-39,0
-49,0
-60,0
-72,0
-85,0
-99,0 -118,8 -135,0 -152,3 -176,0 -195,5 -222,0
Corr. Inches / Yards
-0,5
-2,9
-6,3
-10,8
-14,0
-17,6
-21,6
-25,9
-30,6
-35,6
-42,8
-48,6
-54,8
-63,4
-70,4
-79,9
4
Corr. cm / m
0
-3,0
-10,0
-20,0
-36,0
-45,5
-59,5
-71,3
-84,0
Corr. Inches / Yards
-1,1
-3,6
-7,2
-13,0
-16,4
-21,4
-25,7
-30,2
5
Corr. cm / m
0
-3,0
-10,0
-22,5
-39,0
-52,0
-63,0
-78,8
-96,0
Corr. Inches / Yards
-1,1
-3,6
-8,1
-14,0
-18,7
-22,7
-28,4
-34,6
6
Corr. cm / m
0
-4,5
-12,0
-27,5
-48,0
-58,5
-73,5
-90,0 -108,0
Corr. Inches / Yards
-1,6
-4,3
-9,9
-17,3
-21,1
-26,5
-32,4
-38,9
7
Corr. cm / m
0
-4,5
-14,0
-30,0
-51,0
-65,0
-80,5
-97,5 -120,0
Corr. Inches / Yards
-1,6
-5,0
-10,8
-18,4
-23,4
-29,0
-35,1
-43,2
8
Corr. cm / m
0
-4,5
-16,0
-32,5
-57,0
-74,8
-91,0 -108,8 -132,0
Corr. Inches / Yards
-1,6
-5,8
-11,7
-20,5
-26,9
-32,8
-39,2
-47,5
9
Corr. cm / m
0
-6,0
-18,0
-37,5
-66,0
-87,8 -105,0 -127,5 -156,0
Corr. Inches / Yards
-2,2
-6,5
-13,5
-23,8
-31,6
-37,8
-45,9
-56,2
Display Settings
You can select the appropriate display settings in menu 3 (press the SET button for
2 s press the SET button twice).
As standard, you can choose between seven different display settings. The display
settings are numbered consecutively in your ZEISS Victory RF and are labelled
dI 1 – dI 7.
Table 3
Display in your ZEISS
Victory RF
Function
dI 1
Distance
dI 2
Distance & angle
dI 3
Distance & equivalent horizontal distance
dI 4
Distance & holdover in cm/in
dI 5
Distance & holdover in MOA
dI 6
Distance & holdover in MIL
dI 7
Distance & number of clicks
In addition to the 7 standard settings, you can 3 more personalised display settings
to your ZEISS Victory RF. On your ZEISS Victory RF, the curves are labelled dIu 1 –
dIu3.
(Further information can be found in the „Settings with the ZEISS Hunting App“
section).
Simply release the range finding button
(Fig. 1/6)
on the appropriate setting for
you. The display setting last show will then be saved. To check, you can always
display the saved settings in the menu.
Unit
Choose the appropriate unit in Menu 4 ( press the SET button for 2 s press
the SET button three times).
The distance can be shown in either meters or yards. You can change the settings
with the range finding button
(Fig. 1/6)
. On your ZEISS Victory RF, the units have
the indicators unitM (for meters) and unitY (for yards). To check, you can always
display the saved settings in the menu.
Measuring Mode
You can select the appropriate measuring mode for you in menu 5 (press the SET
button for 2 s press the SET button four times). You can select whether you
are shown the best measurement (tA b) or the furthest measurement (tA L). You can
change the settings with the range finding button
(Fig. 1/6)
.
Fig. 9
illustrates the options. The animal in the background is, in this case, the
furthest measured point (tA L). Since a higher proportion of the measuring
points encounter the tree in the foreground, this point is equivalent to the best
measurement (tA b).
To check, you can always display the saved settings in the menu.
Key Assignment
You can select the most appropriate key assignment for you in menu 6 (press SET
button for 2 s press the SET button five times). By pressing the range finding
button
(Fig. 1/6)
, you can choose between the standard setting („5 _ _ °“ is shown
on your ZEISS Victory RF) and the reverse setting („° _ _ 5“ is shown on your ZEISS
Victory RF). As standard, your ZEISS Victory RF is configured for right-handed users.
In this setting, the measuring button is operated with the right hand and the SET
button is operated with the left hand. In the reverse setting, you measure with your
left hand and the SET button is in your right hand. To check, you can always display
the saved settings in the menu.
Only one of
these will be
displayed.
2 | 7
EN
IDENTIFICATION OF THE COMPONENTS
1 Eye cup
2 Central focusing
3 Diopter compensation
4 Diopter compensation for display
5 Eyelet for fixing the carrying strap
6 Range finder button
7 Set button
8 Battery cover/battery compartment
User information for the disposal of electrical and electronic
equipment (private households)
This symbol on products and/or accompanying documents indicates that
used electrical and electronic products are not to be mixed with ordinary
household waste. Take these products to the appropriate collection point
for proper handling, recovery and recycling, where they will be taken
back for free. In some states, it may also be possible to hand in these
products to your local dealer when purchasing a corresponding new
product. The proper disposal of this product serves to protect the
environment and prevents possible harmful effects on human beings and their
surroundings, which may arise as a result of incorrect handling of waste. More
detailed information on your nearest collection point is available from your local
authority. According to state law, fines may be issued for the incorrect disposal of
this type of waste.
For business customers within the European Union
To dispose of electrical and electronic equipment, please contact your dealer or
supplier, who will be able to provide you with more information.
Information on disposal in other countries outside of the European Union
This symbol is applicable only in the European Union. Please contact your local
authority or your dealer if you wish to dispose of this product and enquire about
how to dispose of it.
Labelled in accordance with the statutory guidelines 2014/53/EU
and 2011/65/EU.
SCOPE OF SUPPLY
ZEISS Victory
®
RF binoculars:
Product
Order number
Scope of supply
Victory RF
8x42
52 45 48
ZEISS Victory RF
Protective lens caps
Eyepiece cap
Carrying strap
Bag with strap
CR2 battery
Lens cleaning cloth
Quick Guide Part 1 & 2
Victory RF
10x42
52 45 49
Victory RF
8x54
52 56 48
Victory RF
10x54
52 56 49
(5)
(3)
(1)
Fig. 1
(7)
(4)
(6)
(8)
(2)
Fig. 2
(12)
(11)
(14)
(13)
(9)
(10)
9 LED sighting mark
10 4-figure LED display
11 Unit yard display
12 Unit meter display
13 Battery display
14 Bluetooth display
15 Carrying strap
16 Eyepiece cap
17 Protective lens caps
INSTRUCTIONS FOR USE
Congratulations on the purchase of your new binoculars with integrated
laser range finder.
ZEISS products are famous for outstanding optical performance, precision
engineering and a long service life.
Please observe the following instructions for use in order to obtain the best from
your binoculars and to ensure that they remain your constant companion for many
years to come.
INFORMATION FOR YOUR SAFETY
Environmental influences
•
Caution:
Do not use the binoculars to look at the sun or at laser light sources.
This could result in serious injury to the eyes and in considerable damage to the
product.
•
Caution:
Never leave the binoculars in the sun for extended periods of time
without the protective lens cap. The objective lens and eyepiece can function as a
burning glass and damage the interior components.
Danger of swallowing
Caution:
Do not leave the batteries and removable exterior parts within reach of
children (danger of swallowing).
Further information and safety instructions be found in the QuickGuide provided.
This guide can also be found at the Download Center on our website.
Battery disposal
Batteries do not belong in household rubbish!
Please use a recycling facility in your area to dispose of used batteries.
Please only recycle discharged batteries.
As a rule, batteries are discharged if the device being run
• shuts off and signals “Battery empty”.
• no longer functions properly after extended use of the batteries.
To prevent short circuits, cover the battery contacts with an adhesive strip.
Caution:
Use only battery types recommended by the manufacturer.
Handle used batteries in accordance with the manufacturer’s instructions.
Under no circumstances should batteries be thrown into a fire, heated up,
recharged, taken apart or broken open.
Germany:
As a consumer, you have a legal obligation to return used
batteries. You can hand in your batteries for free to wherever the
batteries were purchased or to the public collection points in your city or
community.
You will find these symbols on batteries that contain harmful substances:
Pb = Battery contains lead
Cd = Battery contains cadmium
Hg = Battery contains mercury
Li = Battery contains lithium
SET
RANGE