background image


18 


08/2007 

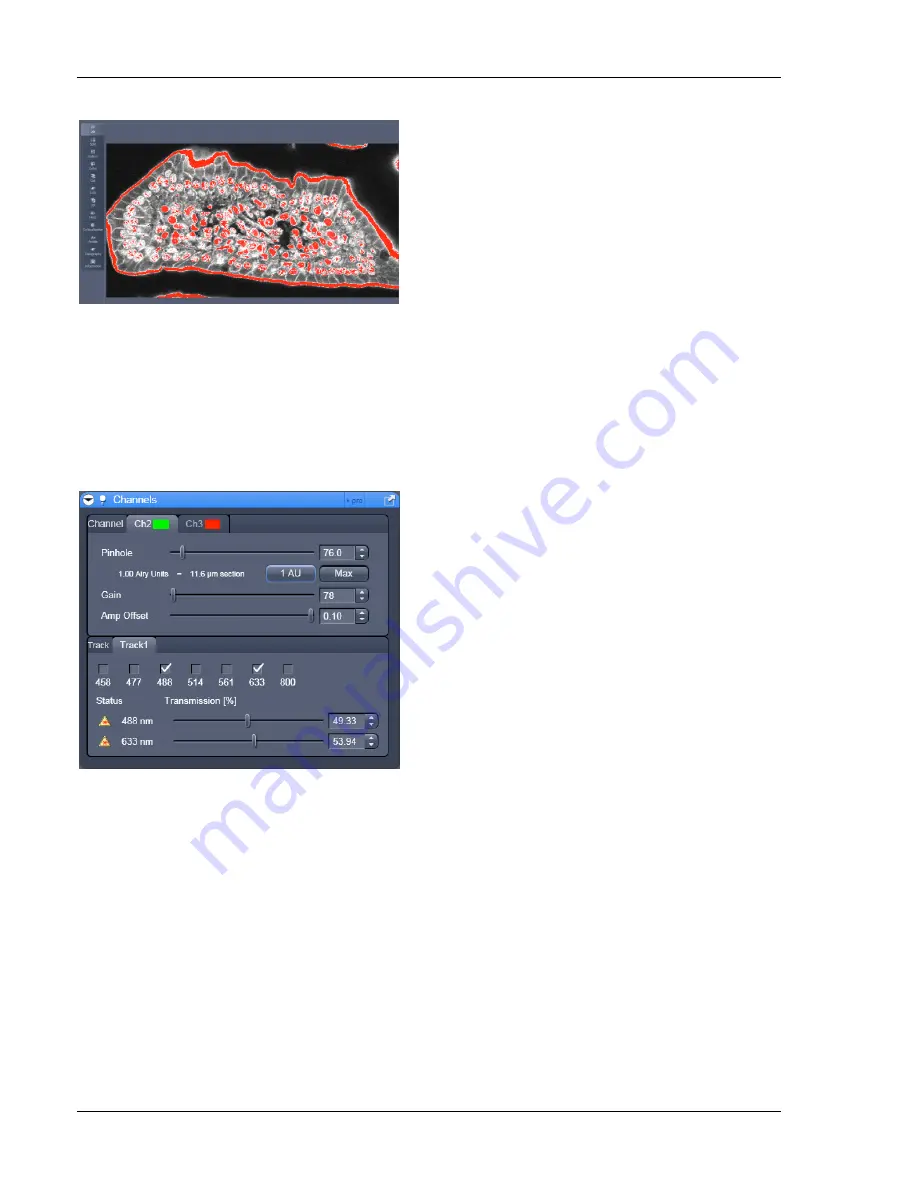
The  scanned  image  appears  in  a  false-color 

presentation (Fig. 22). 
 
If  the  image  is  too  bright,  it  appears  red  on  the 
screen. Red = saturation (maximum). 
If the image is not bright enough, it appears blue 
on the screen. Blue = zero (minimum). 


Adjusting the laser intensity 

"


Set the 

Pinhole

 to 

1

 Airy Unit (Fig. 23). 

"


Set the 

Detector Gain

 high. 

"


When  the  image  is  saturated,  reduce  AOTF 
transmission in the 

Laser

 control section of the 

Channels  Tool

  (Fig.  23)  using  the  slider  to 

reduce  the  intensity  of  the  laser  light  to  the 

specimen. 


Adjusting gain and offset 

"


Increase  the 

Amplifier  Offset

  until  all  blue 

pixels  disappear,  and  then  make  it  slightly 
positive (Fig. 23). 

"


Reduce  the 

Detector  Gain

  until  the  red  pixels 

only just disappear. 


Fig. 22 

Image Display 


Fig. 23 

Channels tool 

Summary of Contents for LSM 5 MP

Page 1: ...LSM 5 MP LSM 510 and LSM 510 META Laser Scanning Microscopes LSM Software ZEN 2007 August 2007 Quick Guide M i c r o s c o p y f r o m C a r l Z e i s s We make it visible ...

Page 2: ...This Quick Guide does NOT replace the detailed information available in the full user manual or in the manual of the respective microscopes Axio Imager Axio Observer Axioskop 2 FS MOT Also this Quick Guide is written for a user who is familiar with the basics of Laser Scanning Microscopy For your safety Observe the following instructions The LSM 510 LSM 510 META LSM 510 NLO laser scanning microsco...

Page 3: ...he complete system is ready to be initialized by the ZEN software Switching on the X Cite 120 or the HBO 100 mercury lamp Switch on the main switch of the X Cite 120 HBO 100 lamp for reflected light illumination via the power supply as described in the respective operating manual Switching on the Enterprise UV Ar Laser If the UV laser is required switch it on via the toggle switch Fig 2 1 on the p...

Page 4: ...vates the entire software package for new image acquisition and analysis The Image Processing mode ignores all hardware and activates only data handling and image processing functionality for already acquired images The Offline Demo mode reads the current hardware database but does not activate the system hardware for use Instead it simulates the system hardware for training purposes Upon clicking...

Page 5: ...4 08 2007 Fig 4 ZEN Main Application Window after Startup with empty image container Fig 5 ZEN Main Application Window after Startup with several images loaded ...

Page 6: ... in the middle of the Main Application Window the Center Screen Area Each displayed image can be displayed and or analyzed with many view options available through view tabs which can be found on the left side of the image According to the chosen view tab the required view controls appear in View Control Blocks below each image File management and data handling tools are found in the Right Tool Ar...

Page 7: ...llows adjustment of the ZEN window size and fonts to the situational needs or your personal preferences Fig 7 Setting up conventional confocal software for a specific experiment can take a long time and is often tedious to repeat With ZEN these adjustments have to be done only once and may be restored with just two clicks of the mouse For each type of experiment one can now set up and save the sui...

Page 8: ...ritten and a new scan will then automatically create a new image document Alternatively you can create a new empty image document with the New button in the Action Button area or the New function in the File Menu Acquired data is not automatically saved to disc Make sure you save your data appropriately and back it up regularly The ZEN software will ask you if you want to save your unsaved images ...

Page 9: ...File Menu The File Browser can be used like the WINDOWS program file browser Images can be opened by a double click and image acquisition parameters are displayed with the thumbnails Fig 9 For more information on data browsing please refer to the detailed operating manual Fig 9 File Browser ...

Page 10: ...ember the argon multi line laser has to first be put to standby for a 5 minute warm up before it changes to on Zeiss recommends operating the Argon multi line Laser at a tube current of about 6 A 50 output This is the best compromise between laser stability power and laser life time tube current control can be found in Pro Mode Fig 10 Laser Control tool in Pro Mode ...

Page 11: ...e the Ocular button has been chosen before the Oculars tab is pre selected and presented as the front tab in this tool Fig 11 Selecting an objective Open the graphical pop up menu by clicking on the Objective symbol and select the objective lens for your experiment Fig 11 The chosen objective lens will automatically move into the beam path Focusing the microscope for transmitted light Open the gra...

Page 12: ... configurations Fig 13 by typing a config name in the pull down selector and pressing the save button Fast restoration of a saved config is achieved by selecting the config from the pull down list and pressing the load button The current config can be deleted by pressing the delete button In Pro Mode these configurations can be assigned to buttons that are easier to press Note Depending on the mic...

Page 13: ...Sequential scanning of double and triple labeling line by line or frame by frame Advantage Only one detector and one laser are switched on at any one time This reduces cross talk Disadvantage slower image acquisition Open the Imaging Setup and the Light Path tool in the Setup Manager Tool group to access the hardware control window to set up the beam path The open Light Path is shown in Fig 14 Fig...

Page 14: ...levant list box Activation deactivation via check box of the selected channel Ch 1 4 monitor diode ChM META detectors ChS1 8 transmission ChD for the scanning procedure and assigning a color to the channel Select the appropriate filters and activate the channels Click the Laser icon to select the laser lines and set the attenuation values transmission in in the displayed window For the configurati...

Page 15: ...ame Tracks are switched during scanning frame by frame The following settings can be changed between tracks Laser line and intensity all filters and beam splitters the channels incl settings for gain and offset and the pinhole position and diameter Frame Fast The scanning procedure can be made faster Only the laser line intensity and the Amplifier Offset are switched but no other hardware componen...

Page 16: ...nhole and Z stack optimization etc The Axioskop 2 FS MOT does not automatically detect the objective lens Adjusting scan speed Use the Scan Speed slider in the Acquisition Mode tool Fig 18 to adjust the scan speed A higher speed with averaging results in the best signal to noise ratio Scan speed 8 usually produces good results Use speed 6 or 7 for superior images Choosing the dynamic range Select ...

Page 17: ...me mode in the Acquisition Mode tool Select the number of lines or frames to average Adjusting pinhole size Select the Channels tool in the Left Tool Area Set the Pinhole size to 1 Airy unit for best compromise between depth discrimination and detection efficiency Pinhole adjustment changes the Optical Slice thickness When collecting multi channel images adjust the pinholes so that each channel ha...

Page 18: ... pre adjustment of detector gain and offset Select Fast for continuous fast scanning useful for finding and changing the focus Select Continuous for continuous scanning with the selected scan speed Select Single for recording a single image Select Stop for stopping the current scan procedure Image optimization Choosing Range Indicator In the View Dimensions View Option Control Block click inside t...

Page 19: ...hole to 1 Airy Unit Fig 23 Set the Detector Gain high When the image is saturated reduce AOTF transmission in the Laser control section of the Channels Tool Fig 23 using the slider to reduce the intensity of the laser light to the specimen Adjusting gain and offset Increase the Amplifier Offset until all blue pixels disappear and then make it slightly positive Fig 23 Reduce the Detector Gain until...

Page 20: ...us on the lower specimen area where the recording of the Z Stack is to end Click on the Set Last button to set this lower position Click on the button to set number of slices to match the optimal Z interval for the given stack size objective lens and the pinhole diameter Make sure that the activation tickbox is set Click on the Start button to start the recording of the Z Stack Note When is not ac...

Page 21: ...vailable extra information and hardware settings of your experiment Click on the SAVE button If you close an image which has not been saved a pop up window will ask you if you want to save it Choosing yes will lead you to the WINDOWS Save As window To export image display data a single optical section in raw data format or the contents of the image display window including analysis and overlays ch...

Page 22: ...should shut them off now in the pop up window indicating the lasers still in use Shut down the computer Wait until the fan of the Argon laser has switched off On the REMOTE CONTROL turn off the Components switch and the System PC switch Fig 1 Switch off the X Cite 120 lamp or the HBO 100 mercury burner Switch off the UV Ar laser of by the toggle switch on the power supply Fig 2 ...

Reviews: