background image

System

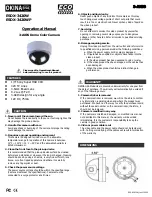
The “System” submenu has the following options:

• 

Factory Reset:

 Select “Factory Reset” to reset the device to the factory settings. 

This also deletes all data saved on the device, including images and videos.

• 

Reset Settings:

 Select “Reset Settings” to reset all settings to the default values for 

the device.

• 

Language Settings: 

Select a menu language here.

• 

Date / Time:

 Set the date and time of the device here.

• 

Pixel Correction:

 Remove defective pixels for a perfect field of view.

• 

Auto Off:

 Activate or deactivate the automatic switch-off function.

• 

Max. Zoom Level:

 Here you can specify the maximum zoom value.

• 

Color Modes:

 Activate or deactivate the desired color modes here.

You can also view the following information:

• 

WLAN SSID: 

The name of the WLAN hotspot is displayed here.

• 

WLAN Password:

 The currently used WLAN password is displayed here.

• 

Firmware:

 The current firmware version is displayed here.

Scene Mode

OFF

Factory Reset

To perform a factory reset, select “System” in the main menu. Then navigate to 

“Factory Reset”. Select “Yes” and confirm your selection. A second security prompt 

follows, which must also be confirmed with “Yes”. 

Resetting the settings

To reset the settings, select “System” in the main menu. Then navigate to “Reset 

Settings”. Select “Yes” and confirm your selection.

Note:

 The device must be restarted for the reset of the settings to be completed 

successfully.

Personal data when you dispose of or pass on your ZEISS device 

Remember that there may be personal photos and videos on the internal device 

memory. Before passing on the device to a third party, please perform the factory reset 

to delete this data and verify it has been deleted. By doing so, you help maintain your 

privacy and data security.

Participating in IT security

Please take an active role in protecting the IT security of your device by using the ZEISS 

Hunting App and installing new firmware updates as soon as they become available. 
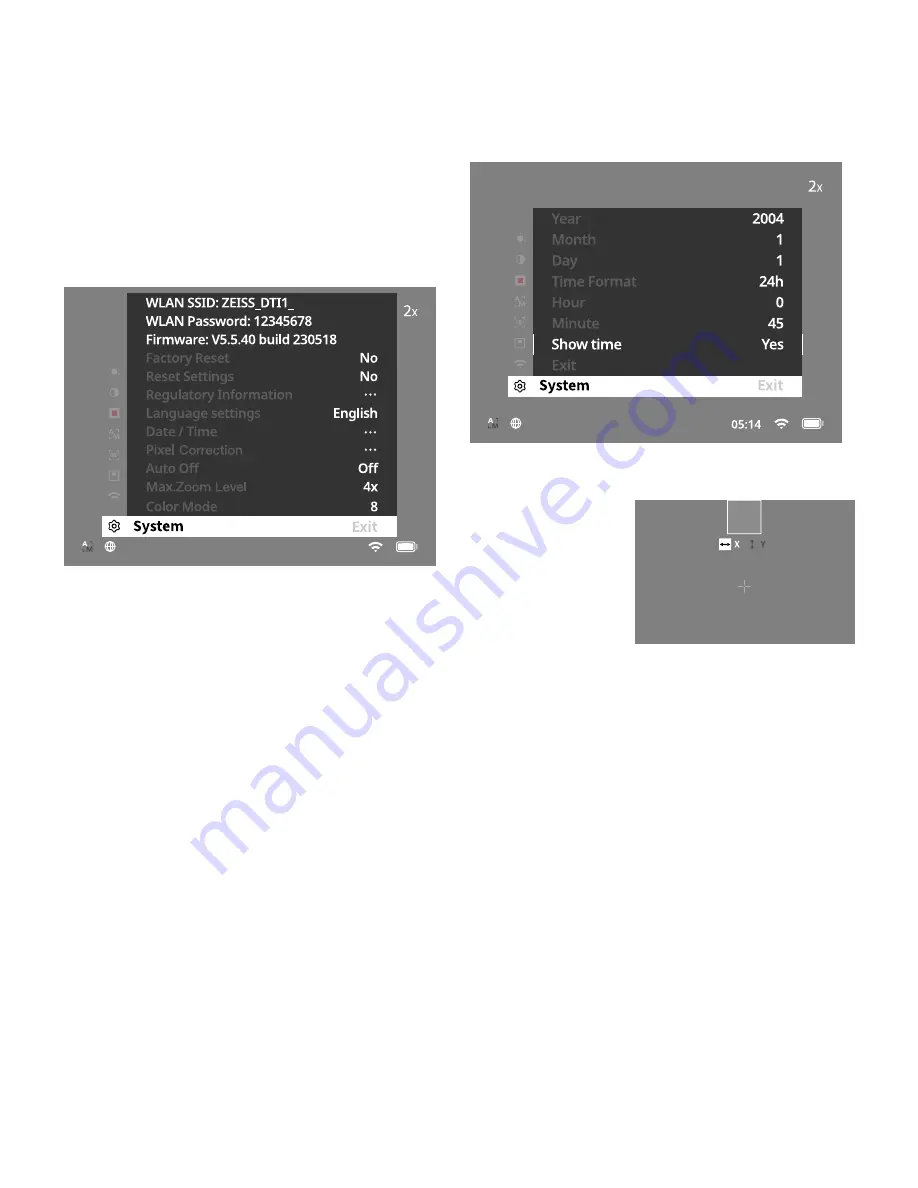
Date / Time

Select “System” in the main menu to set the date and time. Then navigate to 

“Date / Time”. You can now set the year, month, day, hour and minute individually. The 

“Time Format” setting allows you to choose between 24-hour and 12-hour display. Be 

sure to set the current date and time, as your photos and videos will be time stamped. 

At the very bottom in the menu item you can activate or deactivate the display of the 

time on the main screen.

Note:

 If the battery is completely discharged, the device loses the set date and time. 

Reset the date and time so that your images and videos get a correct timestamp.

Pixel Correction

If individual pixels fail, you can 

locate them here and fix the error.

Select “System” in the main menu 

to start the correction. Navigate 

to “Pixel Correction” and start 

the correction by briefly pressing 

the menu button 

(7)

. A crosshairs 

appear, which you use to capture 

the affected pixel. For more precise 

detection, the area around the 

crosshairs is displayed enlarged in 

an additional window. To set the X 

axis: press the left arrow button 

(6)

 for Minus and the right menu button 

(6)

 for Plus. 

Every time you press the button, you move one pixel further. To jump several pixels 

further, press and hold the arrow button 

(6)

. Confirm the setting by briefly pressing 

the menu button 

(7)

. Now make the settings for the Y axis in the same way. Switch 

between the setting for the X and Y axis by briefly pressing the menu button 

(7)

.

To save the settings, press and hold the menu button 

(7)

. Confirm the prompt 

whether you would like to save or discard the calibration by briefly pressing the menu 

button 

(7)

.

Auto Off

The ZEISS DTI 1 switches off automatically after a time of inactivity in order to save 

battery power. The switch-off duration can be adjusted in the menu item “System” 

under “Auto Off”.

Firmware update

A firmware update can be carried out using the ZEISS Hunting App. Follow the 

instructions for this in the ZEISS Hunting App.

Note:

 Make sure that the device is fully charged before updating the firmware. Do not 

switch off the device during the update, otherwise it may be damaged.

Note:

 If you initiate an update via the ZEISS Hunting App, you must confirm this again 

on the device for security reasons.

12 | 15

EN

Summary of Contents for DTI 1/19

Page 1: ...ZEISS DTI 1 19 1 25 Gebrauchsanleitung DE EN 06 2023 For United States patents which may cover this product see our website Patents www zeiss com cop patents ...

Page 2: ...itte vergewissern Sie sich vor der Benutzung dass Ihre Wärmebildkamera keine sichtbaren Schäden hat Prüfen Sie ob die Wärmebildkamera ein klares ungestörtes Bild im Display anzeigt Prüfen Sie die richtige Einstellung der Wärmebildkamera siehe hierzu die Hinweise im Abschnitt Beobachtungsmodus Einlegen Entfernen des Akkus Die Wärmebildkamera ZEISS DTI 1 ist mit einem festverbauten Akku ausgestattet...

Page 3: ... wieder in den Beobachtungsmodus Kalibrierung Das Gerät kann automatisch Auto Kalibrierung Ein oder manuell Auto Kalibrierung Aus kalibriert werden Im automatischen Modus führt das Gerät durch Schließen und Öffnen eines internen Verschlusses selbstständig eine Kalibrierung durch wenn diese nötig ist Dabei ist ein leises Klicken zu vernehmen In diesem Modus haben Sie zusätzlich die Möglichkeit die ...

Page 4: ... Drücken des Menüknopfes 7 wird das Hauptmenü auf dem Display angezeigt Schauen Sie dabei durch den Sucher 8 Im Hauptmenü stehen Ihnen folgende Auswahlmöglichkeiten zur Verfügung Helligkeit Stellen Sie hier die Helligkeit des Displays ein Sie können aus vier Helligkeitsstufen wählen Auf Stufe 1 ist die Helligkeit am geringsten Auf Stufe 10 ist die Helligkeit am größten Kontrast Stellen Sie hier de...

Page 5: ...us Navigieren Sie anschließend zu Datum Zeit Nun können Sie Jahr Monat Tag Stunde und Minute einzeln einstellen Mit der Einstellung Zeitformat können Sie zwischen der 24 Stunden und der 12 Stunden Darstellung wählen Achten Sie darauf die aktuelle Datums und Uhrzeiteinstellung vorzunehmen da Ihre Fotos und Videos mit einem Zeitstempel versehen werden Ganz unten im Menüpunkt können Sie die Anzeige d...

Page 6: ...indet sich eine LED die den aktuellen Ladezustand anzeigt Der Ladezustand des Akkus wird oben rechts auf dem Display angezeigt Bei geringem Ladezustand wechselt die Anzeige im Display auf Rot In der folgenden Grafik erkennen Sie wieviel Prozent Ihrer Akkuladung noch vorhanden ist 10 10 36 36 63 63 90 90 100 Austausch des Objektivschutzdeckels Zum Austausch des Objektivschutzdeckels 3 entfernen Sie...

Page 7: ...asswort ist nicht korrekt Geben Sie das korrekte Passwort ein Es sind zu viele WLAN Netzwerke in unmittelbarer Nähe des Geräts Es kann zu Beeinträchtigungen kommen Bringen Sie das Gerät an einen Ort mit wenigen oder gar keinen unmittelbaren WLAN Netzwerken Das WLAN Signal geht immer wieder verloren oder wird unterbrochen Die ZEISS DTI 1 ist zu weit entfernt oder es sind zu viele andere WLAN Netzwe...

Page 8: ...ZEISS DTI 1 19 1 25 Instructions for use DE EN 06 2023 For United States patents which may cover this product see our website Patents www zeiss com cop patents ...

Page 9: ...tion test Before use please ensure that your thermal imaging camera has no visible damage Test to see if the thermal imaging camera displays a clear undisturbed image Check that the settings for the thermal imaging camera are correct See the notes in the section Observation mode Installing removing the battery The ZEISS thermal imaging camera DTI 1 is equipped with a permanently installed battery ...

Page 10: ...tandby mode Briefly press the on off button 4 again to switch the device back to observation mode Calibration The device can be calibrated automatically Auto Calibration On or manually Auto Calibration Off In automatic mode the device automatically performs a calibration by closing and opening an internal shutter when necessary A gentle click should be heard In this mode you also have the option o...

Page 11: ...2X 2X Photo mode Video mode Menu Press and hold the menu button 7 to show the main menu on the display Look through the viewfinder 8 The main menu offers the following options Brightness Set the brightness of the display here There are four brightness levels to choose from The brightness is lowest at level 1 The brightness is highest at level 10 Contrast Adjust the contrast of the scene here There...

Page 12: ...te and time Then navigate to Date Time You can now set the year month day hour and minute individually The Time Format setting allows you to choose between 24 hour and 12 hour display Be sure to set the current date and time as your photos and videos will be time stamped At the very bottom in the menu item you can activate or deactivate the display of the time on the main screen Note If the batter...

Page 13: ... is empty An LED is located under the cover that indicates the current charge level The battery charge level is shown in the upper right corner of the display When the charge level is low the display changes to red In the following graphic you can see what percentage of your battery charge is still available 10 10 36 36 63 63 90 90 100 Replacing the lens cap To replace the lens cap 3 first remove ...

Page 14: ...connect to my ZEISS DTI 1 The WLAN password is incorrect Enter the correct password There are too many WLAN networks in the immediate vicinity of the device There may be adverse effects Move the device to a location with few or no direct WLAN networks The WLAN signal is repeatedly lost or interrupted The ZEISS DTI 1 is too far away or there are too many other WLAN networks nearby Change the locati...

Page 15: ...Carl Zeiss AG Carl Zeiss Straße 22 73447 Oberkochen Germany www zeiss com nature www zeiss com hunting Printed in Germany 000000 2580 013 CZ 06 2023 ...

Reviews: