background image


Z-2130 


U

SER

M

ANUAL


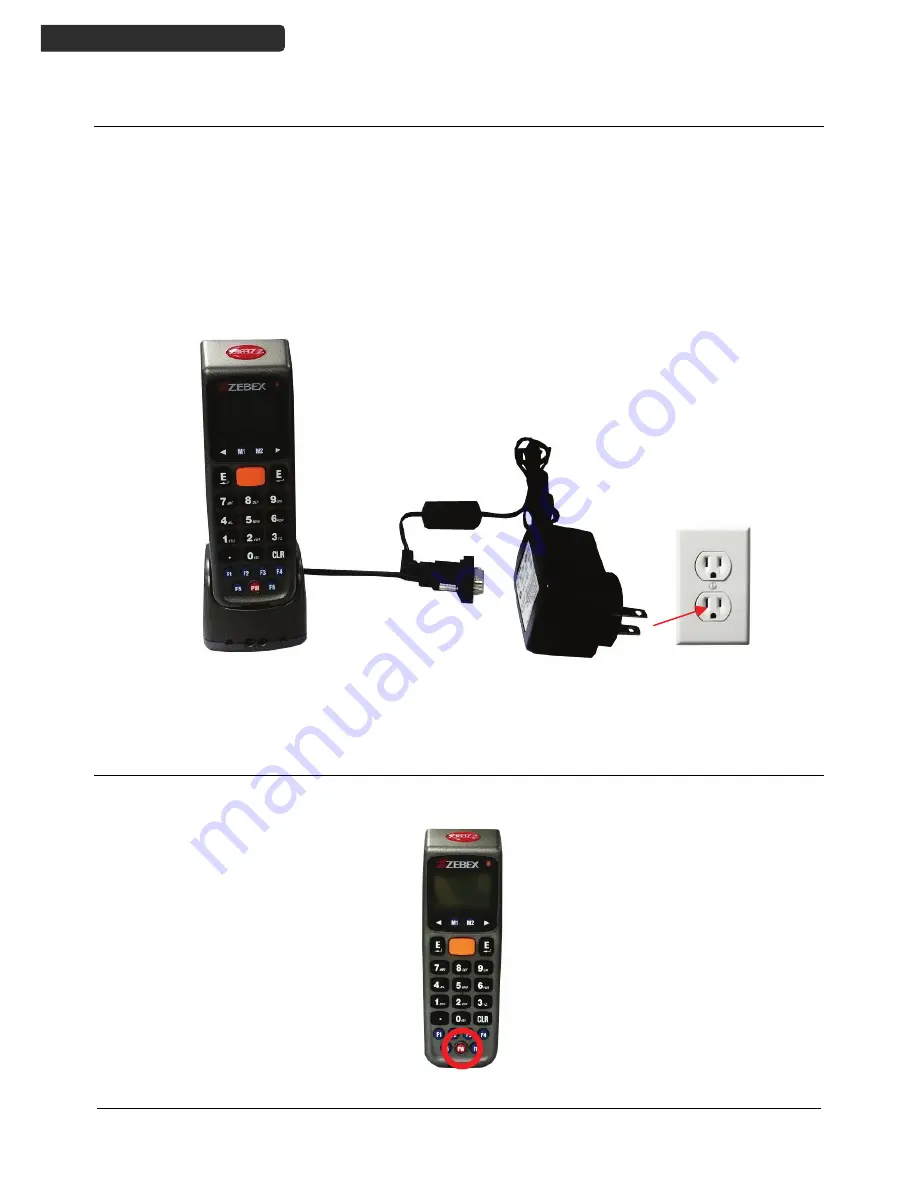
Charging the Battery 

1.


Place the Z-2130 on the cradle. LED on the data collector indicates the status of 
battery charge: Red for charging and Green for full. 

2.


Connect the power adapter to the DB-9 (female) connector. 

3.


Connect the power adapter to a wall outlet. 

4.


Charge the batteries until the LED indicator turns green. 


Power on the Device 

Press the PW button to turn the power on or off. 


Summary of Contents for Z-2130

Page 1: ...Portable CCD Data Collector Z 2130 Version 1 1 User s Manual ZEBEX INDUSTRIES INC WWW ZEBEX COM...

Page 2: ...al Version 1 0 04 07 2011 Revision History Changes to the original manual are listed below Version Date Description of Version 1 0 April 07 2011 Initial release 1 1 January 15 2013 Added USB connectio...

Page 3: ...translated into any language or computer language in any form or by any means electronic mechanical magnetic optical chemical manual or otherwise without express written consent and authorization We...

Page 4: ...ther hazard To charge the device battery the battery and charger temperature must be between 0 45 Do not use incompatible batteries and chargers Use of an incompatible battery or charger may present a...

Page 5: ...ttery Maintenance These are recommendations to extend the life of the battery pack When charging the battery for the first time charge for at least 12 hours prior to use Remove the battery if the devi...

Page 6: ...TTERY 4 POWER ON THE DEVICE 4 CONNECTING TO PC 5 Connecting via RS 232 5 Connecting via Cradle 5 Running the Device on PC 5 Setting the Device on PC 6 USING THE DATA COLLECTOR 7 SCAN AND KEYING IN DAT...

Page 7: ...Convenient on handed operation Ergonomic and modern cellular phone styling PC System Requirement Windows XP Service Pack 2 or above Microsoft Internet Explorer 5 01 or later Microsoft Framework 2 0 Di...

Page 8: ...ates the status of battery charge Red for battery just on charging and Green for full Keypad A total of 26 keys are provided to the power and other function keys Communication Port Connect to communic...

Page 9: ...a collector in this section Inserting Battery 1 Slide the lock lever to unlock the battery lock as shown 2 Remove the battery cover from the data collector 3 Make sure the polarity is correct and inse...

Page 10: ...indicates the status of battery charge Red for charging and Green for full 2 Connect the power adapter to the DB 9 female connector 3 Connect the power adapter to a wall outlet 4 Charge the batteries...

Page 11: ...device as a COM device and ask for the driver when connecting the first time 3 Please download and install the driver from ZEBEX website The system should assign a COM port to the device after the dri...

Page 12: ...data collector 2 Select the Remote Settings tab on the Main Menu Click the Device Settings to obtain the device status Select the options from the dropdown menus in Device Settings Set beep volume op...

Page 13: ...and hold the orange SCAN button A light beam will be activated and shoot out from the window at the lower front end of the data collector Please see the Run Task section in the User s Manual for more...

Page 14: ...o the key will be displayed Pressing M2 will turn the character into the first alphabetical one Pressing M2 each time will turn the character into the next one Eventually it turns back into the numeri...

Page 15: ...er or the number button corresponding to the option to select the option System Menu Menu Description Menu Description Run Task Select this option to start recording data You can scan barcodes or ente...

Page 16: ...iew the Record screen as shown below In the Record screen you can Press M1 to exit Press the left arrow button to view the previous record press the right arrow button to view the next record Press M2...

Page 17: ...tem Menu 2 Task Utility 1 Statu to view file status 2 Number of records will display on the screen Format 1 Select System Menu 2 Task Utility 2 Format to set the data format 2 Instruction screen appea...

Page 18: ...ull ASCII characters p printable ASCII characters ASCII code 32 127 Remove control character The characters represented by such as the check character s in the barcodes will be deleted when the data i...

Page 19: ...confirm Select 3 to delete all the stored data Select 4 to delete all the stored Tasks Setup Select 3 Setup from the System Menu to open the Setup menu The following screen appears Basic Setup Select...

Page 20: ...System Menu 3 Setup 2 System Setup to open System Setup menu The following options appear Communication Select System Menu 3 Setup 2 System Setup 1 Communication to enter the setup The following opti...

Page 21: ...is uploaded 3 Scan Data screen appears Press the SCAN button to scan a barcode The scanned data will be uploaded via the communication port to the host Timeout Value Select System Menu 3 Setup 2 Syst...

Page 22: ...e MM DD YYYY DD MM YYYY MM DD YY or DD MM YY Press Enter to confirm Barcode Setup Select System Menu 3 Setup 3 Barcode Setup to open Barcode setup The following options appear Basic Setup Select Syste...

Page 23: ...tup the next symbology Codabar 1 To turn this symbology on or off use the left or right arrow buttons to change the value and press Enter to confirm 2 When Codabar is set to ON pressing M2 will lead t...

Page 24: ...Barcode Setup 2 Advanced Setup to enter the setup The following options appear CPC 25 1 To turn this symbology on or off use the left or right arrow buttons to change the value and press Enter to conf...

Page 25: ...Barcode Type When enabled the barcode type ID code will be added in front of every data stored Press Enter to confirm 3 Select Disable Beep1 Beep2 Beep3 for Scan TimeOut Beep Press Enter to confirm 4...

Page 26: ...uploaded its name will then be displayed on the screen Repeat the above procedure to choose and confirm 4 Ready to upload screen appears Press Enter to begin upload Delimiter Set 1 Select System Menu...

Page 27: ...Select System Menu 4 Upload 3 Upload Device to enter the setup screen 2 Use the left or right arrow buttons to select the device for uploading RS 232 or USB 3 Make sure the device is connected to the...

Reviews: