background image

ZNMPF1601 


Revision 4.2 


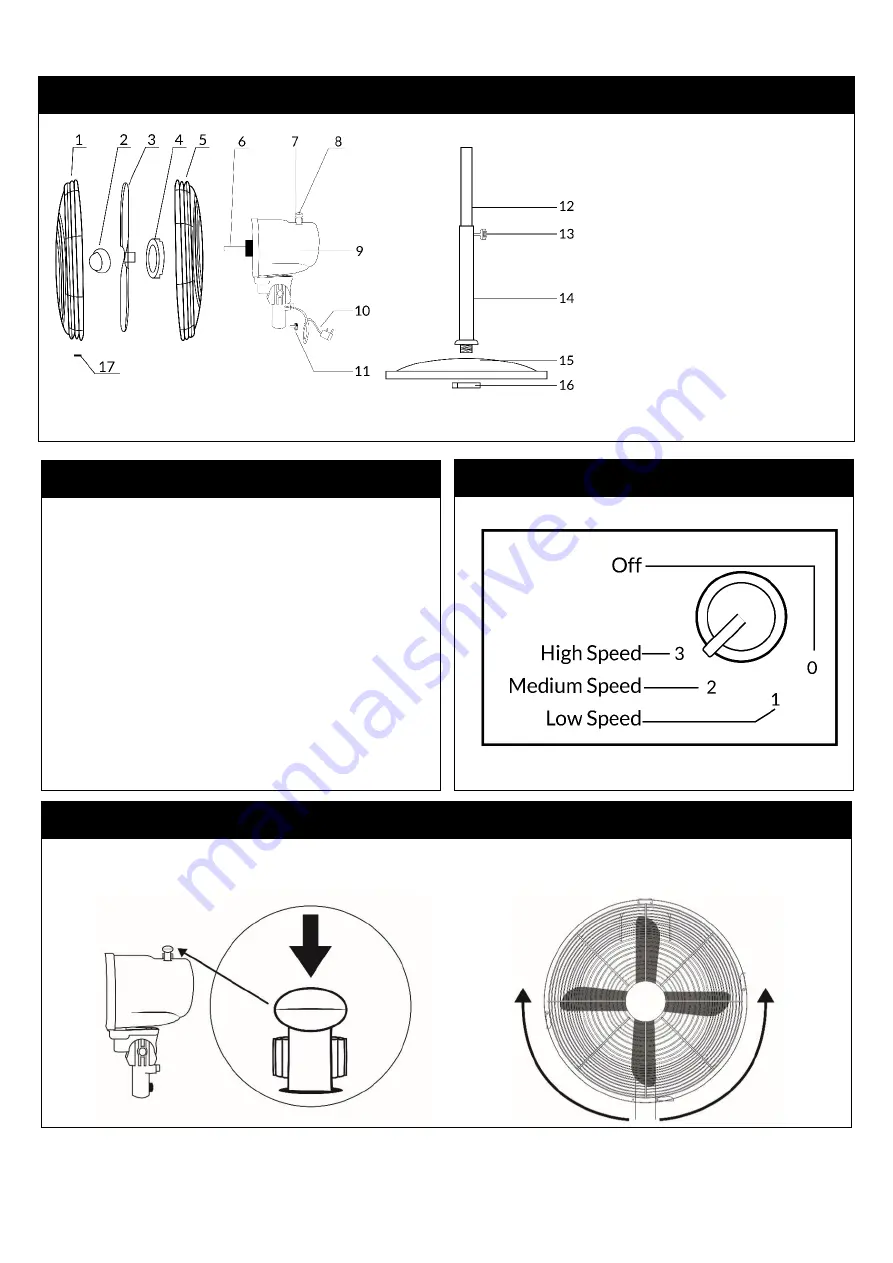
PARTS 


ASSEMBLY 


SETTINGS 


OSCILLATION 

 
Press the switch on the rear of the fan to engage the oscillation feature. 

1.


Front Grille 

2.


Fan Blade Securing Cap 

3.


Fan Blade 

4.


Rear Grille Securing Nut 

5.


Rear Grille 

6.


Fan Blade Fixing Point 

7.


Speed Adjustment Dial 

8.


Oscillation Switch 

9.


Motor Housing 

10.


Power Cord & Plug 

11.


Housing Fixing Screw 

12.


Extension Pole 

13.


Extension Screw 

14.


Lower Pole 

15.


Fan Base Plate 

16.


Base Plate Securing Nut 

17.


Grille Securing Screw 

1.


Thread the Lower Pole [14] through the Base 
Plate [15] and secure with the Nut [16] 

2.


Attach Motor Housing [9] onto Extension 
Pole [12] and secure with Fixing Screw [11] 

3.


Place Rear Grille [5] on Motor Housing [9] 
aligning with rear posts, and secure with Nut 
[4] 

4.


Attach Fan Blade [3] onto Fixing Point [6] 
and secure with Cap [2] 

5.


Clip Front Grille [1] onto Rear Grille [5] using 
attached clips, and screw in Securing Screw 
[17] Screw Hole on the Front Grille should 
be on the bottom. 

Summary of Contents for ZNMPF1601MB

Page 1: ...ZNMPF1601 Revision 4 2 Operating Manual REGISTER TODAY FOR YOUR FREE ADDITIONAL YEAR GUARANTEE ZNMPF1601PN MB ...

Page 2: ...ed and used in accordance with the instructions contained in this instruction guide and any other instructions for use which are supplied It must be used for domestic purposes only and for its intended use This guarantee does not cover wear and tear damage misuse or consumable parts This does not affect your statutory rights ZANUSSI CONTACT DETAILS Website www zanussiheatingandcooling uk Telephone...

Page 3: ... turn unit on Do not handle the appliance with wet hands Do not pull or carry by cord use cord as a handle close door on cord pull cord around sharp corners or edges or expose cord to heated surfaces Do not unplug by pulling on cord To protect against electrical shock do not immerse cord plug or appliance in water or other liquid Unplug from the mains outlet when not in use before putting on and t...

Page 4: ...n Pole 13 Extension Screw 14 Lower Pole 15 Fan Base Plate 16 Base Plate Securing Nut 17 Grille Securing Screw 1 Thread the Lower Pole 14 through the Base Plate 15 and secure with the Nut 16 2 Attach Motor Housing 9 onto Extension Pole 12 and secure with Fixing Screw 11 3 Place Rear Grille 5 on Motor Housing 9 aligning with rear posts and secure with Nut 4 4 Attach Fan Blade 3 onto Fixing Point 6 a...

Page 5: ...ressed down Check that nothing is interfering with the fan preventing oscillation Fan is making a grinding sound Immediately switch off and contact Product Care The air is dusty Ensure fan is unplugged and set to 0 Carefully remove grille Carefully remove blades from fan Using mild soapy water and a sponge gently rinse the blades Allow to dry naturally for 24 hours then refit the blades If you are...

Page 6: ...ate of the original purchase If any defect arises due to faulty materials or workmanship the faulty product must be returned to the place of purchase By registering your product you will get an additional year guarantee free of charge REGISTER ONLINE Visit our website to register your full parts and labour guarantee online www zanussiheatingandcooling uk REGISTER BY PHONE Call our friendly Product...

Page 7: ...ZNMPF1601 Revision 4 2 NOTES www zanussiheatingandcooling co uk Product Care G2S Ltd Green Bank Business Park Swan Lane Hindley Green Wigan WN2 4AY REGISTER YOUR FREE ADDITIONAL YEAR GUARANTEE TODAY ...

Page 8: ...ur general household waste Only discard electrical electronic battery items in separate collection schemes which cater for the recovery and recycling of materials contained within Your co operation is vital to ensure the success of these schemes and for the protection of the environment For your nearest disposal facility visit www recycle more co uk or ask in store for details SEDEX Connecting bus...

Reviews: