11
2.8
Installation
2. Installation
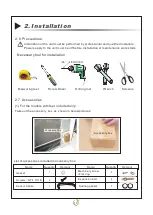
Take out the accessory bag from the place as shown
in below pictures (for all models):
(2)
Accessory bag
1
2
Accessory bag
2
1
1
Quantity
Name
1
Positioning
board
Drain pipe
User
manual
Ribbon
B
e
fo
re
o
p
e
ra
ti
n
g
th
is
u
n
it
,
p
le
a
se
r
e
a
d
th
is
m
a
n
u
a
l
a
n
d
k
e
e
p
it
w
e
ll
fo
r
fu
tu
re
r
e
fe
re
n
c
e
B
M
f
a
n
c
o
i
l
u
n
i
t
I
N
S
T
A
L
L
A
T
I
O
N
A
N
D
U
S
E
R
'S
M
A
N
U
A
L
I
N
S
T
A
L
L
A
T
I
O
N
A
N
D
U
S
E
R
'S
M
A
N
U
A
L
Remark
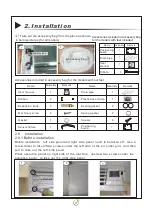
Accessories included in accessory bag
for the models with feet included:
Quantity
Name
Remark
Quantity
Name
Remark
User manual
Ribbon
Expansion
bolts
Machinary screw
Gasket
Sensor fixture
1
2
4
2
1
1
Drain pipe
Plastic hose clamp
Sealing gasket
Spring washer
Screws
1
1
2
2
4
Before op erati ng this uni t, plea se read thi s
manual an d keep it wel l for futu re referen ce
B M f a n c o i l u n i t
IN STAL LATI ON AN D
US ER 'S MA NUA L
IN STAL LATI ON AN D
US ER 'S MA NUA L
1
Positioning
board
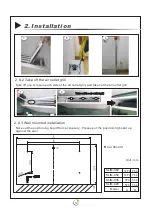
2.8.1 Before
installation
Before installation
,
left
-
side panel and
right
-
side
panel
need
to be taken
off
.
Use
a
screw
driver
to
two
screws
under
the
left
side
of
the
air
outlet
grill
,
and
then
pull
to
take
out
the
left
-
side
panel
.
take off
1
2
3
Screws
Press
operation
panel
on
right
side
of
the
machine
,
unscrew
two
screws
under
the
operation
panel
,
to
take
out
the
right
-
side
panel
.
Press
Accessories included in accessory bag for the models without feet
Summary of Contents for SLIM-C Series
Page 2: ......
Page 34: ...31 5 Appendix 5 1 Exploded view...
Page 36: ...33 5 2 Wiring diagram 5 Appendix...
Page 38: ...NOTES...
Page 39: ......
Page 40: ...www ZAN TIA com...


