background image

11


CONFIDENTIAL 

DOC-USR-0133-01 


____________________________________________________________________________________


Z3 Technology, LLC 

 100 N. 8th St. STE 250 

 Lincoln, NE 68508-1369 USA 

 +1.402.323.0702 


-Set the HD Source to 1080p or 1080i output. 


-Select content you would like to stream. 


      If you see playback on the monitor, you’ve confirmed the source works.   


5.2


Connect the SBE264-DVR-13 


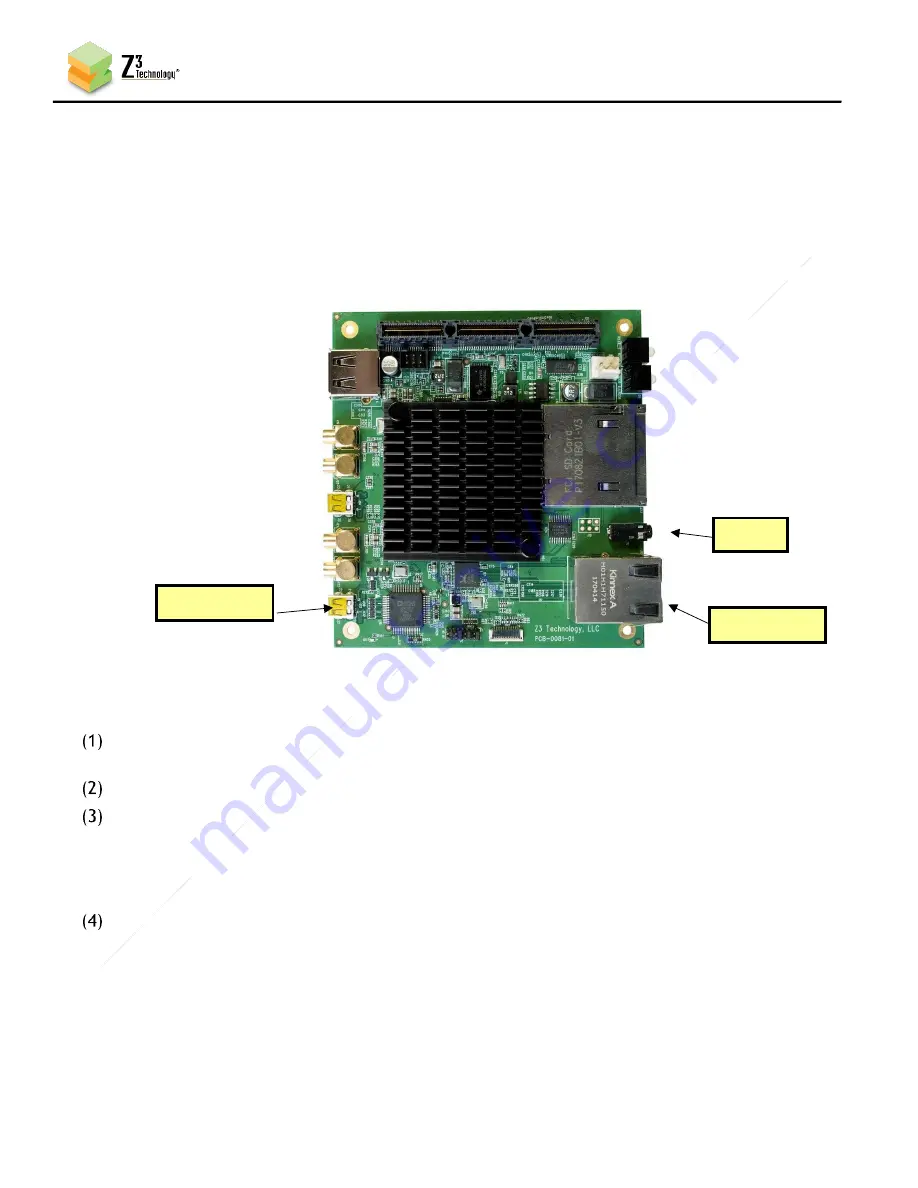
Connect the supplied 2.5 mm serial cable and gender changer to the serial console of the single 

board encoder and to your PC. 


Take the HDMI cable connected to the monitor and now connect it to HDMI In on the board. 


Connect an Ethernet cable to the board and either your PC or hub on the same network as your PC. 


5.3


Set up the Terminal Window 


If you are running from a Windows PC, we recommend running TeraTerm for serial configuration and 

monitoring.  Select “Setup – Serial Port” and use the following settings: 


Port:     

Whichever serial port the port is connected to 


Baud Rate:    115200 


Data:   

8-bit 


Parity:  

None 


Stop:   

1-bit 


Flow Control:  None 

Figure 3  HDMI Encode Connections 

HDMI In  

Serial 

Ethernet  

Summary of Contents for Z3-SBE264-DVR-13

Page 1: ...l rights reserved This document contains proprietary and confidential information of Z3 Technology LLC Z3 This document may not be used reproduced disclosed or disseminated to anyone without the prior...

Page 2: ..._____________________________________________ Z3 Technology LLC 100 N 8th St STE 250 Lincoln NE 68508 1369 USA 1 402 323 0702 Revision History Version Date Change Note Author 1 0 11 2 2017 Original Do...

Page 3: ...er on the Board 12 5 5 Ensure your PC has a Proper IP Address 12 5 6 Configure Channel 1 for HDMI Encode 12 5 7 Start Encoding 14 5 8 Run VLC to View the UDP Stream 15 5 9 Stream RTP RTSP 16 5 10 Chan...

Page 4: ...DMI Pass Through 35 EXERCISING OTHER FEATURES 35 9 1 Saving Current Settings 35 9 2 Using the Password Feature 37 SUMMARY OF OPTIONS 38 10 1 The System Setup Tab 38 10 2 The User Presets Tab 39 10 3 T...

Page 5: ...ble 23 Figure 18 Composite Connection 23 Figure 19 Creating the CH2 Tab 24 Figure 20 Configuring Composite Input on CH2 24 Figure 21 VLC Settings for Viewing the CH2 Stream 25 Figure 22 Using the Aux...

Page 6: ...kernel u boot tool chain and starter file system pre integrated and configured The software bundle also contains binary applications to support multimedia encoding to file or stream Z3 Technology can...

Page 7: ...________________________________________________________ Z3 Technology LLC 100 N 8th St STE 250 Lincoln NE 68508 1369 USA 1 402 323 0702 The following figure shows a block diagram of the SBE264 DVR 13...

Page 8: ...tion Error Reference source not found RUNNING THE ENCODER on page 10 This section describes how to quickly get a UDP stream running from the single board encoder It also describes how to dynamically c...

Page 9: ..._____________________________________________ Z3 Technology LLC 100 N 8th St STE 250 Lincoln NE 68508 1369 USA 1 402 323 0702 INCLUDED PARTS LIST 1 x SBE264 DVR 13 1 x 5V 2A Power Supply 1 x Serial Ca...

Page 10: ...technical configuration and control Operating Temp 20 to 85 degrees C at 20 80 relative humidity non condensing Storage Temp 40 to 70 degrees C at 20 80 relative humidity non condensing Measurements 9...

Page 11: ...changer to the serial console of the single board encoder and to your PC Take the HDMI cable connected to the monitor and now connect it to HDMI In on the board Connect an Ethernet cable to the board...

Page 12: ...with the board the PC that you are communicating from needs to have the same first two parts of the IP address For example if the board has an IP address of 192 168 81 68 your PC would need to have an...

Page 13: ...esolution is set to Follow Input or 1920x1080 Set Output Format to UDP You can set the Dest Address to a the IP address of your PC that will be running the VLC media player in the pictured example 192...

Page 14: ...rner of GUI says RUNNING If the encoder is running click Stop wait for status to say STOPPED and then click Start for the newly entered settings to take effect If the status is POLLING a valid HDMI in...

Page 15: ...player on your PC version used in testing at Z3 2 05 Select Media Open Network Stream In the box type udp 192 168 0 6 5004 where 192 168 0 6 matches the values of the computer IP address or multicast...

Page 16: ...ession Change Output Format from UDP to RTP RTSP Click on start to start the RTP RTSP encoding session At this point your settings should look like the following Open VLC Select Media Open Network Str...

Page 17: ...coln NE 68508 1369 USA 1 402 323 0702 Note To use the RTSP feature VLC v2 1 5 or later is needed If it is not possible to use a newer version of VLC it may be necessary to use SDP files instead of RTS...

Page 18: ...702 5 10 Changing the Bitrate Dynamically The SBE264 DVR 13 includes an Update button which allows you to change the bitrate without stopping and restarting the encoder In VLC click on Tools and selec...

Page 19: ...402 323 0702 In the encoder GUI return to the CH1 tab and change the bitrate from 8000K to 2000K Click the update button You should see the quality of the picture in VLC change as well as the drop in...

Page 20: ...ue of 10Mbps corresponding to 8Mbps for the video There are times however when it is desirable to make this value higher For example if the encoder bitrate is very low below 1Mbps it is advisable to a...

Page 21: ...view the Statistics tab You will see a lower value for the overall input rate and for the content rate The value of TS Rate must be higher than video bitrate audio bitrate 1 25 If an attempt is made...

Page 22: ...than streaming using TS If low latency with TS is desired there is a special TS lowlat mode that can be activated Setting this causes the TS muxer to send packets out immediately rather than gatherin...

Page 23: ...ts encode of video from a Composite source Composite input can not be used in parallel with the HDMI input A composite adapter cable provided with the system is needed To encode Composite perform the...

Page 24: ...n click on the tab that was created The options for a second encode channel appear Here you can specify composite through the Video Source dropdown menu Example values for encoding NTSC are displayed...

Page 25: ...Aux TS File Enable option appears Set this to True using the dropdown menu 3 Insert a USB drive into the port on the rear panel In the Aux TS File Location text box enter media sda1 file name ts wher...

Page 26: ...set up a custom configuration and save this so that the DHCP setting is used the next time the system boots up To do this click on the User Presets tab and click on new This brings up a new text box t...

Page 27: ...ied that z3_test will be used when the system restarts go ahead and reboot the single board encoder Return to the serial interface you established in steps 5 and 6 When the Main Menu comes up you can...

Page 28: ...tal performance cannot exceed the capability of the SBE264 DVR 13 for example three 1080p30 encodes at 30fps would not be allowed Note VLC does not support RTMP The test player within Wowza Streaming...

Page 29: ...68508 1369 USA 1 402 323 0702 8 If necessary set Authentication to Enable and enter the User Name and Password 9 After you re finished your settings should look something like the following Figure 30...

Page 30: ..._______ Z3 Technology LLC 100 N 8th St STE 250 Lincoln NE 68508 1369 USA 1 402 323 0702 6 4 Configure CH2 for RTMP Streaming 10 Click on the CH2 tab 11 Set encode to D1 2Mbps 12 Use the same RTMP form...

Page 31: ...13 Click on the CH3 tab 14 Set encode to 352x240 1Mbps 15 Use the same RTMP format Dest Address Authentication Info replacing d1 with cif 6 6 Set up the Wowza Server 16 Install the Wowza server on a...

Page 32: ...s will bring up the Wowza home page Log in with your user name and password 19 At the top you will see four options Home Server Applications and Help Click on Applications and select live Then click T...

Page 33: ..._______ Z3 Technology LLC 100 N 8th St STE 250 Lincoln NE 68508 1369 USA 1 402 323 0702 21 To view the other channels simply change the stream name to d1 or cif 4 Audio and Video start to appear Figur...

Page 34: ...7 1 Run the Web Interface Steps 1 9 in Section 5 0 Select update device firmware from the main screen This brings you to the File Selection Screen From here select the name of the img file to update...

Page 35: ...MI input only Connect the HDMI output as shown below to a HDMI monitor 1 Connect the other end of the HDMI cable to an HD Monitor EXERCISING OTHER FEATURES 9 1 Saving Current Settings If you have a sp...

Page 36: ...screen 6 As soon as you select z3_config1 the screen will reload 7 Change your desired settings 8 Once your changes have been set in this configuration click on the Save button 9 A pop up window appe...

Page 37: ...the HTTP based user interface The steps for using it are shown below 1 In the System Setup tab click on go next to Set Password 2 The change password options appear Enter the new password twice and cl...

Page 38: ...192 168 a b 192 168 0 1 Sets the network gateway to use for the SBE264 DVR 13 Note that a save of these settings and a reboot is needed for changes to this value to take effect When in DHCP mode this...

Page 39: ...ge 37 for more details update device firmware See Section 7 0 download device logs Clicking this causes the SBE264 DVR 13 to extract a set of diagnostic logs that can be sent to Z3 Technology in the e...

Page 40: ...ight Height of encoded picture A small i will appear if interlaced is being encoded Audio Status Channel The channel number 1 2 or 3 Subchannel Always 1 in this release Codec The codec being used to e...

Page 41: ...ked For any SD resolutions NTSC PAL checking this forces the aspect ratio to be 16 9 in the output otherwise a default value of 4 3 is used This value is ignored for HD resolutions Video Resolution 32...

Page 42: ...all three channels can have the same configuration Noise Filter On Off Turns on an optional noise filter This helps reduce noise in high detail areas for example around text The tradeoff is some deta...

Page 43: ...ft as None RTP Port RTP Only 0 9999 8892 8898 If RTP format is selected the port associated with that audio channel Output Format RTP RTSP UDP TSRTP RTMP TSFILE FILE MPTS Output format of encoded stre...

Page 44: ...y 125K 20000K 8000K The rate of the transport stream Normally this value should be set to 1 25 video bitrate audio bitrate This can be set to higher values to allow leeway for times when many bits are...

Page 45: ...activated it is important that they all have the same GOP size and the same maximum delay setting stop Stop current encode session start Start encode session update Can be used to change the bitrate o...

Page 46: ...ed This means a conversion to progressive is done This method allows for a reduction in bits needed processing power without introducing extra jerkiness when there is motion in the video For example i...

Page 47: ...ew in the User Presets tab Save Click on this to save preset value to what was selected Operating Mode Encoder Interlaced Progressive Encode Single Ch No Scale Encode 1 to 3 Ch Decoder This selects ho...

Page 48: ...TMP streaming the following steps are needed 1 Log in to the Wowza Streaming Engine Manager Home page by typing http localhost 8088 where localhost is the IP address of the server in this User s Guide...

Page 49: ...hing are both set to Open and Client Restrictions is set to No client restrictions Then click Save The Wowza server is now configured to work with your encoder Note You can also specify Require passwo...

Page 50: ...ing the Linux PC from the SBE264 DVR 13 Problem Do not see video in VLC Does the IP address set in Dest Address equal the IP address of the PC running VLC Does the port number in Dest Port equal the v...

Reviews: