background image

63


  CONFIDENTIAL                                         

DOC-USR-0239-04 


____________________________________________________________________________________


Z3 Technology, LLC 

 100 N. 8th St. STE 250 

 Lincoln, NE 68508-1369 USA 

 +1.402.323.0702 

(3)


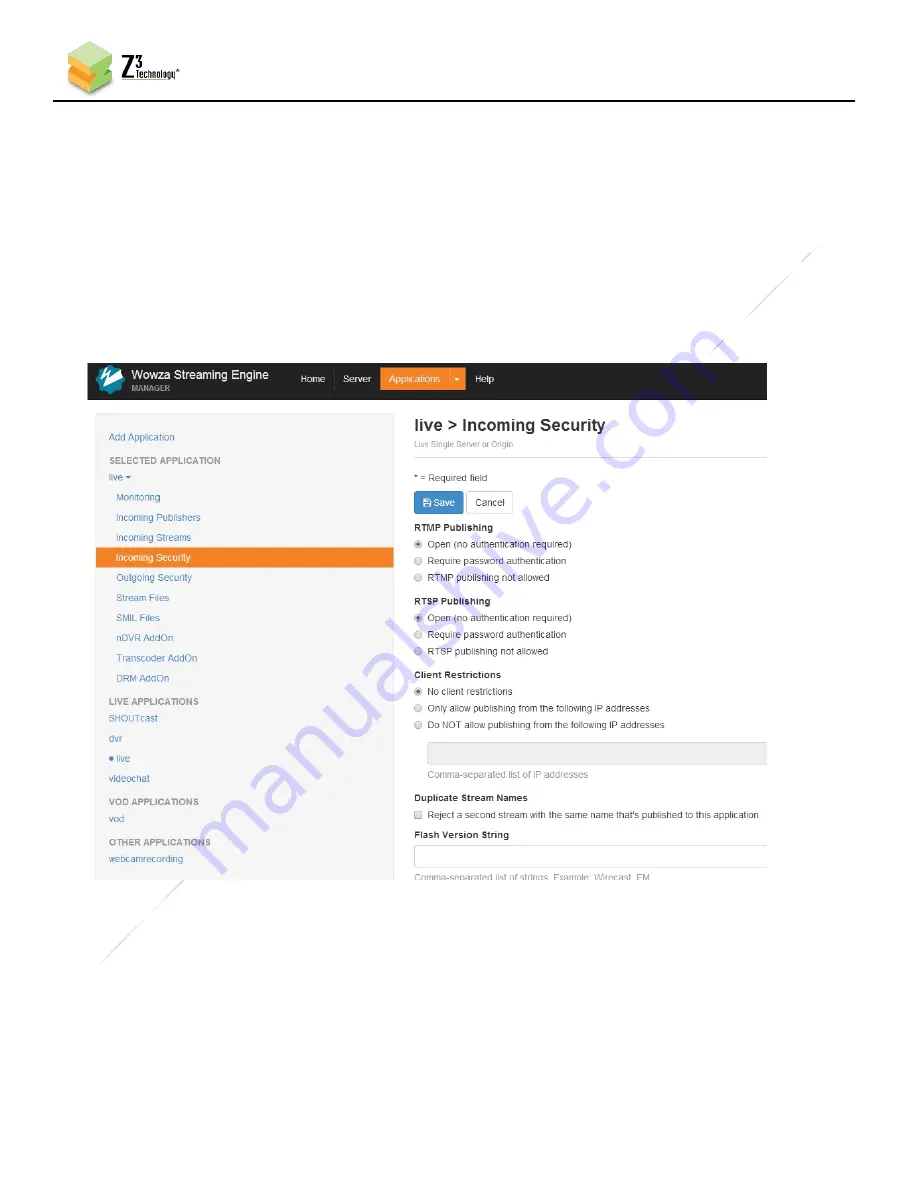
Click on “Applications” in the top band of options.  On the left column, click on “live” and then 

“Incoming Security”.  Click “Edit” and then make sure “RTMP Publishing” and “RTSP Publishing” are 

both set 

to “Open” and “Client Restrictions” is set to “No client restrictions.”  Then click “Save”:


The Wowza server is now configured to work with your Z3 encoder. 


*Note:


You can also specify “Require password authentication” for “RTMP Publishing.”  In this ca

se, 

“Authentication” on the channel tab needs to be enabled and a valid Wowza user name and password needs to be 

entered to successfully access Wowza. 


If you still run into issues, verify the Firewall on your PC with the Wowza server is turned off. 


Figure 52  Wowza Security Settings 

Summary of Contents for Z3-Q603-RPS

Page 1: ...ument contains proprietary information of Z3 Technology LLC Z3 This document may not be used reproduced disclosed or disseminated to anyone without the prior written approval of an authorized representative of Z3 Z3 reserves the right to change this product at any time and without notice All product names trademarks trade names service marks or service names mentioned in this document are the prop...

Page 2: ... Lincoln NE 68508 1369 USA 1 402 323 0702 REVISION HISTORY Version Date Change Note Author 1 0 10 19 2020 Original Document SI 2 0 03 03 2021 Engineering Updates NC 3 0 04 07 2021 4K HD Switch Reboot Note Section 7 0 NC 4 0 05 13 2021 Added operating controls section UART RS485 connections section WiFi Antenna section and thermal management section SD BM ...

Page 3: ...RT AND RS 485 PIN OUTS 13 7 0 WIFI ANTENNA J5 13 8 0 THERMAL MANAGEMENT 14 10 0 UNTARRING AND BUILDING THE SAMPLE CODE 15 10 1 Preparing the Linux Environment 15 10 2 Making the Directories and Running the Make Script 15 11 0 CODE OVERVIEW 17 11 1 codeaurora poky meta z3 17 11 2 Z3 Application Overview 18 12 0 KEL CONNECTIONS 19 12 1 KEL Cable Warning 19 12 2 KEL Connection 19 12 3 4K HD Switching...

Page 4: ...ection 39 13 22 Encoding KLV Stream 41 14 0 PERFORMING OTHER OPERATIONS 42 14 1 Accessing the User Interface using ZFinder 42 14 2 Saving Current Settings 43 14 3 Advanced Settings Mode 44 14 4 Changing the IP Address via the HTTP based User Interface 46 15 0 RUNNING THE CODE YOU BUILT ON THE BOARD 48 15 1 Via User Interface 48 15 2 Via USB using Windows QFIL application 48 16 0 SUMMARY OF OPTIONS...

Page 5: ... 20 VLC Open Network Screen for RTSP 30 Figure 21 Example of Encoded Video Streaming to VLC RTSP 30 Figure 22 Example Settings for RTMP Encode 31 Figure 23 Getting to the Wowza Test Player 32 Figure 24 Viewing Content on Wowza 33 Figure 25 Composite Adapter Cable 34 Figure 26 Channel 1 Tab Composite Encode 34 Figure 27 Viewing Bitrate in VLC 35 Figure 28 Changing the Bitrate Dynamically 35 Figure ...

Page 6: ...ogy LLC 100 N 8th St STE 250 Lincoln NE 68508 1369 USA 1 402 323 0702 Figure 47 Select XML file 51 Figure 48 Select Patch File dialog prompt 51 Figure 49 QFIL application write image 52 Figure 50 Download Succeed and Finish Download in Status field 53 Figure 51 Wowza Performance Settings 62 Figure 52 Wowza Security Settings 63 ...

Page 7: ... 264 and MJPEG encode and decode in resolutions up to 2160p at 30 fps The hardware consists of one Z3 Q603 MOD System on Module card with one Z3 Q603 APP 0x application board and an IO Connector board The software consists of Qualcomm processor and application packages to allow users to develop their own advanced multimedia applications The Z3 Q603 MOD PCB 0101 20 is a compact OEM module which sup...

Page 8: ...S 485 UART and RS 232 serial The Z3 Q603 RPS software is based on the Linux OS The kit comes with all of the low level resources such as the Linux kernel u boot tool chain and starter file system pre integrated and configured The software bundle also contains tools to allow the development of high level applications using hardware accelerated video processing Those customers that license the optio...

Page 9: ...____________________________________________________________ Z3 Technology LLC 100 N 8th St STE 250 Lincoln NE 68508 1369 USA 1 402 323 0702 The following figure shows a block diagram of the Z3 Q603 RPS system Figure 4 Z3 Q603 RPS Block Diagram not enabled ...

Page 10: ...o MPEG Forward Error Correction FEC Zixi Feeder or KLV data are also described 2 3 If You Already Have a System from Z3 and Need to Update the Firmware There are several options for updating the firmware on your RPS by following the instructions in Section 15 0 RUNNING THE CODE YOU BUILT ON THE BOARD on page 48 2 4 If You are Ready to Start Development Details on how to untar and build the code ca...

Page 11: ... CONTENTS 1 x Z3 Q603 RPS 1 x 12V1A Power Supply 1 x Serial Cable 1 x Null Modem Adapter 4 0 OPERATING CONTROLS 1 1 Gb Ethernet 6 Micro HDMI Out not enabled 2 RS 232 Serial 7 Micro HDMI In 3 UART Connection 8 Power Status LED 4 12V1A Power Connection 9 Board reset button 5 J19 Not enabled 10 USB 3 1 type C 11 RS 485 See section 6 0 for pin out details 1 2 4 3 5 6 7 8 9 10 11 Figure 5 Z3 Q603 RPS I...

Page 12: ...ns bitrates codecs or output formats Supports unicast and multicast streaming Supports on the fly bitrate changes HTTP based configuration software for user friendly configuration control and update RS 232 serial port for technical configuration and control WiFi 802 11am dual band 4 33 Mbps Bluetooth 5 0 Power Consumption 5W Typical Encoder Size 50 x 40 x 38 mm Encoder Weight 76g 5 1 Supported Inp...

Page 13: ...6 UART J5 pin outs The RS 485 interface connector J4 connects to dev ttyHS2 See figure below Figure 7 RS 485 J4 pin outs 7 0 WIFI ANTENNA J5 J5 is a low profile UMCC MHF type connector intended for connecting an external WiFi antenna This connector is located on the Q603 MOD PCB 0101 20 The module does not have an on board antenna for the WiFi so one must be connected here if the WiFi function is ...

Page 14: ...or thermal sink The aluminum block is not efficient at radiating the heat from the CPU to air it must be thermally connected to a device that can dissipate the thermal energy The FPGA chip must also be managed carefully This chip is located in the Application board which is the PCB in the middle of the stack making its thermal management particularly important and a little bit challenging The syst...

Page 15: ...tories and Running the Make Script The software provided will allow you to re create the pre installed software of the Z3 Q603 RPS starting from the included code On a PC running Linux create a directory where the released materials are going to be located mkdir home z3 q603 rps Copy the released tar archive to that directory note the name may slightly vary cp SW Q03 01015 01_20201222 tar bz2 home...

Page 16: ...____________________________________________________________________________________ Z3 Technology LLC 100 N 8th St STE 250 Lincoln NE 68508 1369 USA 1 402 323 0702 Figure 9 Sample Content of Images Directory after Successful Build 1 ...

Page 17: ...top service name systemctl start service name systemctl restart service name Note that once a service is started you must run systemctl restart service name to start it again the start action will do nothing if it has already been started Service Name Description mcsenc service Z3 streaming encode application z3_onvif service Z3 ONVIF server haproxy service Z3 web proxy service factory console ser...

Page 18: ...rver z3 uart UART Firmware z3 webgui HTML and Javascript web interface source 11 1 2 recipes z3 basefs files z3 basefs 0 0 1 opt z3scripts This directory contains the control scripts for the serial user interface and HTTP based web user interface 11 2 Z3 Application Overview 11 2 1 Application Names and Locations The application binary can be found at opt mcsenc 11 2 2 Application Source Code Appl...

Page 19: ...mera WARNING If a 4K KEL camera is plugged into the HD KEL connector on the Q603 RPS it will destroy the Q603 RPS and the camera This is also true if a HD KEL camera is plugged into the 4K KEL connector on the Q603 RPS These actions VOID warranty Figure 10 KEL Cable Connection Warning 12 2 KEL Connection 1 Connect the KEL ribbon cable to the Sony block camera Gold teeth face up 2 Connect the other...

Page 20: ...__________ Z3 Technology LLC 100 N 8th St STE 250 Lincoln NE 68508 1369 USA 1 402 323 0702 Figure 11 KEL Connection to Q603 RPS 12 3 4K HD Switching Reboot Note 2160p Camera Blocks When switching between 4k and HD or HD and 4k monitoring mode on the Camera tab click on save setting and a reboot is required ...

Page 21: ...ment 13 1 Set up the Video Source 1 Select a 4K or HD source with non HDCP HDMI output in Z3 s testing the Brite View BV 5005HD is used Power on the 4K or HD Source Connect HDMI to a monitor Set the 4K or HD Source to 2160p 1080p or 1080i output If your source is a media player select content you would like to stream If you see playback on the monitor you ve confirmed the source works 13 2 Connect...

Page 22: ...rlaced fields You may also use Z3 H 265 Decoder products to play back the H 265 interlaced streams The interlaced stream will be detected automatically 13 3 Set up the Terminal Window 1 If you are running from a Windows PC we recommend running TeraTerm for serial configuration and monitoring Select Setup Serial Port and use the following settings Port Whichever serial port the port is connected to...

Page 23: ...ave the same first two parts of the IP address For example if the board has an IP address of 192 168 0 120 your PC would need to have an address of 192 168 x y where x y is anything but 0 120 and not conflicting with what is on your current network 1 Ensure that this is the case If necessary use the P and N options to modify the address network of the board to conform to your network Note The firs...

Page 24: ... encoding 1 If necessary click on the Stop button in the Channel Controls section of the user interface CH1 tab or the Stop All button in the lower right corner of the screen of any tab 2 In the CH1 tab verify the Video Source is set to HDMI using the dropdown menu 3 Change Output Resolution to 1920x1080 or Follow Input 4 Select the codec you would like to use for your encoding Both H 265 HEVC and...

Page 25: ...______ Z3 Technology LLC 100 N 8th St STE 250 Lincoln NE 68508 1369 USA 1 402 323 0702 Figure 14 CH1 Tab UDP Configuration 5 Change to UDP 1 If necessary click Stop 8 Click Start 2 Verify Is HDMI 3 Change to 1920x1080 or Follow input 4 Verify Is H265 HEVC 6 Set to PC IP Address or Multicast Address 7 Note value ...

Page 26: ...C media player on your PC 2 Select Media Open Network Stream In the box type udp 192 168 0 6 8600 where 192 168 0 6 matches the values of the computer IP address or multicast address entered for Dest Address previously and 8600 is the value of Dest Port noted previously 3 Press Enter or click Play 4 You will now see your source video streaming to VLC Figure 16 Example of Encoded Video Streaming to...

Page 27: ...t Resolution to 1920x1080 or Follow Input 5 Select the codec you would like to use for your encoding Both H 265 HEVC and H 264 AVC are supported In the pictured example Video Codec is set to H265 HEVC in the dropdown menu 6 Verify the codec under Audio Info is set to the codec you would like to use for your encoding Both AACHE and AACHEv2 are supported In the pictured example Codec is set to ARM A...

Page 28: ...r Z3 account 1 Open VLC media player 2 Select Media Open File 3 In the file type dropdown menu select All Files 4 Find and select the SDP file corresponding to the video and audio codec you selected previously a H265 HEVC video AACHE audio use the SDP file entitled z3 netra_h265_aache sdp b H265 HEVC video AACHEv2 audio use the SDP file entitled z3 netra_h265_aachev2 sdp c H264 AVC no audio use th...

Page 29: ...any tab 3 At the CH1 tab verify the Video Source is set to HDMI using the dropdown menu 4 Verify Output Resolution to 1920x1080 or Follow Input 5 Select the codec you would like to use for your encoding Both H 265 HEVC and H 264 AVC are supported In the pictured example Video Codec is set to H265 HEVC in the dropdown menu 6 Set Output Format to RTSP Note By default a limited selection of video enc...

Page 30: ...s is the IP address of the Z3 Q603 RPS default 192 168 0 120 ch is 1 for CH1 and m is added if a multicast address is being streamed For example if the IP address of the Z3 Q603 RPS is the default value of 192 168 0 120 encode is being done from CH1 and unicast streaming is being done the user would type in rtsp 192 168 0 120 z3 1 mp4 Note VLC version 2 1 5 or later is needed for RTSP support 3 Pr...

Page 31: ...en of any tab 3 At the CH1 Tab set Output Format to RTMP 4 The Dest Address textbox should be formatted as IP_address port application stream_name where the IP address is the address of the PC with the Wowza server installed port refers to the port used on this PC application will need to match the application used in Wowza and the stream name is of your choosing For the pictured example enter 192...

Page 32: ...n the Wowza Streaming Engine to View RTMP Stream 1 Go to a PC that is on the same network as the Wowza server and open a web browser in this example FireFox is used Type in the URL of the Wowza server with the port 1935 in this example 192 168 0 4 1935 This will bring up the Wowza home page Log in with your user name and password 2 At the top you will see four options Home Server Applications and ...

Page 33: ... 402 323 0702 3 You should see the Test Players popup screen Select the Adobe RTMP tab change the Stream name to 1080 should match the directory you are streaming to in the Z3 MVE 250 and click Start You will then see the content streamed from your Z3 product Figure 24 Viewing Content on Wowza 1 Select Adobe RTMP tab 2 Type stream name 3 Click Start 4 Audio and Video start to appear ...

Page 34: ...nnect the red and white connectors to the analog audio outputs of your video source 3 Connect black connector to A V In on the RPS 4 Return to the user interface 5 If necessary click on the Stop button in the Channel Controls section of the user interface CH1 tab or the Stop All button in the lower right corner of the screen of any tab 6 At the CH1 tab change the Video Source to Composite using th...

Page 35: ...s currently encoding and streaming to the VLC media player 2 In VLC click on Tools and select Codec Information 3 Select the Statistics tab In this tab you can see the current video audio bitrate 4 Changing the bitrate is supported through serial control Return to your serial terminal enter D and press enter to display dynamic options 5 Enter 1 and press enter to select the Bitrate option 6 Change...

Page 36: ...chnology LLC 100 N 8th St STE 250 Lincoln NE 68508 1369 USA 1 402 323 0702 7 Enter B for the Update Bitrate option and press enter to set the new bitrate 8 You will see the quality of the encoded video in VLC change and the video bitrate drop Figure 29 Drop in Bitrate after Dynamic Bitrate Change Lower video audio bitrate ...

Page 37: ...e connected to the Micro SD card in ts or mp4 file format 1 Insert a microSD card into the microSD slot on the front of the unit Note The microSD card must be formatted in either FAT32 VFAT EXT3 or EXT4 format 2 If necessary click on the Stop button in the lower right corner of the screen of the user interface CH1 tab 3 Verify the settings under Encoder Setup match your video source 4 Under Output...

Page 38: ...player Note The PC should be at least a quadcore or 8 core PC If the PC is too slow frame skips and possibly video artifacts will be observed upon playback VLC should be version 2 1 3 or newer 13 20 Simultaneous Stream and Record When streaming UDP or TSRTP the TS stream can be simultaneously saved to a file on a microSD storage device 1 Connect and configure the encoder Output Format to output UD...

Page 39: ...trols section of the user interface CH1 tab or the Stop All button in the lower right corner of the screen of any tab 4 Set Output Format to ZIXI 5 Set the Dest Address to address port streamid where a address is the IP address of the decoder b port is the port of the decoder c streamid is any stream ID or name you select for example 192 168 0 6 2088 z3 6 The Zixi percent overhead can be adjusted ...

Page 40: ...at the FEC Enable dropdown will become visible Change the value for FEC Enable to True 5 This will allow for setting the number of FEC columns and rows The default setting is 5x1 This is a medium level of coverage that will work in many situations The number of columns multiplied by the number of rows must be less than or equal to 100 so 10x10 would be an example of the maximum coverage Keep in mi...

Page 41: ...lect TRUE from the KLV Enable drop down This will reveal the KLV Pid KLV Bitrate KLV Mode and KLV source settings 4 Set the desired PID value Most applications will dynamically find any PID with KLV The default KLV bitrate of 1000 bps is usually sufficient If a higher data rate is expected set the bitrate higher 5 Set the KLV Mode to SERIAL The other option is FILE which will take a binary file of...

Page 42: ...3 systems connected to the network In this case the Z3 Q603 RPS appears 3 Click on the Z3 Q603 RPS entry in the window to select it This will cause the Edit Device Open Device and Flash LEDs boxes to activate Figure 35 ZFinder with Z3 Q603 RPS Selected Note Selecting Edit Device allows for manual changes to network settings including the Device Name IP Address Netmask and Gateway address Selecting...

Page 43: ...the preset dropdown menu at the bottom of the screen 5 As soon as you select a new preset the screen will reload 6 Change your desired settings 7 Once your changes have been set in this configuration click on the Save button 8 A pop up window appears to confirm the saving of these settings is complete Click OK Note The very first time settings are saved may take up to 30 seconds This is due to som...

Page 44: ...n visible To do this see Section 14 2 Saving Current Settings 2 Return to the System Setup tab 3 Select your newly created configuration from the preset dropdown menu at the bottom of the screen 4 As soon as you select your preset the screen will reload 14 3 2 Access Advanced Settings 1 Under Device Setup check the Advanced Settings box 2 Click on the Save button 3 A pop up window appears with a m...

Page 45: ..._____________ Z3 Technology LLC 100 N 8th St STE 250 Lincoln NE 68508 1369 USA 1 402 323 0702 5 You can return to the use of limited settings by un checking the Advanced Settings box in the System Setup tab and saving that to the preset Figure 40 Default UDP Settings Left and Advanced UDP Settings Right ...

Page 46: ...iguration so that the manual networking settings are used the next time the system boots up To do this see Section 14 2 2 Select your newly created configuration from the preset dropdown menu at the bottom of the screen As soon as you select your configuration the screen will reload 3 Return to the System Setup tab 4 Enter in your desired network settings including Local IP Address Local Netmask D...

Page 47: ...ndow pops up reminding the user that for changes to IP Address Netmask Gateway to take effect a reboot is required and asking if a reboot is desired Click Ok and then Ok to the Are you sure window after that to start rebooting Note The very first time settings are saved it may take up to 30 seconds This is due to some flash initialization which occurs on the very first configuration save Figure 42...

Page 48: ...on from the System Setup tab 3 This brings you to the update image screen In this screen click on the Choose File button 4 This brings you to the File Selection Screen Navigate to the img file to update with and click Open 5 Click on Upload and Update 6 You will see screens stating that the image is being uploaded and that the flash is being updated After about one minute you should see the main m...

Page 49: ... build host to the Windows QFIL machine 2 Power the Z3 board while holding reset button to place the board in edl mode and connect the USB Type C to your Windows computer Open QFIL application Part of QPST install Figure 45 Open QFIL Application 3 Upon opening QFIL should find your board within a few seconds If the board is not found click on select serial port Note you may have to manually find t...

Page 50: ..._______________________________ Z3 Technology LLC 100 N 8th St STE 250 Lincoln NE 68508 1369 USA 1 402 323 0702 Figure 46 QFIL Select Flat Build 4 Select the Flat Build radio button under Select Build Type Under Select Programmer browse to flat_image prog_firehose_ddr elf and click Open ...

Page 51: ...______________ Z3 Technology LLC 100 N 8th St STE 250 Lincoln NE 68508 1369 USA 1 402 323 0702 5 Click Load XML and select rawprogram_unsparse xml and click Open Figure 47 Select XML file 6 A Select Patch File dialog will show up Select patch0 xml and click Open Figure 48 Select Patch File dialog prompt ...

Page 52: ...______________________ Z3 Technology LLC 100 N 8th St STE 250 Lincoln NE 68508 1369 USA 1 402 323 0702 7 The QFIL application is now ready to write the image to the board Click Download to write the image to the board It will take about a minute to complete Figure 49 QFIL application write image ...

Page 53: ...y LLC 100 N 8th St STE 250 Lincoln NE 68508 1369 USA 1 402 323 0702 8 When programming is complete you will see Download Succeed and Finish Download messages display in the Status field Figure 50 Download Succeed and Finish Download in Status field 9 Disconnect the USB and the 12V power Re connect the 12V power to boot the board ...

Page 54: ...b c d 8 8 8 8 Used to specify the DNS server for hostname lookup when in static IP mode DNS Server IP 2 e f g h 8 8 4 4 Used to specify the secondary DNS server for hostname lookup when in static IP mode Use DHCP Checked Unchecked Sets whether DHCP is used to dynamically obtain an IP address at start up Device Setup Auto Start Checked Unchecked Check this box to set the system to automatically sta...

Page 55: ...ames per second of encoder Actual FPS Actual frames per second being encoded Key frame FPS of key frames per second for example a value of 0 5 means a key frame is inserted every two seconds Width Width of encoded picture Height Height of encoded picture A small i will appear if interlaced is being encoded Audio Status Channel The channel number 1 3 Subchannel Always 1 in this release Codec The co...

Page 56: ... Video Codec H265 HEVC H264 AVC MJPEG Selects the codec used for compression of the output video stream MJPEG is only available when RTP or RTSP are selected as the Output format Video Profile H264 AVC Only High Main Baseline The H 264 profile of the bitstream Generally High is used for 1080p or greater Main for D1 and Baseline for less than D1 Video Rate Control VBR CBR Selects the encoder rate c...

Page 57: ...ults The bitrate range for AACHE and AACHE V2 is 32 64 Kbps Rtp Port RTP Only 0 9999 8700 Destination port for RTP audio Pid UDP TSRTP TSFILE ZIXI Only 0 8191 120 Audio PID for transport stream Max PTS PCR UDP TSRTP TSFILE ZIXI Only 0 8191 250 Maximum difference between the PTS and PCR in the audio stream It is generally recommended to leave this value at 250 Certain decoders may require a value s...

Page 58: ... Textbox to enter desired file name for ts file Entered text will be followed by a number starting with zero in the recorded file name Max File Size TSFILE Aux TS File Only 1024M Sets the file size at which a new ts file is started Video PID UDP TSRTP TSFILE Only 0 8191 221 PID assigned to video in the TS stream PCR PID UDP TSRTP TSFILE Only 0 8191 521 PID assigned to PCR in the TS stream PCR Inte...

Page 59: ...electing True allows for entering valid Zixi user credentials User ID ZIXI Only Allows for entering valid Zixi user ID Zixi Overhead ZIXI Only 1 100 Adjust Zixi percent overhead KLV Enable True False Enables the capture and insertion of KLV data into the bitstream KLV Pid 0 8191 35 PID assigned to the KLV stream in the TS stream KLV Bitrate 100 1M Expected bit rate of the KLV stream KLV Mode SDI F...

Page 60: ...s done This method allows for a reduction in bits needed processing power without introducing extra jerkiness when there is motion in the video For example if the input is 1080i at 60 fields per second 30 frames per second Frame Rate Divider has the following effect Frame Rate Output fields used frame rate Full 1080i 60 30 Half 1080p 30 30 Quarter 1080p 15 15 Sixth 1080p 10 10 Note 3 GOP Sizes Sup...

Page 61: ...ure resolution 3840x2160 resizing will occur Video Bitrate 2K 40M 2M Textbox for entering video bitrate 16 6 Values Appearing at the Bottom of All Tabs Parameter Options default in bold Notes preset encoder any user defined profiles new preset The preset configuration file selected for use encoder factory defaults Create more profiles by selecting new preset Save Button Click to save preset value ...

Page 62: ... from your encoder the following steps are needed 1 Log in to the Wowza Streaming Engine Manager Home page by typing http localhost 8088 where localhost is the IP address of the server in this User s Guide 192 168 0 4 2 Click on Server in the top band of options On the left column click on Performance Tuning and then Java Settings Click Edit and then change Java Heap Size to Production Level and J...

Page 63: ...ishing and RTSP Publishing are both set to Open and Client Restrictions is set to No client restrictions Then click Save The Wowza server is now configured to work with your Z3 encoder Note You can also specify Require password authentication for RTMP Publishing In this case Authentication on the channel tab needs to be enabled and a valid Wowza user name and password needs to be entered to succes...

Page 64: ...s 4 We recommend setting this value to 2x the number of processors on the build machine PARALLEL_MAKE can be set in the users bashrc Pre download codeaurora The open source code for this platform is provided via codeaurora The initial make universe for any of our releases will repo sync this code over the network which can take time To avoid doing this more than once we have provided a way to use ...

Page 65: ...outers etc Can the PC and target board see each other on the network Try pinging the encoder IP address from the PC Try pinging the PC from the encoder Problem Do not see video in VLC UDP Does the IP address set in Dest Address equal the IP address of the PC running VLC Does the port number in Dest Port equal the value entered in the URL for VLC Was included in the UDP address for VLC Is the PC fa...

Page 66: ... 16530D5E920F5C65 Repo Maintainer repo android kernel org not changed gpg key 67B7E448692B382C public key Conley Owens cco3 android com imported gpg Total number processed 2 gpg imported 1 gpg unchanged 1 Get https gerrit googlesource com git repo clone bundle Get https gerrit googlesource com git repo remote Counting objects 3 done remote Finding sources 100 63 63 remote Total 63 delta 29 reused ...

Page 67: ...ne 289 in _ConfigureUser name self _Prompt Your Name mp UserName File home z3 workspace SW Q01 01015 08 z3 QCS SW Q01 01015 08 20210301 codeaurora repo repo project py line 650 in UserName self _LoadUserIdentity File home z3 workspace SW Q01 01015 08 z3 QCS SW Q01 01015 08 20210301 codeaurora repo repo project py line 663 in _LoadUserIdentity u self bare_git var GIT_COMMITTER_IDENT File home z3 wo...

Page 68: ...ted Warranty will be void if the label on the hardware bearing the Serial Number is removed tampered with or defaced You can view Z3 Technology s full hardware warranty at https z3technology com support warranty To submit a warranty claim complete a Return Material Authorization RMA request form online at https z3technology com support report rma Your receipt or invoice with the original purchase ...

Reviews: