background image

41


CONFIDENTIAL     


DOC-USR-0045-05 


____________________________________________________________________________________


Z3 Technology, LLC 

 100 N. 8th St. STE 250 

 Lincoln, NE 68508-1369 USA 

 +1.402.323.0702 

(g)


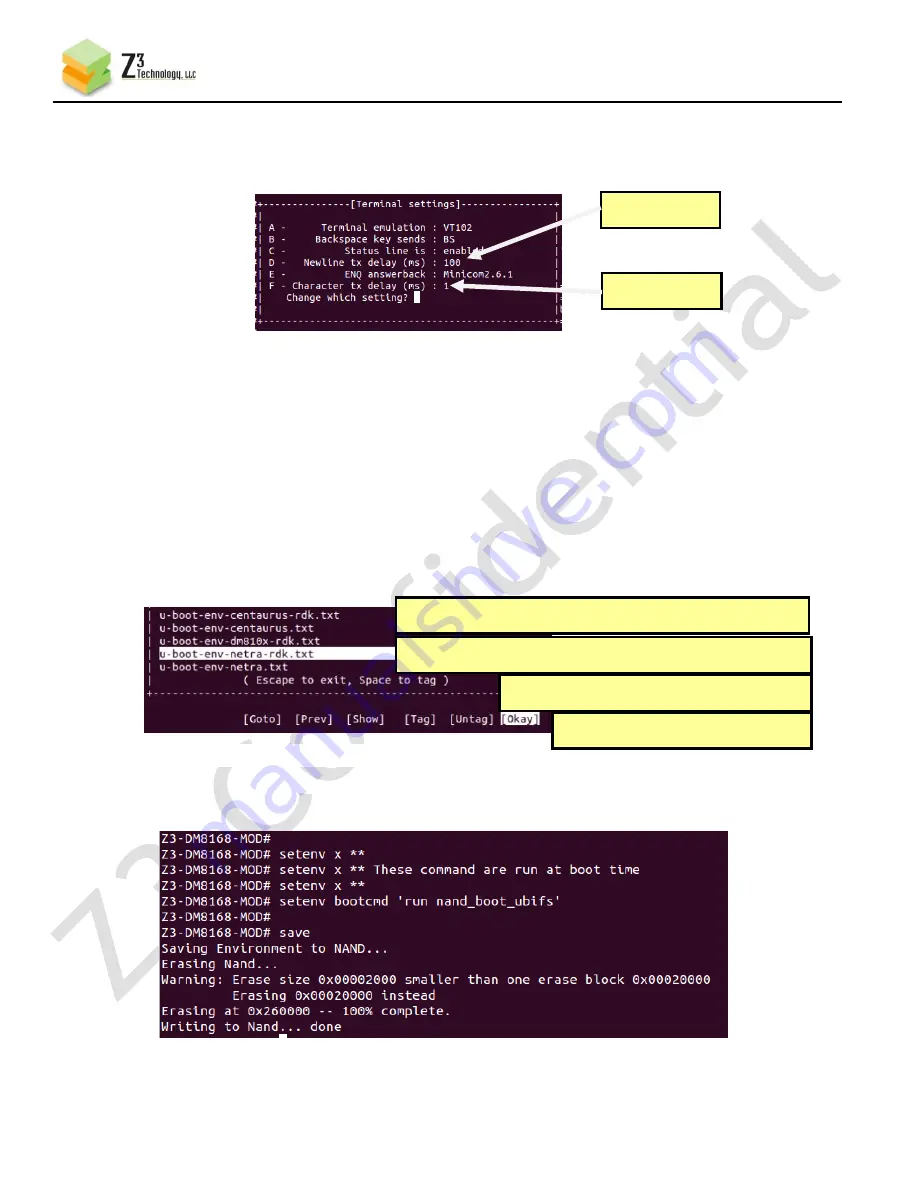
Now set up your terminal program to take input from a file.  If you are using minicom, type 
<ctl-A>, then Z.  This should bring up the minicom Command Summary.  From here, type “T” 
to bring up the “Terminal Settings” window.  From here, set “Newline tx delay (ms)” (option 
D) to 100, and “Character tx delay (ms)” (option F) to 1:


(h)


Press <return> to save your terminal settings.


(i)


The next step is to read in the u-boot environment file you just modified.  If you are using 
minicom, type <ctl-A> and Z to bring up the Command Summary.  Then type “Y” for “Paste 
file.”


(j)


This should bring up the “Select file for upload” window pointing to your home directory.  
From here, use the up and down arrow keys to scroll down and select the “u-boot-env-netra-
rdk.txt” file you modified and then copied in step (4e).  Press the space bar to tag the file.  
Then, use the left and right arrow keys to select “Okay”.  Press <return>. 


You should then see a series of commands being pasted on run within u-boot.  The very last 
line should say “Writing to Nand… done” 


Figure 36  Minicom Terminal Settings 

Change to 
100 

Change to 1 

Figure 37  Minicom Paste File Selection 

Figure 38  Example of Successful u-boot Configuration 

(1) Use <up> and <down> to select u-boot file 

(2) Press Space to tag 

(3) Use <left> and <right> to select Okay 

(4) Press Return 

Summary of Contents for Z3-DM8169-4K-RPS

Page 1: ...e use This document contains proprietary and confidential information of Z3 Technology LLC Z3 This document may not be used reproduced disclosed or disseminated to anyone without the prior written approval of an authorized representative of Z3 Z3 Technology LLC incorporates HDMI technology The terms of HDMI and HDMI High Definition Multimedia Interface and the HDMI Logo are trademarks or registere...

Page 2: ...7 11 24 2014 Modified App board picture in Section 1 Added Quick Start Section in Section 2 0 Added Included Parts List in Section 3 0 Added Untarring and Building the Code in Section 5 0 Added Code Overview in Section 6 0 Added details on streaming UDP and RTP in Sections 7 9 and 7 10 Added sections 8 to 10 Updated screenshots Made document more robust RC 2 01 47a 12 15 2014 Added block diagram i...

Page 3: ...and Running the Make Script 11 6 0 CODE OVERVIEW 13 6 1 The z3apps rdk directory 13 6 1 1 rdk_demo 13 6 1 2 z3_mcfw_api 13 6 1 3 z3 14 6 2 Z3 Application Overview 14 6 2 1 Application Names and Locations 14 6 2 2 Application Options and Arguments 14 6 2 3 Application Source Code 14 6 3 RDK documentation 15 7 0 RUNNING THE Z3 DM8169 4K RPS ENCODER 17 7 1 Prepare the 4K Source 17 7 2 Connect the Z3 ...

Page 4: ... FEATURES 36 10 0 RUNNING THE CODE YOU BUILT ON THE BOARD 37 10 1 Method 1 Updating the Image File 37 10 2 Method 2 Running Your Code through TFTP NFS 39 10 3 Other Available u boot Commands 42 11 0 USING THE PASSWORD FEATURE 43 12 0 SUMMARY OF OPTIONS 45 12 1 The System Setup Tab 45 12 2 The User Presets Tab 46 12 3 The Status Tab 46 12 4 The MPTS Tab 47 12 5 The CH1 Tab Encode Options 48 12 6 Th...

Page 5: ... VLC RTP 25 Figure 16 Tuning for Various Use Cases 26 Figure 17 The User Presets Tab 27 Figure 18 Entering a User Preset Name 27 Figure 19 Selecting z3_test within the System Setup Tab 27 Figure 20 Setting DHCP within z3_test 28 Figure 21 Saving a User Preset 28 Figure 22 Reboot Reminder for Changing IP Settings 29 Figure 23 New IP Address through Serial UI 29 Figure 24 ZFinder with DM8169 4K RPS ...

Page 6: ...M8169 APP 6X application board The software bundle consists of the necessary components for developing advanced multimedia graphics and DSP applications The Z3 DM8169 MOD 4K is a compact OEM module It is well suited for applications such as broadcast video encoding and decoding digital signage and video kiosks medical and industrial video video conference terminals and MCUs and high definition emb...

Page 7: ...al functions not present in the base module The Z3 DM8169 APP 6X application board has 1 HDMI input 1 HDMI output 1 Gigabit Ethernet connection 2 USB ports 1 SATA port 3 bi color LEDs for status and a JTAG header to access the module s on board MSP430 processor Figure 2 below shows the Z3 DM8169 APP 6X application board Software licensing additional design services and support are available from Z...

Page 8: ..._______________________________________________________________ Z3 Technology LLC 100 N 8th St STE 250 Lincoln NE 68508 1369 USA 1 402 323 0702 The figure below shows a block diagram of the Z3 DM8169 4K RPS system Figure 3 Z3 DM8169 4K RPS Block Diagram ...

Page 9: ...tection is described in Section 11 0 USING THE PASSWORD FEATURE on page 43 Finally a summary of each parameter that can be configured in the GUI is given in Section 12 0 SUMMARY OF OPTIONS on page 45 2 2 If You Already Have a System from Z3 and Need to Update the Firmware You can update the firmware via the web GUI interface by following the instructions in Section 10 1 Method 1 Updating the Image...

Page 10: ...following features Encode at 3840 x 2160 at 30fps H264 AAC 29 97 25 23 98fps capture also supported 4K HDMI Input Output to MPEG 2 TS or RTP stream through GigE Ethernet Multicast or Unicast streaming Optional output to ts file on USB Bit rate and frame rate changes without stopping restarting encoder Web based configuration software for user friendly configuration control and update Operating tem...

Page 11: ... can determine whether your OS is 64 bit by using the uname p command A 64 bit OS will return x86_64 while a 32 bit OS will return i386 i586 or i686 For 64 bit Ubuntu you can get the necessary libraries by typing sudo apt get install ia32 libs For 64 bit Fedora you can type sudo yum install glibc i686 5 2 Making the Directories and Running the Make Script The software provided will allow you to re...

Page 12: ...oln NE 68508 1369 USA 1 402 323 0702 The outcome of the build process should be newly created image files in the images directory You can confirm this by doing the following cd images ls alt The result should be something like the following Note that actual filenames dates and times will differ Figure 5 Sample Content of Images Directory after Successful Build ...

Page 13: ...his binary is built from the dvr rdk directory The code for the binary resides in z3apps rdk rdk_demo The z3apps rdk directory is described in more detail in the next section 6 1 The z3apps rdk directory There are 3 main subdirectories rdk_demo z3_mcfw_api and z3 6 1 1 rdk_demo This directory contains the code for the various modes that Z3 s boards are able to run in The encoder setup is done in d...

Page 14: ...menu based demo uses an ini file This ini file is built in the script run sh and stored in tmp encode ini Once called with the ini file the menu based demo presents to the user a menu of demos Most ini files are geared towards a specific demo The easiest way to get a valid ini file is to run the script with the settings you want and then copy the generated ini out of tmp and save it The command li...

Page 15: ...ernal_Device pdf DM81xx_DVR_RDK_Customer_Display_Resolution pdf DM81xx_DVR_RDK_Debug_Statistics pdf DM81xx_DVR_RDK_Display_Output_Configuration pdf DM81xx_DVR_RDK_Ethernet_Offload_Driver pdf DM81xx_DVR_RDK_External_Video_Device_Configuration pdf DM81xx_DVR_RDK_Flash_File_FS pdf DM81xx_DVR_RDK_Graphics_Using_FBDev pdf DM81xx_DVR_RDK_HDMI_Control_Notes pdf DM81xx_DVR_RDK_Memory_Map pdf DM81xx_DVR_RD...

Page 16: ...Guide_16D1_DVR pdf DM816x_DVR_RDK_UseCaseGuide_32D1_Decode_Display pdf DM816x_DVR_RDK_UseCaseGuide_SD_HD_Encode_Card pdf DM81xx_DVR_RDK_Interlace_UseCaseGuide pdf UserGuides DM8168_DVR_RDK_GUI_Guide pdf DM816x_FAPLL xls DM81xx_DVR_RDK_Demo_Guide pdf DM81xx_DVR_RDK_FAQs pdf DM81xx_DVR_RDK_IPC_Bits_Out_Host pdf DM81xx_DVR_RDK_Migration_Guide pdf DM81xx_DVR_RDK_Overview pdf DM81xx_DVR_RDK_PSP_Arago p...

Page 17: ...al cable and NULL modem adapter to your PC 3 Take the HDMI 1 4 cable from step 1 and connect it to HDMI In on the Z3 DM8169 4K RPS 4 Connect an Ethernet cable to the Ethernet jack on the Z3 DM8169 4K RPS Connect the other end of the Ethernet cable directly to a PC or to a hub connected to a PC You will use this PC to control the Z3 DM8169 4K RPS 5 Take a USB 3 0 drive that the encoder will write t...

Page 18: ...ta Parity Stop 115200 8 bit None 1 bit Flow Control None 7 If you are running from Linux type sudo minicom s And then configure by doing the following Select Serial Port Setup Ensure the right Serial Device is specified typically dev ttyUSB0 Set option E Bps Par Bits to 115200 8N1 press return and then Exit 7 4 Power on the Board 8 Connect the 12V power supply 9 Turn on the power switch 10 You sho...

Page 19: ... with whatever is on your current network Ensure that this is the case If necessary use the P and N options in the RPS menu to modify the address network mask of the board to conform to your network Note that the first 2 parts being the same are based on a netmask of 255 255 0 0 If netmask were 255 255 255 0 then the first 3 parts of the IP address would have to be the same 7 6 Run the Web Interfa...

Page 20: ...ut Format to TSFILE 17 In Dest Address type in the name of the file to save to example media sda1 test_4k2k ts to save to file test_4k2k ts on USB1 18 Check if the encoder has already autostarted the encoder will autostart if it senses a valid input and 20 seconds have elapsed since the Z3 DM8169 4K RPS came up If it has autostarted click on stop The status will then change to STOPPED 19 Click on ...

Page 21: ...has stopped 23 Remove the USB drive from the Z3 DM8169 4K RPS and connect to a PC Note The PC should be at least a quadcore or 8 core PC If the PC is too slow frame skips and possibly video artifacts will be observed upon playback 24 On the PC open VLC version 2 1 3 or newer 25 Select Media Open File Select test_4k2k ts on the USB drive You should now be able to see encoded 4K video playing on the...

Page 22: ...DP To do this complete the following steps 26 Change Output Format to UDP 27 Change Dest Address to the IP address of the PC you are streaming to for example a typical default value is 192 168 0 6 28 Change Dest Port to 5004 29 Click start 30 After your changes the CH1 tab should have the following settings 1 Change Output Format to UDP 2 Change Dest Address to IP address of PC being streamed to 3...

Page 23: ...NE 68508 1369 USA 1 402 323 0702 31 Run VLC on your PC version used in testing at Z3 2 1 3 32 Select Media Open Network Stream In the box type udp 192 168 0 6 5004 where 192 168 0 6 is the IP address of your PC 33 Press Play 34 You should now see 4K video streaming to VLC Figure 12 VLC Open Network Screen for UDP Figure 13 Example of Z3 Video Streaming to VLC UDP ...

Page 24: ...llowing steps 35 Click stop to abort any previous encoding runs 36 Change Output Format to RTP 37 Change Dest Address to the IP address of the PC you are streaming to For example a typical default value is 192 168 0 6 38 Change Dest Port to 5004 39 Click Start 40 After your changes the CH1 tab should have the following settings 1 Change Output Format to RTP 2 Change Dest Address to IP address of P...

Page 25: ...LLC 100 N 8th St STE 250 Lincoln NE 68508 1369 USA 1 402 323 0702 41 Run VLC on your PC version used in testing at Z3 2 1 3 42 Select Media Open File Select the sdp file z3 netra sdp that comes with this release 43 Click Open 44 You should now see 4K video streaming to VLC via RTP Figure 15 Example of Z3 Video Streaming to VLC RTP ...

Page 26: ...st value Z3 recommends is 100 B frames improve the quality of the picture but they also increase the latency by 1 frame time To minimize latency B frames should be disabled done by setting Number of B frames to 0 Figure 16 shows the suggested values for Maximum Delay and Number of B frames for three common use cases Maximum Delay of B frames Case 1 Highest Quality Highest Latency 3000 2 Case 2 Goo...

Page 27: ...ee the following steps 1 The first thing you need to do is set up a custom configuration so that the DHCP setting is used the next time the system boots up To do this click on the User Presets tab and click on new 2 This brings up a new text box to enter the preset name Type z3_test and click ok 3 Now go back to the System Setup tab Go to the bottom of the screen and select as the preset the z3_te...

Page 28: ...0 N 8th St STE 250 Lincoln NE 68508 1369 USA 1 402 323 0702 4 As soon as you select z3_test the screen will reload Go ahead and check the Use DHCP box 5 Now that DHCP is set in z3_test save the configuration by clicking on the Save button Click Save Check Use DHCP again Figure 21 Saving a User Preset Figure 20 Setting DHCP within z3_test ...

Page 29: ...uration z3_test and specified that z3_test will be used when the system restarts you can go ahead and reboot the Z3 DM8169 4K RPS 8 A new IP address is assigned to the unit through DHCP You have two ways of finding out that IP address The first is to check the serial UI for the new value shown below 9 The second is to use the ZFinder utility on a Windows PC To use ZFinder make sure the Windows PC ...

Page 30: ...k and lists the location of all Z3 systems connected to the network In this case the Z3 DM8169 4K RPS appears with the IP address obtained through DHCP 11 Select the DM8169 4K RPS and then click Open Device A web browser will then open at the IP address of the Z3 DM8169 4K RPS and you should see the Web GUI Figure 25 Web GUI Using DHCP Address 12 You can go back to Static IP by unchecking Use DHCP...

Page 31: ... PC 2 Take an HDMI 1 4 cable and connect it to HDMI Out on the Z3 DM8169 4K RPS Connect the other end to a 4K2K monitor 3 Connect an Ethernet cable to the Ethernet jack on the Z3 DM8169 4K RPS Connect the other end of the Ethernet cable directly to a PC or to a hub connected to the PC You will use this PC to control the Z3 DM8169 4K RPS 4 Take a USB 3 0 drive with the content to be decoded and con...

Page 32: ...er Mode 6 Stop any encoding sessions that might be running on the Z3 DM8169 4K RPS 7 Switch to Decoder mode by changing Operating Mode in the lower right corner of the GUI 8 Once you do this the System Setup tab will appear with decode settings In this tab select serial_menu as the preset at the bottom left of the GUI Figure 27 System Setup Tab Change to Decoder Figure 28 Changing Preset Change to...

Page 33: ...02 323 0702 9 Once you see serial_menu appear on the presets click on Save 10 After you click on Save a Window saying that a reboot is required for settings to take effect appears Click on Ok after seeing this Note The very first time this is done it can take up to 15 seconds for this window to appear Click Save Figure 29 Saving serial_menu settings Figure 30 The Save complete window ...

Page 34: ...into the browser You should then see the decoder settings come up with serial_menu as the preset used Note It is important to retype the IP address or to refresh the browser or exit the browser and reenter it Not doing so could lead to stale data being used and unpredictable operation 13 Click on the CH1 tab You will see the settings for CH1 decode 14 After making sure the file 4kdemo ts is in a U...

Page 35: ...enu appear on the presets click on Save 19 After you click on Save a Window saying that a reboot is required for settings to take effect appears Click on Ok after seeing this Note The very first time this is done it can take up to 15 seconds for this window to appear 20 After clicking Ok power off the Z3 DM8169 4K RPS and power it back on 21 After the green ready light comes up retype the IP addre...

Page 36: ... using the web based GUI you can also use the serial menus More detailed system information can also be gained from the options in the serial interface A command line interface called MCSENC is also available for running commands This can be invoked with the command source opt mcsenc mcsenc sh source opt mcsdec mcsdec sh A separate manual for MCSENC is available upon request The command line inter...

Page 37: ...ODE YOU BUILT ON THE BOARD There are two ways to take the image files you built in Section 5 0 and run them on the board 1 Updating the image file and 2 Setting up NFS TFTP to link to your development PC 10 1 Method 1 Updating the Image File 1 Run the Web Interface Steps 2 13 in Section 7 0 2 Select update device firmware from the main screen Figure 33 Updating the Device Firmware from the Web Int...

Page 38: ...s you to the Software Updater screen Click Browse and browse to the directory z3 netra rdk z3 netra 4K RPS date images and select the image file z3 netra upd img 4 Click Open 5 Click Upload and Update You should see a FLASH Update now in progress message Once finished it will go back to the main menu 6 You should be able to now run using the updated image Figure 34 Browsing for the Image File in t...

Page 39: ...ver_args s home c Start TFTP sudo etc init d xinetd start 2 Enable NFS on the Linux PC The target DM8169 will mount the root file system using NFS This like TFTP will also vary depending on the Linux setup you have As an example here is a set of steps that would be run from Ubuntu 10 x or later these are in gray to denote they can vary from system to system a Get NFS if it is not already installed...

Page 40: ... text editor can be used cd home z3 z3 netra rdk cd z3 netra 4K RPS 20141124 cd u boot emacs u boot env netra rdk txt e In the editor you want to modify the values for nfsserver serverip gatewayip netmask ipaddr tftp_root and nfs_root as shown below The value for tftp_root when combined with the value of server_args in your etc xinetd d tftp file see step 1b should point to the images link you set...

Page 41: ... you are using minicom type ctl A and Z to bring up the Command Summary Then type Y for Paste file j This should bring up the Select file for upload window pointing to your home directory From here use the up and down arrow keys to scroll down and select the u boot env netra rdk txt file you modified and then copied in step 4e Press the space bar to tag the file Then use the left and right arrow k...

Page 42: ...in Appendix B 10 3 Other Available u boot Commands Besides booting from NAND and TFTP NFS there are other boot configurations that are possible Below are the possible options provided in the Z3 u boot environment setenv bootcmd run boot nfs Get kernel from TFTP root file system from NFS setenv bootcmd run nand_boot_nfs Get kernel from NAND root file system from NFS setenv bootcmd run nand_boot_jff...

Page 43: ...he Z3 DM8169 4K RPS includes an optional password to prevent unauthorized users from accessing the Web GUI The steps for using it are shown below 1 In the system Setup tab click on go next to Set Password 2 Once you click on go the change password options appear Enter the new password twice and click change Click here Figure 39 Selecting Set Password Enter new password twice Click change when done...

Page 44: ... 1369 USA 1 402 323 0702 3 Wait for the password option to disappear This indicates that the password has changed 4 Retype the IP address in the web browser You should then see a prompt for a user name and password Use admin for the user name and the value you had chosen before for the password 5 You should now be able to access the web GUI Figure 41 Password Entry Screen ...

Page 45: ... value to take effect Default Gateway 192 168 a b 192 168 0 1 Sets the network gateway to use for the Z3 DM8169 4K RPS Note that a save of these settings and a reboot is needed for changes to this value to take effect Use DHCP Checked Unchecked Sets whether DHCP is used See Using DHCP for more details Set Device Name Sets the name for the Z3 DM8169 4K RPS Set Password Sets the system password See ...

Page 46: ... Set Display button Note 1 Encode Resolutions supported 2160p30 2160p29 97 2160p25 2160p24 2160p23 98 1080i30 1080i29 97 1080i25 1080p60 1080p59 94 1080p50 720p60 720p59 94 720p50 480p60 576p50 12 2 The User Presets Tab Parameter Options default in bold Notes new Define a new configuration file Up to 9 configurations can be created rename Rename a configuration file delete Delete a configuration f...

Page 47: ... will appear if interlaced is being encoded Audio Status Channel The channel number 1 or 2 Subchannel Always 1 in this release Codec The codec being used to encode audio for that channel Stream Status channel The channel number 1 or 2 URL URL the channel is being streamed to frames of frames sent from encoder to channel since the beginning of encoding This can serve as a quick sanity check For exa...

Page 48: ...ith a divider of 2 would cause an output stream of 15fps Number of B frames 0 2 0 The number of B frames A value of 0 means B frames are disabled GOP Size 10 240 frames 60 I frame frequency Note 1 Maximum Delay 0 3000 1000 of ms to buffer The higher the value the smoother the encode but also the higher the latency Audio Enable True False True Encode audio Audio Info Enable yes for Sub Channel 1 no...

Page 49: ... raw aac to 2 separate files If this is selected you should type the path name of the H264 file in Dest Address for example media sda1 test h264 If audio is enabled a companion aac file is then created for example for test h264 a companion file test_0 aac is created MPTS Upcoming Release Dest Address 192 168 x y 192 168 0 6 The IP address that the encoder is streaming to Dest Port 0 9999 5004 The ...

Page 50: ...encoder POLLING indicates start was pressed and the encoder is waiting for valid input data to be detected Note 1 GOP Sizes Supported 10 12 15 25 30 50 60 100 120 200 240 frames 12 6 The CH1 Tab Decode Options Parameter Options default in bold Notes Input Interface RTP UDP TSFILE FILE Where to get input for channel 1 See the description in Output Format in the Encode section for details Address x ...

Page 51: ... Tabs Parameter Options default in bold Notes preset serial_menu encoder factory default any user defined profiles The configuration file to use serial_menu Last value saved in GUI encoder factory default Factory settings Can also add more profiles by clicking on new in the User Presets tab Save Click on this to save preset value to what was selected Operating Mode Encoder UltraHD Decoder This sel...

Page 52: ... 0x280000 size 0x300000 3145728 bytes read OK Booting kernel from Legacy Image at 81800000 Image Name Linux 2 6 37 Image Type ARM Linux Kernel Image uncompressed Data Size 2507712 Bytes 2 4 MiB Load Address 80008000 Entry Point 80008000 Verifying Checksum OK Loading Kernel Image OK OK Starting kernel Uncompressing Linux done booting the kernel Linux version 2 6 37 jwhit jwhit laptop gcc version 4 ...

Page 53: ...Objects 0 CPUs 1 Nodes 1 NR_IRQS 375 IRQ Found an INTC at 0xfa200000 revision 5 0 with 128 interrupts Total of 128 interrupts on 1 active controller GPMC revision 6 0 Trying to install interrupt handler for IRQ368 Trying to install interrupt handler for IRQ369 Trying to install interrupt handler for IRQ370 Trying to install interrupt handler for IRQ371 Trying to install interrupt handler for IRQ37...

Page 54: ... End bus recovery procedure omap_i2c omap_i2c 2 bus 2 rev4 0 at 100 kHz Advanced Linux Sound Architecture Driver Version 1 0 23 Switching to clocksource gp timer musb hdrc version 6 0 host debug 0 musb hdrc musb hdrc 0 dma type dma cppi41 MUSB controller 0 revision 4ea20800 musb hdrc musb hdrc 0 MUSB HDRC host driver musb hdrc musb hdrc 0 new USB bus registered assigned bus number 1 usb usb1 New U...

Page 55: ...rial 8250 16550 driver 4 ports IRQ sharing enabled omap_uart 0 ttyO0 at MMIO 0x48020000 irq 72 is a OMAP UART0 omap_uart 1 ttyO1 at MMIO 0x48022000 irq 73 is a OMAP UART1 omap_uart 2 ttyO2 at MMIO 0x48024000 irq 74 is a OMAP UART2 console ttyO2 enabled bootconsole disabled console ttyO2 enabled bootconsole disabled brd module loaded loop module loaded ahci probe devid name is ahci ahci CAP registe...

Page 56: ...576 UBI background thread ubi_bgt0d started PID 41 davinci_mdio davinci_mdio 0 davinci mdio revision 1 6 davinci_mdio davinci_mdio 0 detected phy mask fffffffc davinci_mdio 0 probed davinci_mdio davinci_mdio 0 phy 0 device 0 00 driver unknown davinci_mdio davinci_mdio 0 phy 1 device 0 01 driver unknown usbcore registered new interface driver cdc_ether usbcore registered new interface driver dm9601...

Page 57: ...ize 195162112 bytes 190588 KiB 186 MiB 1537 LEBs UBIFS journal size 9023488 bytes 8812 KiB 8 MiB 72 LEBs UBIFS media format w4 r0 latest is w4 r0 UBIFS default compressor lzo UBIFS reserved for root 0 bytes 0 KiB VFS Mounted root ubifs filesystem on device 0 14 devtmpfs mounted Freeing init memory 220K init started BusyBox v1 15 0 svn 2014 11 24 11 34 51 CST starting pid 50 tty etc init d rcS Plea...

Page 58: ... 3g Failed to access volume rootfs No such file or directory root ntfs 3g 2014 2 15 integrated FUSE 27 Third Generation NTFS Driver root Configuration type 1 XATTRS are on POSIX ACLS are off root Copyright C 2005 2007 Yura Pakhuchiy root Copyright C 2006 2009 Szabolcs Szakacsits root Copyright C 2007 2012 Jean Pierre Andre root Copyright C 2009 Erik Larsson root Usage ntfs 3g o option device image...

Page 59: ... Core Thread Started tso_core_thread 479 TPPS_CORE TSO Thread running tso_core_thread 471 TPPS_CORE TSO Core Thread Started tso_core_thread 479 TPPS_CORE TSO Thread running remove stale dev tppss_dmx major number for dev tppss_dmx 251 remove stale dev tppss_dmx_io major number for dev tppss_dmx_io 250 remove stale dev tppss_tso major number for dev tppss_tso 234 downrate the ts clock dev mem opene...

Page 60: ...ter help for a list of built in commands run RDK init Bootargs Validated for mem param Bootargs Validated for notifyk vpssm3 params Kernel Base address validated Kernel bootargs validated Simple mixer control Left PGA Mixer Mic3L 0 Capabilities pswitch pswitch joined Playback channels Mono Mono Playback on Simple mixer control Left PGA Mixer Mic3R 0 Capabilities pswitch pswitch joined Playback cha...

Page 61: ...er Ipc_startcallback status 0x00000000 Attached to slave procId 0 Loaded file firmware dvr_rdk_fw_c6xdsp_1024M_256M xe674 on slave procId 0 Started slave procId 0 After Ipc_loadcallback status 0x00000000 After Ipc_startcallback status 0x00000000 nohup appending output to nohup out c6xdsp Remote Debug Shared Memory 0xbf000000 m3video Remote Debug Shared Memory 0xbf010820 m3vpss Remote Debug Shared ...

Page 62: ...000 query acodecs here are the audio codec options none fdk_aaclc fdk_aache fdk_aache_v2 dsp_aaclc arm_g711_alaw set demo mode to ultrahd OK Z3 Technology LLC DM8169 4K RPS v2 01 47 4 H 264 multichannel Current P Change local IP address 192 168 81 68 D Change DHCP mode on 169 254 119 161 16 N Change netmask 255 255 0 0 G Change default gateway 192 168 0 1 Change device name 4K RPS Change device pa...

Page 63: ...h0 OK Z3 Technology LLC DM8169 4K RPS v2 01 47 4 H 264 multichannel Current P Change local IP address 192 168 81 68 D Change DHCP mode on 169 254 119 161 16 N Change netmask 255 255 0 0 G Change default gateway 192 168 0 1 Change device name 4K RPS Change device password BLANK M Change mode enc_ultrahd C Config Multi Program TS name mpts1 enabled n Preset serial_menu 1 Change channel 1 H 264 RES U...

Page 64: ...C UDP Does the IP address set in Dest Address equal the IP address of the PC running VLC Does the port number in Dest Port equal the value entered in the URL for VLC Is the PC fast enough for 4K2K decode on VLC Does the PC have enough DDR to handle 4K2K decode on VLC Is VLC version 2 1 3 or later Problem Do not see video in VLC RTP Is Dest Port set to 5004 If using an SDP file is the correct SDP f...

Page 65: ...he IP address set in nfsserver in u boot Does the value of nfs_root in u boot point to z3 netra rdk filesys fs Did you start the NFS server If you modified the exports file did you remember to restart the NFS server after that For information regarding your hardware warranty please visit http Z3technology com support hardware warranty Answers to more questions can be found on the FAQ at your custo...

Reviews: