background image


CONFIDENTIAL

                                              DOC-USR-0012-08 


___________________________________________________________________________________________ 

Z3 Technology, LLC 

 100 N 8

th

 ST, STE 250 

 Lincoln, NE 68508-1369 USA 

 +1.402.323.0702 

46 

9.0


   RUNNING THE CODE YOU BUILT ON THE BOARD 


There are 2 ways to take the image files you built in Chapter 3 and run them on the board:  (1) Updating 
the image file, and (2) Setting up NFS/TFTP to link to your development PC. 


9.1   Method 1:  Updating the Image File 


(1)


Run the Web Interface (Steps (1)-(9) in Section 5). 


(2)


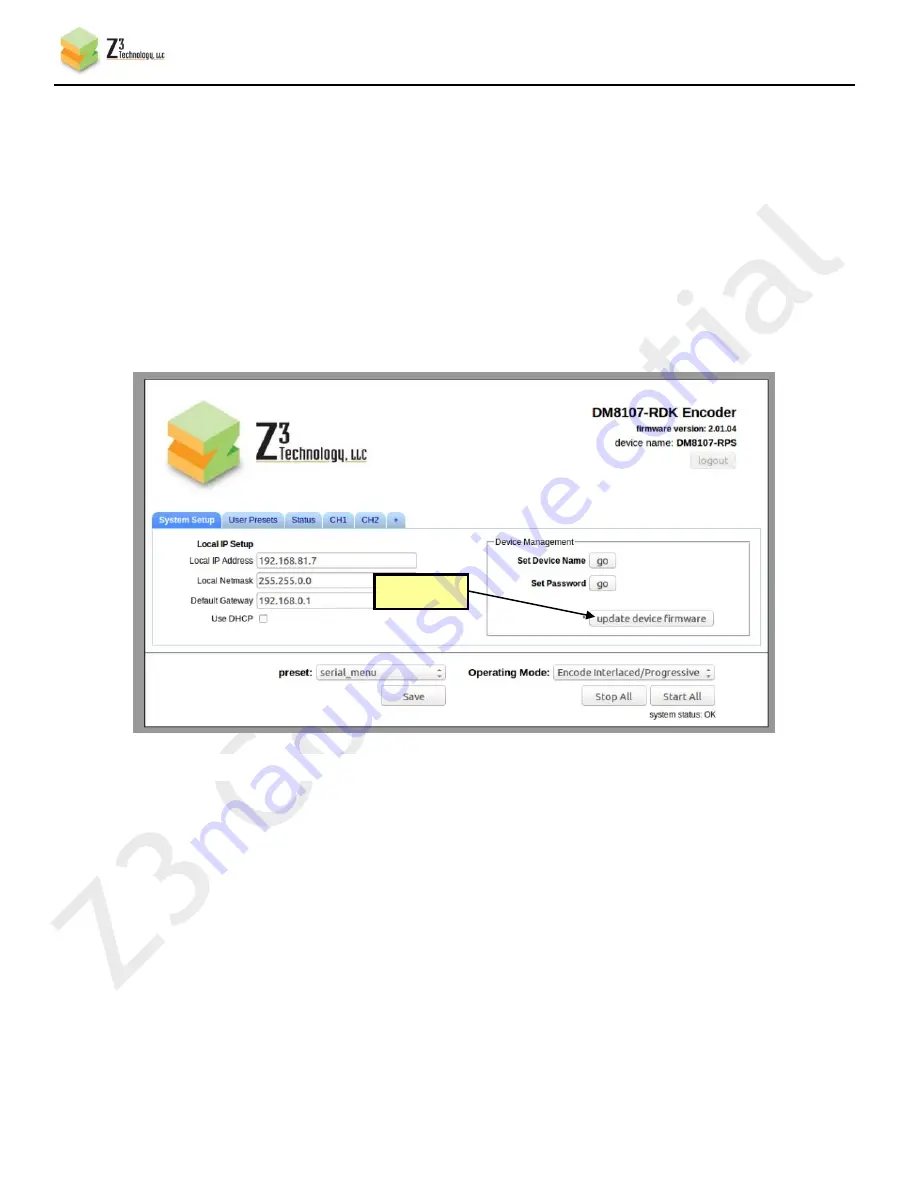
Select “update device firmware” from the main screen:


Figure 43  Updating the Device Firmware from the Web Interface


Click here 

Summary of Contents for Z3-DM8107-RPS

Page 1: ...ctions carefully and save the manual for future use This document contains proprietary and confidential information of Z3 Technology LLC Z3 This document may not be used reproduced disclosed or disseminated to anyone without the prior written approval of an authorized representative of Z3 Z3 Technology LLC incorporates HDMI technology The terms of HDMI and HDMI High Definition Multimedia Interface...

Page 2: ...rrection on p 7 8 note on Ubuntu versions on p 11 section on possible input combinations on p 22 note on known limitations on p 36 and some formatting tweaks throughout the document RC 2 01 04 03 07 14 Updated screenshots added sections on RTP encode valid input combinations changing bitrate dynamically adjusting TS rate tuning for latency DHCP ZFinder ts file write and playback and details on run...

Page 3: ... 4 2 Z3 Application Overview 13 4 2 1 Application Names and Locations 13 4 2 2 Application Options and Arguments 13 4 2 3 Application Source Code 14 4 3 RDK documentation 15 5 0 RUNNING THE ENCODER 17 5 1 Set up the HD Source 17 5 2 Connect the Board 17 5 3 Set up the Terminal Window 18 5 4 Power on the board 18 5 5 Ensure your PC has a proper IP address 20 5 6 Run the Web Interface to Configure C...

Page 4: ...0 EXERCISING OTHER FEATURES 45 9 0 RUNNING THE CODE YOU BUILT ON THE BOARD 46 9 1 Method 1 Updating the Image File 46 9 2 Method 2 Running Your Code through TFTP NFS 48 9 3 Other available u boot commands 52 10 0 SUMMARY OF OPTIONS 53 10 1 The System Setup Tab 53 10 2 The User Presets Tab 54 10 3 The Status Tab 54 10 4 The CH1 Tab Encode 55 10 5 The CH1 Tab Decode 59 10 6 The CH2 Tab 59 10 7 Value...

Page 5: ...posite Inputs 24 Figure 13 Mapping of A V Cable to Component Jacks 24 Figure 14 Mapping of A V Cable to Composite 1 2 25 Figure 15 Allowed Input Combinations on the Z3 DM8107 RPS 25 Figure 16 Viewing Bitrate in VLC 26 Figure 17 Changing the Bitrate Dynamically 26 Figure 18 Drop in Bitrate after Dynamic Bitrate Change 27 Figure 19 Testing TS Rate 28 Figure 20 Status Tab 29 Figure 21 TS Rate and Low...

Page 6: ... from the Serial UI 40 Figure 39 Serial UI Settings for Write to TS File 41 Figure 40 Decoder Serial UI Top Part 42 Figure 41 Configure Decode Channel 1 Menu from the Serial UI 43 Figure 42 Serial UI Settings for Playback of TS File 44 Figure 43 Updating the Device Firmware from the Web Interface 46 Figure 44 Browsing for the Image File in the Updater 47 Figure 45 Editing u boot env dm810x rdk txt...

Page 7: ...imedia graphics and DSP applications The Z3 DM8107 MOD is a compact OEM module which supports up to1080p60 H 264 encode decode1 in streaming or storage mode It is especially suited for power sensitive applications requiring a single video stream These applications include broadcast video encoding and decoding video surveillance and security industrial digital video recorders DVRs and medical video...

Page 8: ...MOD to implement additional functions not present in the base module The Z3 DM8168 APP 02 application board has 2 HDMI inputs 2 YPbPr component inputs 2 analog stereo audio inputs an SD card jack and 2 bi color LEDs for status Figure 2 below shows the Z3 DM8168 APP 02 application board A Linux based media SDK license additional design services and support are available from Z3 Technology Please co...

Page 9: ...thernet USB 2 0 x2 SATA2 MMC SD 1 GB DDR3 256 MB NAND Flash Control through serial port or web GUI JTAG debug port High density connectors to all signals 2 1 Supported Input Resolutions Encoder HDMI 1080p60 1080p50 1080i30 1080i29 97 1080i25 720p60 720p59 94 720p50 576p50 576i25 480p60 480i30 and 480i29 97 Component 1080p60 1080p50 1080i30 1080i29 97 1080i25 720p60 720p59 94 720p50 576p50 576i25 4...

Page 10: ...ry to install some 32 bit libraries for the cross compiling toolchain You can determine whether your OS is 64 bit by using the uname p command A 64 bit OS will return x86_64 while a 32 bit OS will return i386 i586 or i686 For 64 bit Ubuntu you can get the necessary libraries by typing sudo apt get install ia32 libs For 64 bit Fedora you can type sudo yum install glibc i686 3 2 Making the Directori...

Page 11: ...und 30 40 minutes You will also need to type in the sudo password a few times towards the end of the build The outcome of the build process should be newly created image files in the images directory You can confirm this by doing the following cd images ls alt The result should be something like the following Note that actual filenames dates and times will differ Figure 3 Sample Content of Images ...

Page 12: ...he Z3 DM8107 RPS is run from the run sh script in dvr rdk dvr_rdk bin ti810x This code calls the z3_dvr_rdk_demo_mcfw_api out binary which initializes and runs the encoder This binary is built from the dvr rdk directory The code for the binary resides in z3apps rdk rdk_demo The z3apps rdk directory is described in more detail in the next section 4 1 The z3apps rdk directory There are 3 main subdir...

Page 13: ...is is what comes up in the serial terminal when the board is powered on The second is a command line interface that is more flexible and easier to use from a programming standpoint The web based interface uses this command line interface extensively The menu based sample application binary can be found at opt dvr_rdk ti816x bin z3_dvr_rdk_demo_mcfw_api out The command line interface binary can be ...

Page 14: ...find an example of using this in a script at PRJROOT dvr rdk runz3demo sh The command line interface for the decoder is set up by running source opt mcsdec mcsdec sh This will present you with an prompt You can then enter commands to decode For example decode instance 1 source rtp 192 168 0 6 5004 audio on aport hdmi will start a decode from RTP from port 192 168 0 6 at port 5004 sending audio to ...

Page 15: ...s_Summary pdf DM81xx_DVR_RDK_Audio_Notes pdf DM81xx_DVR_RDK_AVSync_Notes pdf DM81xx_DVR_RDK_Boot_Logo_and_External_Device pdf DM81xx_DVR_RDK_Customer_Display_Resolution pdf DM81xx_DVR_RDK_Debug_Statistics pdf DM81xx_DVR_RDK_Display_Output_Configuration pdf DM81xx_DVR_RDK_Ethernet_Offload_Driver pdf DM81xx_DVR_RDK_External_Video_Device_Configuration pdf DM81xx_DVR_RDK_Flash_File_FS pdf DM81xx_DVR_R...

Page 16: ...eCaseGuide_Decode_Display pdf DM814x_DVR_RDK_UseCaseGuide_4D1_8CIF_16CIF_DVR pdf DM814x_DVR_RDK_UseCaseGuide_Decode_Display pdf DM816x_DVR_RDK_UseCaseGuide_16D1_DVR pdf DM816x_DVR_RDK_UseCaseGuide_32D1_Decode_Display pdf DM816x_DVR_RDK_UseCaseGuide_SD_HD_Encode_Card pdf DM81xx_DVR_RDK_Interlace_UseCaseGuide pdf UserGuides DM8168_DVR_RDK_GUI_Guide pdf DM816x_FAPLL xls DM81xx_DVR_RDK_Demo_Guide pdf ...

Page 17: ... up the HD Source 1 Select an HD source with HDMI non HDCP output Z3 used the Brite View BV 5005HD is used Power on the HD Source Connect HDMI to a monitor Set the HD Source to 1080p or 1080i output Select content you would like to stream 5 2 Connect the Board For these steps please refer to Figure 4 and Figure 5 Figure 4 Z3 DM8107 RPS Encode Example Connections HDMI In 2 HDMI In 1 Stereo 1 Stereo...

Page 18: ...s PC run TeraTerm Select Setup Serial Port and set the following Port Whichever serial port the port is connected to Baud Rate 115200 Data 8 bit Parity None Stop 1 bit Flow Control None 6 If you are running from Linux type sudo minicom s And then configure by doing the following Select Serial Port Setup Ensure the right Serial Device is specified typically dev ttyUSB0 Set option E Bps Par Bits to ...

Page 19: ...SR 0012 08 ___________________________________________________________________________________________ Z3 Technology LLC 100 N 8th ST STE 250 Lincoln NE 68508 1369 USA 1 402 323 0702 19 Figure 6 Z3 DM8107 RPS Serial Menu ...

Page 20: ...re that this is the case If necessary use the P and N options to modify the address network of the board to conform to your network Note that the first 2 parts being the same are based on a value of netmask of 255 255 0 0 If netmask were 255 255 255 0 for example then the first 3 parts of the IP address would have to be the same After you are done make note of the address you set it to This will b...

Page 21: ...ess to the IP address of your PC in this example 192 168 0 6 Also make note of the value of Dest Port should be 5004 by default 12 Click start The status should change from IDLE or STOPPED to RUNNING The encoder automatically starts 20 seconds after booting up If it has already started it may be necessary to click stop before clicking start Figure 8 Web Interface Channel 1 Configuration Tab b Chan...

Page 22: ...un VLC to View Stream 13 Run VLC on your PC version used in testing at Z3 2 05 14 Select Media Open Network Stream Type udp 192 168 0 6 5004 where 192 168 0 6 is the IP address of your PC and 5004 is the value of Dest Port noted in step 11 15 Press Enter 16 You should now see video streaming to VLC Figure 9 VLC Network Screen Setting to Receive Z3 TS Stream Figure 10 Example of Z3 Video Streaming ...

Page 23: ... software release from Z3 To stream using RTP do the following steps 17 In the CH1 configuration tab click on stop to stop the current encoding session 18 Change Output Format from UDP to RTP see Figure 8 19 Confirm that Dest Port see Figure 8 is 5004 this will be important for the VLC configuration 20 Click on start to start the RTP encoding session 21 Copy the z3 dm8107 sdp file received from Z3...

Page 24: ...site inputs To select a source simply select the desired source from Video Source To use HDMI2 simply plug a video source to the HDMI port just below HDMI1 For Component the 2 inputs are to the right of the HDMI ports with Component1 on the right and Component2 on the left Figure 12 below When connecting Component to the video source the mapping is red red white blue and yellow green Figure 13 Fig...

Page 25: ...e from the CH1 tab HDMI2 Component2 and Composite2 are all accessible from the CH2 tab Most combinations are allowed However because of the way the hardware is configured within the Z3 DM8107 RPS two combinations are not allowed For both of those combinations an alternative is available Figure 15 below shows the combinations that are allowed and not allowed on the Z3 DM8107 RPS CH1 CH2 Allowed Not...

Page 26: ...lows you to change the bitrate without stopping and restarting the encoder To use it do the following steps 24 In VLC click on Tools and select Codec Information This brings up a window with 4 tabs Select the Statistics tab In this tab you can see the current video audio bitrate 25 In the CH1 screen change the bitrate from 8000K to 2000K and click the update button Video Audio bitrate Figure 16 Vi...

Page 27: ...m of the video and audio bitrate For example the default value out of the factory is a value of 8Mbps corresponding to 6Mbps for the video There are times however when it is desirable to make this percentage higher For example if the encoder bitrate is very low below 1Mbps it is advisable to allow more leeway in the event there are some challenging scenes to encode The steps below show an example ...

Page 28: ... 402 323 0702 28 28 Once you select UDP TS RATE should appear with the default value of 8000K Change this to 1000K see step 5 above 29 Click on start to start encoding 30 Click on the Status tab You should see the new bitrate and resolution reflected in the status 1 Click stop 6 Click start 2 Change to 720x480 3 Change to 512K 4 Change to UDP 5 Change to 1000K Figure 19 Testing TS Rate ...

Page 29: ...m see Section 5 7 and view the Statistics tab see Section 5 10 You will see a lower value for the overall input rate and for the content rate The value of TS Rate must be higher than video bit rate audio bit rate 1 25 If an attempt is made to input a value less than this the error message TS rate too small to carry elementary streams will appear Figure 20 Status Tab Input bit rate lowered to 1Mbps...

Page 30: ...B frames should be disabled done by setting Number of B frames to 1 Figure 22 shows suggested values for Maximum Delay and Number of B frames for 3 use cases Maximum Delay of B frames Case 1 Highest Quality Highest Latency 9999 3 Case 2 Good Quality Standard Latency 2000 2 Case 3 Normal Quality Lowest Latency 100 1 Figure 22 Tuning for Various Use Cases GDR can also be used to reduce latency if I ...

Page 31: ...et name Type z3_test and click ok 34 Now go back to the System Setup tab Go to the bottom of the screen and select as the preset the z3_test configuration you just created 35 As soon as you select z3_test the screen will reload Check the Use DHCP box Figure 24 Entering a User Preset Name Select z3_test configuration Figure 25 Selecting z3_test within the System Setup Tab Check Use DHCP again Figur...

Page 32: ...nd saved it to a configuration z3_test and specified that z3_test will be used when the system restarts go ahead and reboot the Z3 DM8107 RPS 38 A new IP address is assigned to the unit through DHCP You have two ways of finding out that IP address The first is to check the serial UI for the new value shown in Figure 28 The second is to use the ZFinder utility on a Windows PC The next steps assume ...

Page 33: ...ty on your Windows PC The ZFinder window appears ZFinder does a scan of the network and lists the location of all Z3 systems connected to the network In this case the Z3 DM8107 RPS appears with the IP address obtained through DHCP 41 Select the DM8107 RPS and then click Open Device A web browser will then open at the IP address of the Z3 DM8107 RPS and you should see the Web GUI Figure 30 Web GUI ...

Page 34: ...e to be adjusted They can also try encoding to file and then decoding from file using the Serial UI described in Section 7 6 1 Connect the Decoder board 1 Connect the supplied 2 5mm serial cable and NULL modem adapter to your PC 2 Take the HDMI cable connected to a monitor and connect it to HDMI Out of the RPS 3 Connect the Ethernet Make sure the Ethernet is connected to a hub router that is also ...

Page 35: ...resses 6 If not already done set DHCP on the Encoder board see Section 5 13 for details on how to do this You can also set DHCP on the Decoder board In this example the Encoder board through DHCP has an IP address of 192 168 0 3 The Decoder board is set to the default value of 192 168 81 07 6 3 Configure the Encoder 7 Going back to the Encoder board 192 168 0 3 change the settings to match those i...

Page 36: ...oder board controls 192 168 81 07 in this example The first thing you want to do is switch to Decoder mode This can be done by changing Operating Mode in the lower right corner 9 Once you do this the description at the top right will change from DM8107 RDK Encoder to DM8107 RDK Decoder and settings for Display Mode Resolution and Layout will appear Figure 33 Changing to Decoder Mode Change here to...

Page 37: ...ay monitor is to be configured 11 Click on the CH1 tab The configuration settings for the Decoder appear 12 In these settings change Input Interface to UDP Address to 225 1 2 3 Port to 5004 and Audio Output Port to HDMI Then click on start or stop and then start if the decoder has already autostarted Figure 35 Decoder Configuration Settings Initial Figure 36 Decoder Configuration Settings for Deco...

Page 38: ... 68508 1369 USA 1 402 323 0702 38 13 If you haven t already go back to the Encoder board and click start 14 The decoder then initializes the HDMI About 5 10 seconds later decode should start and you should see a picture hear audio 15 You can also view the content using VLC Open VLC as you did in the Encode instructions and use the address udp 225 1 2 3 5004 for the URL ...

Page 39: ...his the Serial UI should be used The steps below list the steps to write a file and then play back that same file It is assumed that a serial terminal has already been set up as described in Section 5 steps 5 and 6 and that HDMI In 1 is connected for input and HDMI Out is connected for display 7 1 Write to a TS File 1 Boot the DM8107 RPS The Main Serial UI should appear 2 If an encode has already ...

Page 40: ...e Encode Channel 1 Menu from the Serial UI 4 In this menu type A ret and then y ret to enable the channel 5 Next type C ret to configure the URL Type 3 ret to set tsfile and then type media sda1 test1 ts to set the name of the file to write to 6 If VSRC is not already HDMI1 type D ret and then 1 ret to make it HDMI1 7 Type X ret to go back to the previous menu 8 Type 2 ret A ret n ret and then X r...

Page 41: ...h ST STE 250 Lincoln NE 68508 1369 USA 1 402 323 0702 41 Your configuration should look like the following 9 Insert a USB drive into the top or bottom USB port on the Z3 DM8107 RPS 10 Type S ret to start encoding to the ts file test1 ts 11 Wait 1 minute 12 Type T ret to terminate the encode session Figure 39 Serial UI Settings for Write to TS File ...

Page 42: ... Play Back a TS File 13 Type M ret to change the mode to enc_1ch_noscale 14 Type M ret again to change the mode to enc_1_to_3_ch 15 Type M ret one more time to change to decoder 16 Type y ret in response to the question Would you like to switch to decoder mode y n 17 Once you do this the HDMI is initialized takes around 4 seconds Then you will see the Decoder Serial UI Figure 40 Decoder Serial UI ...

Page 43: ... 20 Type B ret A list of 4 decode type options will appear Type 3 ret to select tsfile 21 Type media sda1 test1 ts ret to set the source file to test1 ts from the USB 22 Type D ret and 1 ret to set the audio port to HDMI 23 Type X ret to go back to the main menu 24 Type 2 ret to configure channel 2 25 Type A ret and n ret to disable channel 2 26 Type X ret to go back to the main menu 27 Make sure ...

Page 44: ...__________ Z3 Technology LLC 100 N 8th ST STE 250 Lincoln NE 68508 1369 USA 1 402 323 0702 44 Your decode settings should look like the following Figure 42 Serial UI Settings for Playback of TS File 28 Type S ret to start playback After 5 10 seconds you should see the video on the monitor connected to HDMI Out ...

Page 45: ... GUI to exercise other features These include Encoding from a second channel Adjusting input resolution Setting of I P B frames Besides using the web based GUI you can also use the serial menus More detailed system information can also be gained from the options in the serial interface Command line interfaces called MCSENC and MCSDEC are also available for running commands This can be found with t...

Page 46: ...G THE CODE YOU BUILT ON THE BOARD There are 2 ways to take the image files you built in Chapter 3 and run them on the board 1 Updating the image file and 2 Setting up NFS TFTP to link to your development PC 9 1 Method 1 Updating the Image File 1 Run the Web Interface Steps 1 9 in Section 5 2 Select update device firmware from the main screen Figure 43 Updating the Device Firmware from the Web Inte...

Page 47: ... you to the Software Updater screen Click Browse and browse to the directory z3 dm810x z3 centaurus dm810x_RDK date images and select the image file z3 centaurus upd img Figure 44 Browsing for the Image File in the Updater 4 Click Open 5 Click Upload and Update You should see a FLASH Update now in progress message Once finished it will go back to the main menu 6 You should be able to now run using...

Page 48: ...reate the file etc xinetd d tftp Set server_args to the home directory containing z3 dm810x home z3 in this example An example of a tftp file would be service tftp disable no socket_type dgram protocol udp wait yes user nobody server usr sbin in tftpd server_args home c Make a tftpboot directory sudo mkdir tftpboot sudo chmod R 777 tftpboot sudo chown R nobody tftpboot d Start tftp sudo etc init d...

Page 49: ... to your filesys and images directory note actual directory name may be different depending on your specific release cd home z3 z3 dm810x ln s z3 centaurus dm810x_RDK 20140304 images images ln s z3 centaurus dm810x_RDK 20140304 filesys filesys f Start the NFS server sudo service nfs kernel server restart 3 Configure u boot on your board to match your system configuration settings a Reboot the boar...

Page 50: ...tep 2e e Save your changes and then copy this file to your home directory this will make it easy to transfer from minicom later cp u boot env dm810x rdk txt home z3 f Now set up your terminal program to take input from a file If you are using minicom type ctl A and Z This should bring up the minicom Command Summary From here type T to bring up the Terminal Settings window From here set Newline tx ...

Page 51: ...0x rdk txt file you modified and then copied in step 3e Press the space bar to tag the file Then use the left and right arrow keys to select Okay Press return j You should then see a series of commands being pasted on run within u boot The very last line should say Writing to Nand done k Type printenv to show the current environment variables in u boot l Check the value of gatewayip and netmask to...

Page 52: ...ossible Below are the possible options provided in the Z3 u boot environment setenv bootcmd run boot nfs Get kernel from TFTP root file system from NFS setenv bootcmd run nand_boot_nfs Get kernel from NAND root file system from NFS setenv bootcmd run nand_boot_jffs2 Get kernel from NAND root file system from NAND JFFS2 setenv bootcmd run nand_boot_ramdisk Get kernel from NAND root file system from...

Page 53: ...e written to a configuration before rebooting occurs See the section on DHCP configuration for details Display Mode hdmi Only appears if decoder mode selected This sets the output display Only HDMI supported on the Z3 DM8107 RPS Resolution Decode Only NTSC 1080i30 See note 1 Only appears if decoder mode selected The format to display the video Layout Decode Only 1x1 Only appears if decoder mode se...

Page 54: ...licked Also may take around 10 seconds for fps and bitrate values to settle Output Value Explanation Encoder Status CH The channel number 1 or 2 Bitrate Current target bit rate of encoder Actual Bitrate Actual bit rate being output by encoder FPS Current target frames per second of encoder Actual FPS Actual frames per second being encoded Key frame FPS of key frames per second for example a value ...

Page 55: ...io channel Indicates the audio codec being used to encode a specific audio subchannel Input Status Input Input type Resolution Capture resolution for that input FPS Capture frames per second for that input Decoder Status channel Channel being decoded URL Source of the stream file being decoded frames of frames decoded so far fps Fps being decoded 10 4 The CH1 Tab Encode Parameter Options default i...

Page 56: ...refreshed per frame if GDR is set to 30 then each frame will have a set of macroblocks equal to 1 30th of the frame that are intra refreshed Over 30 frames the entire picture is intra refreshed Turning on GDR can prevent generation of large I frames and allow for lower latency encode decode since the decoder buffer can be reduced GOP Size 10 240 frames 60 I frame frequency Note 2 Maximum Delay 0 9...

Page 57: ...at audio channel RTP Port 0 9999 8892 8898 If RTP format is selected the port associated with that audio channel Max PTS PCR 16ms 3000ms Defines the maximum allowed difference between the audio PTS and the stream PCR in the resulting transport stream You can try increasing this if you are experiencing issues on decoders playing back encoded ts files Output Format RTP UDP TSFile File Output format ...

Page 58: ...h playback at lower bitrates see Section 5 11 Adjusting the UDP TS Rate on page 27 stop Stop current encode session start Start encode session update Can be used to change the bitrate without stopping restarting an encode session see Section 5 10 Changing the bitrate dynamically on page 26 clone Duplicate CH tab can be used to quickly copy CH1 values to CH2 for example delete Used to delete excess...

Page 59: ...the GUI in this release Serial UI is needed for those options Address x y z w 225 1 2 3 The URL the bitstream is being sent to Port 0 9999 5004 The port the bitstream is being sent to Max Video Lag ms 25 3000 Used to play back files with large differences between video and audio In most cases this value can be left unchanged If a file is not playing back this can be set to a high value such as 300...

Page 60: ... The configuration file to use serial_menu Last value saved in GUI encoder factory default Factory settings Can also add more profiles by clicking on new in the User Presets tab Save Click on this to save preset value to what was selected Operating Mode Encoder Interlaced Progressive Encoder Single HD Encode 1 to 3 CH Decoder Encoder Interlaced Progressive and Decoder can be used to select between...

Page 61: ...M 1 GiB NAND setting chip delay to 15us HW ECC BCH8 Selected 256 MiB Using default environment The 2nd stage U Boot will now be auto loaded Please do not interrupt the countdown till DM385_EVM prompt if 2nd stage is already flashed Hit any key to stop autoboot 0 NAND read device 0 offset 0x80000 size 0x40000 262144 bytes read OK Starting application at 0x81000000 U Boot 2010 06 Apr 01 2014 12 46 2...

Page 62: ... Image Type ARM Linux Kernel Image uncompressed Data Size 2965264 Bytes 2 8 MiB Load Address 80008000 Entry Point 80008000 Verifying Checksum OK Loading Kernel Image OK OK Starting kernel Uncompressing Linux done booting the kernel Linux version 2 6 37 z3 z3pci dev gcc version 4 5 3 20110311 prerelease GCC 1 Tue Apr 1 12 46 07 CDT 2014 CPU ARMv7 Processor 413fc082 revision 2 ARMv7 cr 10c53c7f CPU ...

Page 63: ... SLUB Genslabs 11 HWalign 64 Order 0 3 MinObjects 0 CPUs 1 Nodes 1 NR_IRQS 407 IRQ Found an INTC at 0xfa200000 revision 5 0 with 128 interrupts Total of 128 interrupts on 1 active controller GPMC revision 6 0 Trying to install interrupt handler for IRQ400 Trying to install interrupt handler for IRQ401 Trying to install interrupt handler for IRQ402 Trying to install interrupt handler for IRQ403 Try...

Page 64: ...ppi41 Init Done omap_i2c omap_i2c 1 bus 1 rev4 0 at 100 kHz regulator VRTC 1800 mV regulator VIO 1500 mV regulator VDD1 600 1500 mV at 1200 mV regulator VDD2 600 1500 mV at 1200 mV regulator VDDCTRL 600 1400 mV at 1200 mV regulator LDO1 1100 3300 mV at 1800 mV regulator LDO2 1100 3300 mV at 1800 mV regulator LDO3 1100 3300 mV at 3300 mV regulator LDO4 1100 3300 mV at 1800 mV regulator LDO5 1100 33...

Page 65: ...ing DMA IRQ 19 NET Registered protocol family 2 IP route cache hash table entries 2048 order 1 8192 bytes TCP established hash table entries 8192 order 4 65536 bytes TCP bind hash table entries 8192 order 3 32768 bytes TCP Hash tables configured established 8192 bind 8192 TCP reno registered UDP hash table entries 256 order 0 4096 bytes UDP Lite hash table entries 256 order 0 4096 bytes NET Regist...

Page 66: ...evice Maf ID 0xad Chip ID 0xda Hynix NAND 256MiB 3 3V 8 bit erasesize 0x20000 writesize 2048 oobsize 64 Scanning device for bad blocks Factory marked eraseblock 551 at 0x0000044e0000 Factory marked eraseblock 1363 at 0x00000aa60000 Factory marked eraseblock 1769 at 0x00000dd20000 Creating 8 MTD partitions on omap2 nand 0 0x000000000000 0x000000080000 U Boot min 0x000000080000 0x0000001c0000 U Boot...

Page 67: ...el driver for USB modems and ISDN adapters Initializing USB Mass Storage driver usbcore registered new interface driver usb storage USB Mass Storage support registered mice PS 2 mouse device common for all mice omap_rtc omap_rtc rtc core registered omap_rtc as rtc0 i2c dev entries driver Linux video capture interface v2 00 usbcore registered new interface driver uvcvideo USB Video Class driver v1 ...

Page 68: ...836 KiB 186 MiB 1539 LEBs UBIFS journal size 9023488 bytes 8812 KiB 8 MiB 72 LEBs UBIFS media format w4 r0 latest is w4 r0 UBIFS default compressor lzo UBIFS reserved for root 0 bytes 0 KiB VFS Mounted root ubifs filesystem on device 0 14 devtmpfs mounted Freeing init memory 232K init started BusyBox v1 15 0 svn 2014 04 01 12 47 08 CDT starting pid 57 tty etc init d rcS Please wait booting Startin...

Page 69: ...ol family 10 server sh source line 41 can t open tmp actv_state Point your browser to http 192 168 0 4 Starting zfinder daemon Starting Z3 demo BusyBox v1 15 0 svn 2014 04 01 12 47 08 CDT built in shell ash Enter help for a list of built in commands run RDK init Bootargs Validated for mem param Bootargs Validated for notifyk vpssm3 params Kernel bootargs validated Simple mixer control Left PGA Mix...

Page 70: ...R name PGA Capture Volume type INTEGER access rw R values 2 min 0 max 119 step 0 values 15 15 dBscale min 0 00dB step 0 50dB mute 0 Setting L3 bandwidth regulator for HDVICP0 to press 3 3 BW 2000 WM Cycles 4000 Setting DMM priority for DUCATI to 0 0x4e000624 0x08000000 Setting DMM priority for HDVICP0 to 2 0x4e000634 0x0000000a run RDK loadmodule Attached to slave procId 1 Loaded file firmware dvr...

Page 71: ...8107 MOD MC RPS v2 01 08 H 264 multichannel Current P Change local IP address 192 168 81 6 D Change DHCP mode on 192 168 0 4 24 N Change netmask 255 255 0 0 G Change default gateway 192 168 0 1 M Change mode enc_int_prog Preset serial_menu 1 Change channel 1 H 264 RES 720x480 URL udp 10 1 10 15 5004 VSRC COMPOSITE1 VBRATE 8000K VFRATEDIV 1 VDELAY 2000 ms BFRAME 1 GOP 60 PROFILE high GDR 0 VPID 221...

Page 72: ...the Z3 DM8107 RPS IP address from the Linux PC Try pinging the Linux PC from the Z3 DM8107 RPS Problem Do not see video in VLC UDP Does the IP address set in Dest IP Address equal the IP address of the PC running VLC Does the port number in Dest Port equal the value entered in the URL for VLC Is the PC fast enough for 1080p decode on VLC Does the PC have enough DDR to handle 1080p decode on VLC Is...

Page 73: ...me up Is the link to filesys properly set up see step 2e on page 50 Does the IP address in the line added in etc exports match the IP address set in nfsserver in u boot Does the value of nfs_root in u boot point to z3 dm810x filesys fs Did you start the NFS server If you modified the exports file did you remember to restart the NFS server after that When contacting Z3 Support for additional suppor...

Reviews: