User’s Manual
91
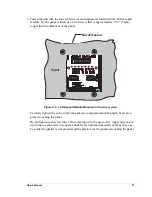
3. Fasten the unit with the four 4-40 screws and washers included with the LCD/keypad
module. If your panel is thick, use a 4-40 screw that is approximately 3/16" (5 mm)
longer than the thickness of the panel.
Figure C-8. LCD/Keypad Module Mounted in Panel (rear view)
Carefully tighten the screws until the gasket is compressed and the plastic bezel face-
plate is touching the panel.
Do not tighten each screw fully before moving on to the next screw. Apply only one or
two turns to each screw in sequence until all are tightened manually as far as they can
be so that the gasket is compressed and the plastic bezel faceplate is touching the panel.
Bezel/Gasket
DISPLAY BOARD
U1
U2
C1
C2
C3
C4
U3
R17
J1
Q1
D1
R1
R2
R3
R4
R9
R10
R1
1
Q2
Q3
Q4
R12
R5
R6
Q5
Q6
R13
R7
R14
R8
R15
R18
Q7
Q8
C5
R16
C6
J3
U4
RN1
J2
C8
C7
KP1
Panel
Summary of Contents for Fox LP3500
Page 1: ...Fox LP3500 C Programmable Single Board Computer User s Manual 019 0111 041029 E ...
Page 6: ...Fox LP3500 ...
Page 14: ...8 Fox LP3500 ...
Page 22: ...16 Fox LP3500 ...
Page 86: ...80 Fox LP3500 ...
Page 120: ...114 Fox LP3500 ...
Page 130: ...124 Fox LP3500 ...
Page 134: ...128 Fox LP3500 ...
Page 138: ...132 Fox LP3500 ...
Page 142: ...136 Fox LP3500 ...
Page 144: ......

