


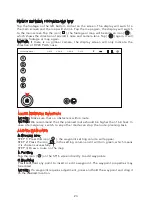


SWITCH BETWEEN FOOTAGE AND MAP
Tap the footage on the left bottom corner on the screen. The display will switch to
the main screen and the map will shrink. Tap the map again, the display will switch
to the main screen.Tap the icon
[ ]
, the footage or map will become an icon
[ ]
,
which shows the direction of aircraft's nose and camera lens. Tap
[ ]
again, it will
become footage or map again.
NOTICE: If there is no gimbal camera, the display screen will only indicate the
direction of H920 PLUS nose.
Connecting drone...
H:N/A
V.S:N/A
H.S:N/A
D:N/A
23
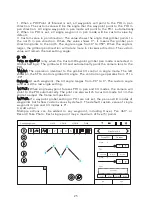
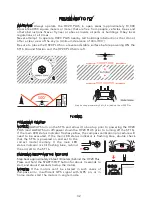
ROUTE-PLANNING FUNCTION
NOTICE: Make sure that no obstacle is within route.
NOTICE: We recommend that the planned route should be higher than 16.4 feet. In
case of emergency, switch to any other mode can stop the route-planning task.
ADDING WAYPOINTS
A. Drawing Line
STEP 1) Press the icon
[ ]
, the waypoint setting column will appear.
STEP 2) Press the icon
[ ]
in the setting column and it will turn green, which means
it is chosen successfully.
STEP 3) Draw a route on the map.
B. Pointing
Tap the icon
[ ]
on the ST16 screen directly to add waypoints.
C. Inserting
Press and hold any point to insert or edit a waypoint. The waypoint properties may
be edited.
NOTICE: If a waypoint requires adjustment, press and hold the waypoint and drag it
to the desired location.
Summary of Contents for H920 PLUS
Page 1: ...V3 0 ...