


NORMAL MAINTENANCE
CAUTION: Prior to any of the following maintenance proce-
dures, shut off all electric power to the unit to
prevent personal injury.
Periodic maintenance normally consists of changing or
cleaning filters and (under some conditions) cleaning the main
burners.
FILTERS - Inspect once a month. Replace disposable or clean
permanent type as necessary. DO NOT replace permanent
type with disposable. The dimensional size of the replacement
filter must be the same as the replaced filter.
MOTORS
Outdoor fan motors are permanently lubricated and require no
maintenance.
Ventor motor is factory lubricated for an estimated 10 year life.
Indoor Blower Motor and Drive - The indoor blower motor
features ball bearings that do not require periodic lubrication.
Periodic lubrication of the motor and bearings can extend the
life of components but is optional.
CAUTION: Damage can occur if the bearings are overlubri-
cated. Use grease sparingly.
WARNING: Perform all maintenance operations on the blower
motor with electric power disconnected from the
unit. Do not attempt to lubricate bearings with the
unit in operation.
On an annual basis, check the motor for accumulations of dust,
etc. that may block the cooling slots in the motor shell. Check
for loose, damaged or misaligned drive components. Check
that all mounting bolts are tight. Replace defective parts as
required.
If desired, every three years remove both pipe plugs at each
end shell and clean out any hardened grease or foreign matter.
Replace one plug on each end with a clean grease fitting. Using
a low pressure grease gun, pump grease (Chevron SRI-2 or
equivalent) into the bearing cavity until new grease shows at
the open port. Do not over lubricate. Run the motor for ten
minutes until excess grease is purged from the cavity. Replace
the plugs.
Units are supplied with blower shaft bearings that do not require
maintenance but may be relubricated if desired. Every three
years, using a low pressure grease gun, pump grease into the
bearing grease fitting until grease just begins to show at the
seals. Do not over lubricate. Use any lithium base grease
recommended for ball bearing service.
OUTDOOR COIL - Dirt should not be allowed to accumulate
on the outdoor coil surface or other parts in the air circuit.
Cleaning should be as often as necessary to keep coil clean.
Use a brush, vacuum cleaner attachment, or other suitable
means. If water is used to clean coil, be sure electric power to
the unit is shut off prior to cleaning.
NOTE: Exercise care when cleaning the coil so that the coil
fins are not damaged.
Do not permit the hot condenser air discharge to be
obstructed by overhanging structures of shrubs.
GAS HEATING UNITS
BURNER & PILOT - Periodically (at least annually at the
beginning of each heating season) make a visual check of the
pilot and main burner flame. If necessary, adjust main burner
primary air shutters to give a distinct, sharp blue flame as
explained under “BURNER AIR SHUTTER ADJUSTMENT”. If
it is not possible to adjust for the proper flame, the burners may
need cleaning.
TO CLEAN BURNERS - Remove them from the furnace as
explained in “Burner Instructions”. Clean burners with hot water
applied along top of the burner.
COMBUSTION AIR DISCHARGE - Visually inspect discharge
outlet periodically to make sure that the buildup of soot and dirt
is not excessive. If necessary, clean to maintain adequate
combustion air discharge.
CLEANING FLUE PASSAGES AND HEATING ELEMENTS
With proper combustion adjustment the heating element of a
gas fired furnace will seldom need cleaning. If the element
should become sooted, it can be cleaned as follows:
1. Remove the burner assembly as outlined in “BURNER
INSTRUCTIONS”.
2. Remove the roof over the gas heat section.
3. At the top plate from the top draft blower housing and the
top draft blower wheel.
4. Remove the screws holding the top of the flue collector box.
Carefully remove the top of the flue collector box without
ripping the adjacent insulation. Then remove the center
divider plate separating the upper and lower flue boxes.
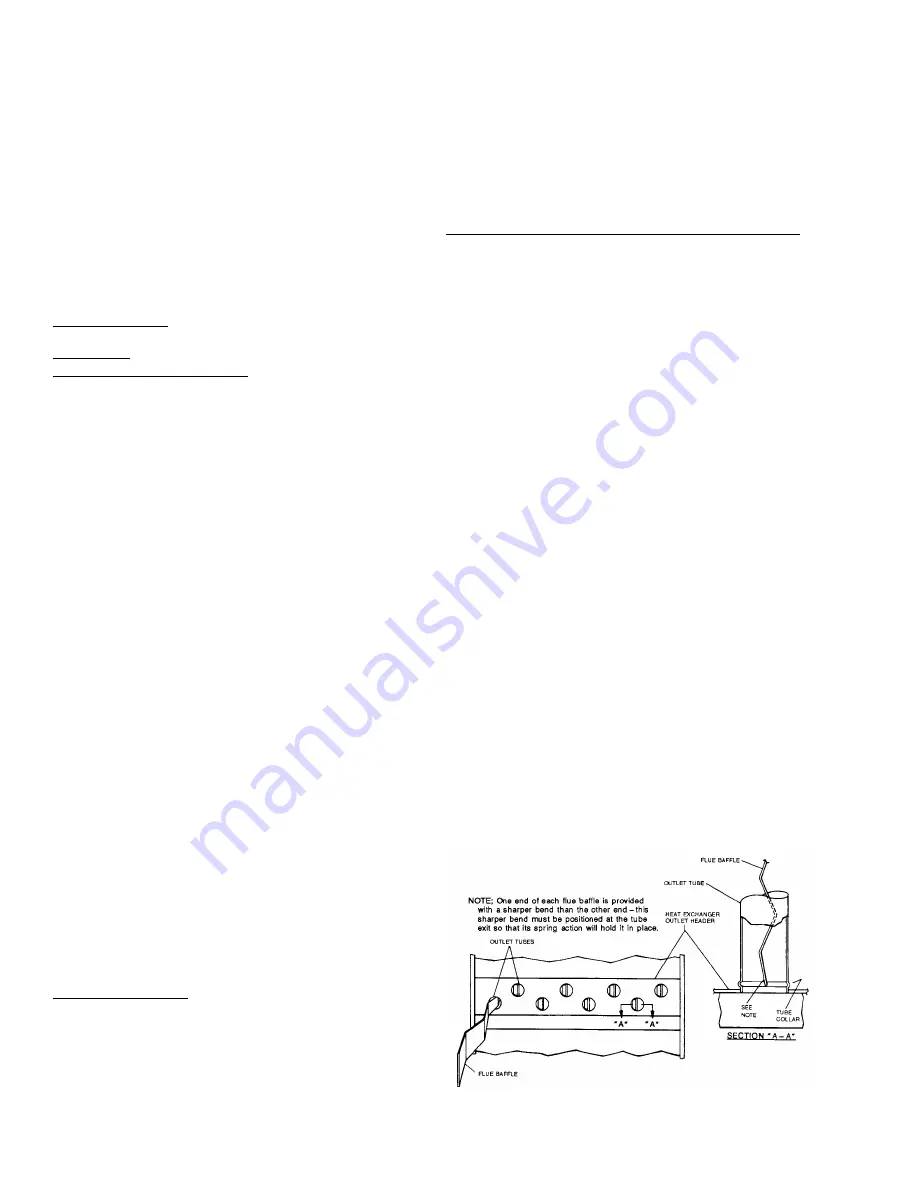
5. On the inside of the flue collector box, remove the flue
baffles from the tube interiors. Note the last bend of the
baffle fits tightly against the tube forcing the end of the baffle
to lock into the tube collar. This collar is formed when the
tube is expanded into the end sheet. To remove, move the
end of the baffle toward the center of the tube releasing the
end of the baffle from the tube collar, then pull straight out
of the tube. Refer to Figure 20.
6. Using a wire brush on a flexible wand, brush out the inside
of each heat exchanger from the burner inlet and flue outlet
ends.
7. Brush out the inside of the flue collector box and the flue
baffles.
8. Run the wire brush down the vent hoods from the flue
collector end.
9. If soot build-up is particularly bad, remove the vent motor
and clean the wheel and housings. Run the wire brush
down the flue extentions at the outlet of the vent housings.
10. After brushing is complete, blow all brushed areas with air
or nitrogen. Vacuum as needed.
11. Replace parts in the order they were removed in Steps
1 thru 4.
12. When replacing the center and top of the flue collector box,
be careful not to tear the adjoining insulation.
13. Ensure that all seams on the vent side of the combustion
system are air tight. Apply a high temperature (+500
°
F)
sealing compound where needed.
MAINTENANCE
FIG. 18 - TYPICAL FLUE BAFFLE INSTALLATION
530.18-N11Y
20
Unitary Products Group


