background image

280241-YIM-D-0909

20

Johnson Controls Unitary Products

TO TURN OFF GAS TO UNIT

1.

Set the thermostat to the OFF position.

2.

Turn off all electric power to the appliance if service is to 
be performed.

3.

Remove the control access panel.

4.

Turn the gas valve switch to the OFF position. DO NOT 
FORCE.

5.

Replace the control access panel.

POST-START CHECK LIST (GAS)

After the entire control circuit has been energized and the 
heating section is operating, make the following checks:

1.

Check for gas leaks in the unit piping as well as the sup-
ply piping.

2.

Check for correct manifold gas pressures. See Checking 
Gas Input.

3.

Check the supply gas pressure. It must be within the lim-
its shown on rating nameplate. Supply pressure should 
be checked with all gas appliances in the building at full 
fire. At no time should the standby gas line pressure 
exceed 13.5", nor the operating pressure drop below 
4.5" for natural gas units. If gas pressure is outside these 
limits, contact the local gas utility for corrective action.

MANIFOLD GAS PRESSURE ADJUSTMENT

Small adjustments to the gas flow may be made by turning 
the pressure regulator adjusting screw on the automatic gas 
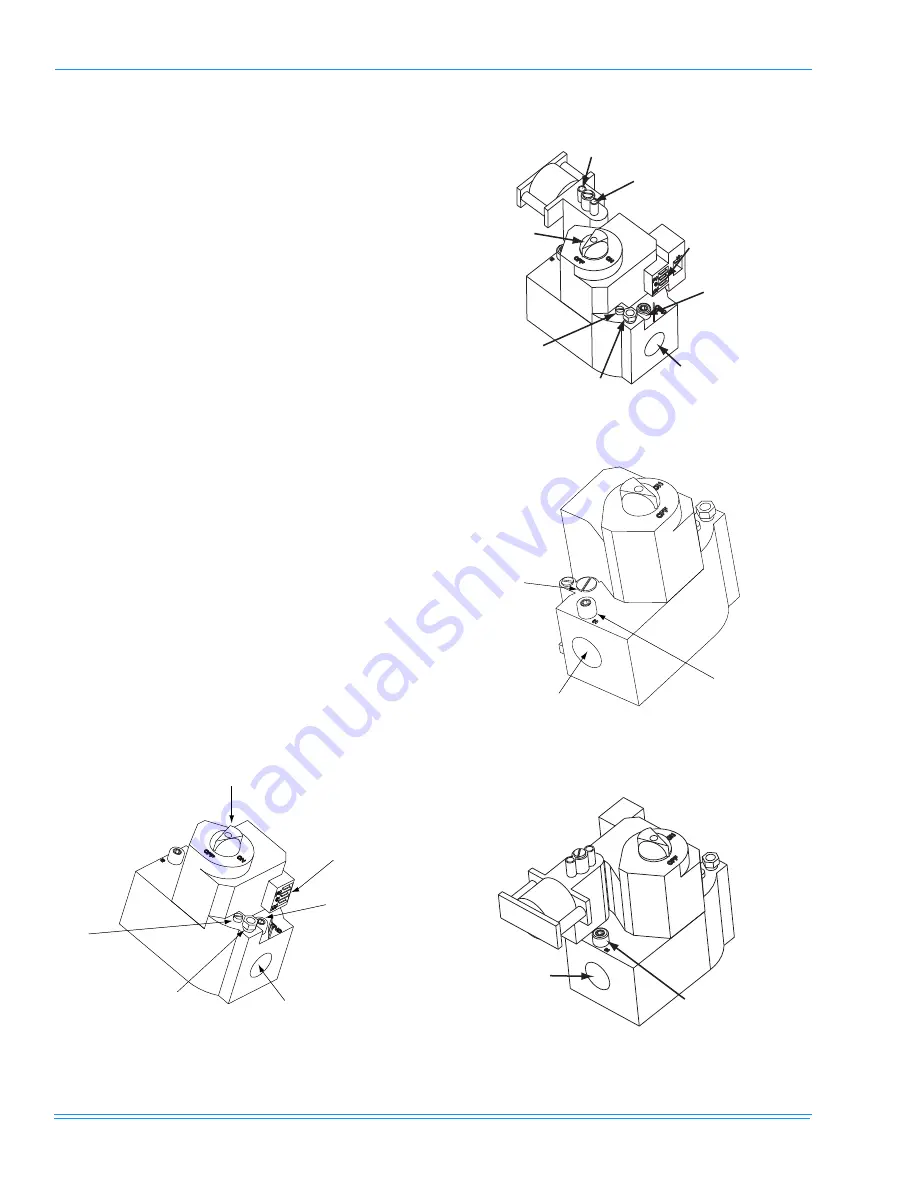
valve. Refer to Figures 13 and 14.

FIGURE 13 -  SINGLE STAGE GAS VALVE - FRONT

FIGURE 14 -  TWO STAGE GAS VALVE - FRONT

FIGURE 15 -  SINGLE STAGE GAS VALVE - REAR

FIGURE 16 -  TWO STAGE GAS VALVE - REAR

Manual

Gas Switch

Pilot
Adjustment
(Remove Cap)

Pilot Gas
Connection
(1/4” Compression)

1/2” NPT

(Outlet)

Outlet Pressure

Tap (1/8” NPT)

Electrical
Connection

Hi Fire
(2nd Stage)
Manifold Pressure

Low Fire
(1st Stage)
Manifold Pressure
Adjustment

Electrical
Connection

½

NPT

(Outlet)

Manifold
Pressure
Tap

Pilot
Gas
Connect

Pilot
Adjustment
(Remove Cap)

Manual
Gas
Switch

Manifold Pressure
Adjustment
(Under Cap)

1/2” NPT

(Inlet)

Line Pressure
Tap (1/8” NPT)

Line Pressure
Tap

½

NPT

(Inlet)

Summary of Contents for AFFINITY SERIES

Page 1: ...are intended to clarify or make the installation easier Cautions are given to prevent equipment damage Warnings are given to alert installer that personal injury and or equipment damage may result if...

Page 2: ...ITION TRIAL PERIOD 17 PILOT FLAME STABILIZATION PERIOD 17 HEAT BLOWER ON DELAY 17 MAIN BURNER OPERATION 17 POST PURGE 18 HEAT BLOWER OFF DELAY 18 LOCKOUT 18 HIGH TEMPERATURE LIMIT SWITCH 18 ROLLOUT SW...

Page 3: ...060 SINGLE STAGE 208 230 1 60 POWER SUPPLY 27 23 TYPICAL WIRING DIAGRAM D NP 060 TWO STAGE 208 230 1 60 POWER SUPPLY 28 24 TYPICAL WIRING DIAGRAM D NP 030 048 SINGLE STAGE GAS HEAT 208 230 3 60 POWER...

Page 4: ...easier CAUTIONS are given to prevent equipment damage WARNINGS are given to alert the installer that personal injury and or equipment damage may result if installation procedure is not handled proper...

Page 5: ...48 000 BTUH 060 60 000 BTUH 036 36 000 BTUH 58 575 3 60 D Single Package Air Conditioner PRODUCT IDENTIFIER NP 13 SEER Gas Heat Electric NOMINAL COOLING CAPACITY MBH N Single Stage D Two Stage FACTOR...

Page 6: ...ngs in the skid are provided for this purpose Forks must pass completely through the base Refer to Table 2 for unit weights and to Figure 2 for approxi mate center of gravity DUCT WORK These units are...

Page 7: ...ccess to all serviceable components is provided by the fol lowing removable panels Blower compartment Gas control electrical service access Refer to Figure 10 for location of these access panels and m...

Page 8: ...HERMOSTAT ONLY Minimum wire size of 18 AWG wire should be used for all field installed 24 volt wire THERMOSTAT UNIT TERMINAL STRIP NOTE HEAT ANTICIPATOR SHOULD BE SET AT 0 35 AMPS FOR ALL MODELS 24 VO...

Page 9: ...TERMINAL STRIP NOTE HEAT ANTICIPATOR SHOULD BE SET AT 0 35 AMPS FOR ALL MODELS 24 VOLT TRANSFORMER C 2 1 C PROGRAMMABLE THERMOSTAT ONLY 1 2 1 W2 FIGURE 6 TYPICAL FIELD POWER WIRING DIAGRAM G R O U N...

Page 10: ...0 feet above sea level 2 Based on 1075 BTU Ft 3 3 The air flow must be adequate to obtain a temperature rise within the range shown Continuous return air temperature should not be below 55 F TABLE 4 N...

Page 11: ...to obtain a temperature rise within the range shown Continuous return air temperatures should not be below 55 F TABLE 6 PROPANE1 GAS APPLICATION DATA TWO STAGE AVAILABLE ON MODELS INPUT MBH 2 HIGH FI...

Page 12: ...by local codes a manual shut off valve may have to be installed outside of the unit 3 Use wrought iron or steel pipe for all gas lines Pipe dope should be applied sparingly to male threads only FIGUR...

Page 13: ...be fastened to the outside of the side gas control electri cal compartment with the screws provided in the bag attached to the inside of the gas control electrical compart ment see Figure 9 If flexib...

Page 14: ...OMPRESSOR COND FAN MOTOR FLA SUPPLY AIR BLOWER MOTOR FLA MINIMUM CIRCUIT AMPACITY MAX FUSE SIZE AMPS2 MAX HACR BREAKER SIZE AMPS UNIT POWER FACTOR TRANSFORMER SIZE VA MIN MAX RLA LRA 024 208 230 1 60...

Page 15: ...GAS ELECTRIC CONTROL SERVICE ACCESS COMPARTMENT PANEL OVERALL OVERALL TABLE 11 UNIT DIMENSIONS FRONT UNIT SIZE DIMENSION A B 024 030 036 33 1 2 18 1 4 042 048 060 41 1 2 23 1 8 TABLE 12 UNIT MINIMUM C...

Page 16: ...ONT CONDENSATE DRAIN 3 4 NPTF GAS SUPPLY 1 5 8 DIA KNOCKOUT 1 2 NPTF CONNECTION LOW VOLTAGE CONN DIA KNOCKOUT 8 7 1 3 4 1 5 2 9 9 1 6 1 5 3 1 2 1 3 4 1 3 4 1 5 4 1 4 1 2 3 1 2 3 3 8 1 4 1 2 2 8 3 8 1...

Page 17: ...ge period before de energizing If the pressure switch is lost during an ignition trial period the control immediately de energizes spark and gas The control begins pressure switch proving before an in...

Page 18: ...lve and flash 7 on the LED The blower output will be energized during an open rollout condition If the rollout switch closes the control shall remain locked out until power removed or W is removed Rol...

Page 19: ...for COOL occurs the circulating fan continues to run at the cool speed If a call for HEAT occurs the circulating fan switches to heat speed after a 30 second delay When the thermostat ends the call f...

Page 20: ...hould the standby gas line pressure exceed 13 5 nor the operating pressure drop below 4 5 for natural gas units If gas pressure is outside these limits contact the local gas utility for corrective act...

Page 21: ...3 8 of the end of the flame sensor and not contain any yellow color see Fig ure 17 4 Replace the pilot adjustment cover screw after the pilot flame is set To check adjust or remove the pilot assembly...

Page 22: ...your particular locality Contact your gas company for this information since it varies widely from city to city TABLE 14 GAS RATE CUBIC FEET PER HOUR1 SECONDS FOR ONE REV SIZE OF TEST DIAL 1 2 CU FT...

Page 23: ...280241 YIM D 0909 Johnson Controls Unitary Products 23 FIGURE 18 TYPICAL WIRING DIAGRAM D NP 024 SINGLE STAGE GAS HEAT 208 230 1 60 POWER SUPPLY...

Page 24: ...280241 YIM D 0909 24 Johnson Controls Unitary Products FIGURE 19 TYPICAL WIRING DIAGRAM D NP 024 TWO STAGE GAS HEAT 208 230 1 60 POWER SUPPLY...

Page 25: ...280241 YIM D 0909 Johnson Controls Unitary Products 25 FIGURE 20 TYPICAL WIRING DIAGRAM D NP 030 048 SINGLE STAGE GAS HEAT 208 230 1 60 POWER SUPPLY...

Page 26: ...280241 YIM D 0909 26 Johnson Controls Unitary Products FIGURE 21 TYPICAL WIRING DIAGRAM D NP 030 048 TWO STAGE GAS HEAT 208 230 1 60 POWER SUPPLY...

Page 27: ...280241 YIM D 0909 Johnson Controls Unitary Products 27 FIGURE 22 TYPICAL WIRING DIAGRAM D NP 060 SINGLE STAGE 208 230 1 60 POWER SUPPLY...

Page 28: ...280241 YIM D 0909 28 Johnson Controls Unitary Products FIGURE 23 TYPICAL WIRING DIAGRAM D NP 060 TWO STAGE 208 230 1 60 POWER SUPPLY...

Page 29: ...280241 YIM D 0909 Johnson Controls Unitary Products 29 FIGURE 24 TYPICAL WIRING DIAGRAM D NP 030 048 SINGLE STAGE GAS HEAT 208 230 3 60 POWER SUPPLY...

Page 30: ...280241 YIM D 0909 30 Johnson Controls Unitary Products FIGURE 25 TYPICAL WIRING DIAGRAM D NP 030 048 TWO STAGE GAS HEAT 208 230 3 60 POWER SUPPLY...

Page 31: ...280241 YIM D 0909 Johnson Controls Unitary Products 31 FIGURE 26 TYPICAL WIRING DIAGRAM D NP 060 SINGLE STAGE GAS HEAT 208 230 3 60 POWER SUPPLY...

Page 32: ...280241 YIM D 0909 32 Johnson Controls Unitary Products FIGURE 27 TYPICAL WIRING DIAGRAM D NP 060 TWO STAGE GAS HEAT 208 230 3 60 POWER SUPPLY...

Page 33: ...280241 YIM D 0909 Johnson Controls Unitary Products 33 FIGURE 28 TYPICAL WIRING DIAGRAM D NP 030 048 SINGLE STAGE GAS HEAT 460 575 3 60 POWER SUPPLY...

Page 34: ...280241 YIM D 0909 34 Johnson Controls Unitary Products FIGURE 29 TYPICAL WIRING DIAGRAM D NP 030 048 TWO STAGE GAS HEAT 460 575 3 60 POWER SUPPLY...

Page 35: ...280241 YIM D 0909 Johnson Controls Unitary Products 35 FIGURE 30 TYPICAL WIRING DIAGRAM D NP 060 SINGLE STAGE GAS HEAT 460 575 3 60 POWER SUPPLY...

Page 36: ...280241 YIM D 0909 36 Johnson Controls Unitary Products FIGURE 31 TYPICAL WIRING DIAGRAM D NP 060 TWO STAGE GAS HEAT 460 575 3 60 POWER SUPPLY...

Page 37: ...sent wire 801 BL and 805 BL are connected to M1 coil If only ASCT is present wire 202 Y is connected to ASCT 3 If neither LR or ASCT are present wire 202 Y is connected to M1coil as shown 7 Removed 8...

Page 38: ...280241 YIM D 0909 38 Johnson Controls Unitary Products...

Page 39: ...280241 YIM D 0909 Johnson Controls Unitary Products 39...

Page 40: ...o change without notice Printed in U S A 280241 YIM D 0909 Copyright 2009 by Johnson Controls All rights reserved Supersedes 280241 YIM C 1108 Johnson Controls Unitary Products 5005 York Drive Norman...

Reviews: