YOKOGAWA YTMX580 Startup Manual Download Page 5

5

TI 04R01B01-01EN

Dec. 12, 2011-00

1.3   Configuration Work Flow

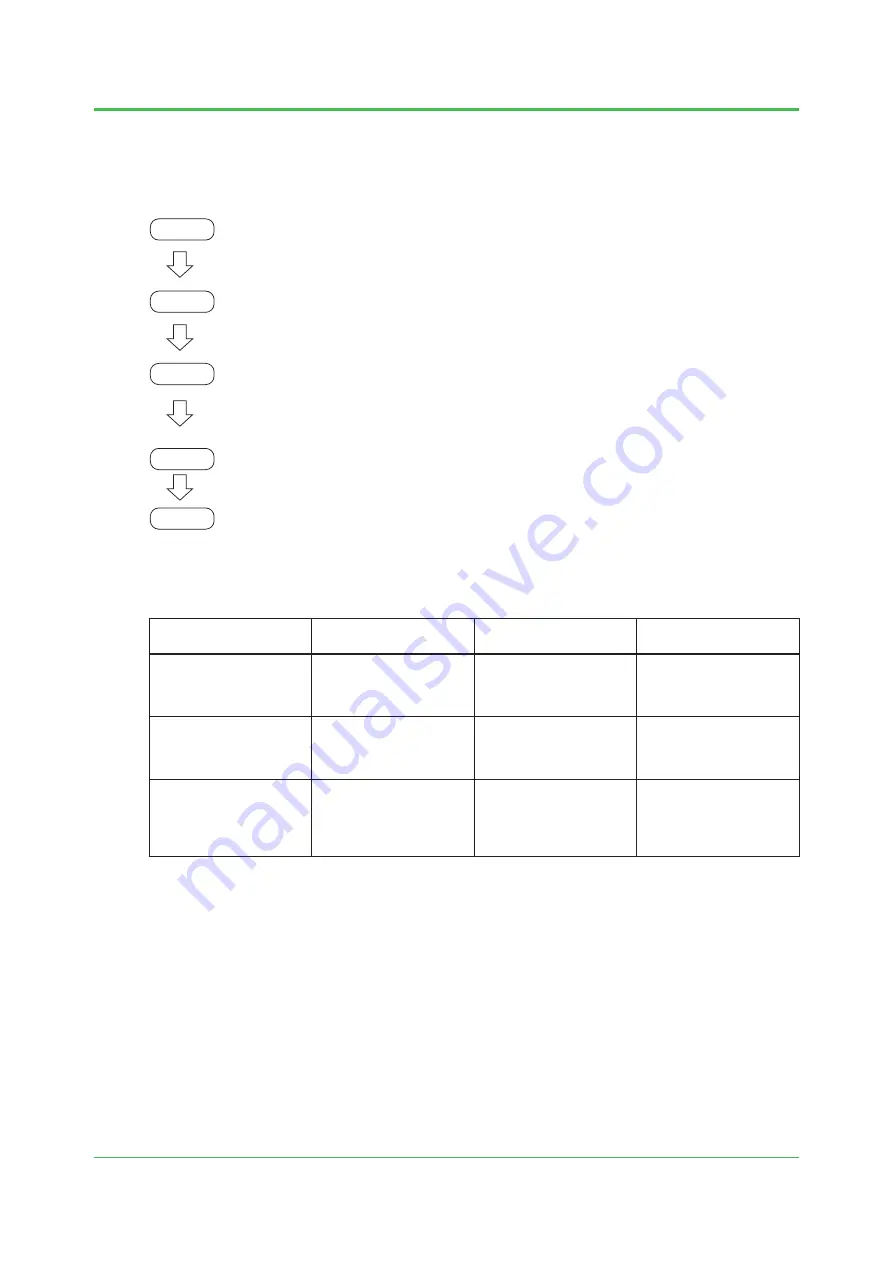
Figure 2 shows the configuration work flow. This document explains the operating procedures according to the 

steps shown in the work flow. For the work items and configuration tools used for the respective work items, refer 

to Table 2 “Work Items and Configuration Tools.” 

Step 1

Step 2

Step 3

Step 4

Start

operation

Provisioning (Section 3.1)

・ 

Perform a provisioning task to enable the YTMX to join the field wireless network.

  Configuration tool used: FieldMate Provisioning Device Tool

Configuring the YTMX

*1

 (Section 3.2)

・ 

Configure the device (the YTMX) to measure temperatures.

  Configuration tool used: FieldMate

Configuring the Network (Communication) and Registering Device

*2

 (Section 3.3)

・ 

Configure the network (communication), register the device (the YTMX) with the YFGW 

and connect the YTMX to the field wireless network.

  Configuration tool used: Field Wireless Configurator

Configuring Monitoring Device (Section 3.4)

・ 

Configure the DX or the MW to acquire the process data via Modbus/TCP.

Figure 2  Work Flow

Table 2  Work Items and Configuration Tools

Item

Settings

Configuration Tool

Applicable Device and 

Communication Medium

Provisioning

• Device Tag

• Network ID

• Join Key

• Export Configuration File

FieldMate Provisioning 

Device Tool

Configure the settings on 

the YTMX via infrared com

-

munication

Configuring the YTMX

• Device Configuration

• Input Configuration

FieldMate

Configure the settings 

on the YTMX via infrared 

communication or wireless 

communication

*1

Configuring the Network 

(Communication) and Reg-

istering Device

• Import Configuration File

• Publication Period

• Device Role

• Register Device (YTMX)

• Modbus Configuration

Field Wireless Configurator

Configure the settings on 

the YFGW via Ethernet

*1: Configuration via wireless communication is available after operation starts.

*2: Configuration on the YTMX is performed from the YFGW.

Summary of Contents for YTMX580

Page 1: ...onitoring Device Network 7 2 4 1 Configuring the DX 7 2 4 2 Configuring the MW 8 2 5 Connecting the Devices 8 3 Configuration 9 3 1 Provisioning Step 1 9 3 2 Setting the YTMX Step 2 12 3 3 Configuring...

Page 2: ...product names appearing in this document are trademarks or registered trademarks of their respective com panies Precautions for Use n Scope of Explanation in this Document This document does not expla...

Page 3: ...eferred to as PCs are used In one PC hereinafter referred to as PC1 Field Wireless Configurator that is used for field wireless network configuration and maintenance and Field Wireless Management Tool...

Page 4: ...guration and provi sioning Infrared adapter Supplier ACTiSYS Product name Infrared USB Serial Adapter Product No ACT IR224UN LN96 9 600 bps 1 Hub 1 3 ports or more LAN cable 3 Straight cable Software...

Page 5: ...X to the field wireless network Configuration tool used Field Wireless Configurator Configuring Monitoring Device Section 3 4 Configure the DX or the MW to acquire the process data via Modbus TCP Figu...

Page 6: ...and Device File Table 4 shows the software that is required for configuration Install the configuration tools the infrared adapter driver and Device File on each of the PCs For the installation proce...

Page 7: ...Mask 255 255 255 0 Default Gateway 192 168 0 1 2 4 1 Configuring the DX Configure the network settings in the Basic Setting Mode Perform the following operation to enter the Basic Setting Mode MENU ke...

Page 8: ...nfiguring the MW Configure the network settings in MW100 IP Configuration Software 1 Start MW100 IP Configuration Software from the Start menu of PC1 2 Click Search Select the detected MW and click Ne...

Page 9: ...e information will need to be imported into Field Wireless Configurator later on 1 Connect the infrared adapter to PC2 and ensure that the distance to the infrared communication port on the front of t...

Page 10: ...00 in Network ID and YTMX580 in Device Tag and click Start Provisioning If a device tag is already set set YTMX580 as necessary When the dialog box to confirm whether to update the settings appears cl...

Page 11: ...11 TI 04R01B01 01EN Dec 12 2011 00 7 Click Exit from the File menu to exit Provisioning Device Tool...

Page 12: ...ruction manual of FieldMate 1 Connect the infrared adapter to PC2 and ensure that the distance to the infrared communication port on the front of the YTMX is within 30 cm 2 Start FieldMate from the St...

Page 13: ...ice Configuration and select the Configuration tab For FieldMate R2 04 01 Device Configuration is under Menu online 5 Select the O S checkbox in Mode Target of Block Mode and click Apply parameters Do...

Page 14: ...Temp Scale High Limit Scale EU at 100 100 0 Scale Low Limit Scale EU at 0 0 0 Unit Scale Unit Index C degC Input Type Lin Type Type K Data Type Process Value Type Direct 7 Select the checkbox for Auto...

Page 15: ...uring the Network Communication and Registering the Device Step 3 3 3 1 Configuring Network Communication 1 Start Field Wireless Configurator from the Start menu of PC1 2 When the Login dialog box app...

Page 16: ...m Settings Remarks Network ID 100 The YFGW710 works with the network ID specified here IPAddress 192 168 0 101 Field Wireless Configurator will access the YFGW710 that is specified here Subnet Mask 25...

Page 17: ...Click the Devices tab and click the Open File icon 2 Select the file YTMX Prov ypif from the location to which the provisioning file was copied and click Open When the dialog box to confirm whether to...

Page 18: ...ed Device Tag 2 When the Edit Device window appears click Load CF DD Select the CF file 00010101 cff for the YTMX and click Open Default c Program Files Yokogawa DTM DTMev EV ISA100 00594543 1802 n Se...

Page 19: ...click Apply When the confirmation message appears click OK n Setting Modbus Resisters Map the process data parameters to the registers of the YFGW according to the settings below Parameter Input Regis...

Page 20: ...r AI_02 to AI_08 to map the parameters to the registers 4 When the mapping of the parameters is complete click Apply Changes n Saving Project File 1 Click Save Project As from the File menu 2 Enter YT...

Page 21: ...k Download from the Tools menu 2 When the Download Project Data window appears click Start download When the confirmation message appears click Yes 3 Select YTMX yep and click Save When the message to...

Page 22: ...e confirm that there are no errors and click Close If errors such as a timeout occur wait for about 3 minutes and then click Start download again 5 Click Close in the Download Project Data dialog box...

Page 23: ...instruction manuals of the respective devices 3 4 1 Configuring the DX n Configuring the Modbus Client Configure the Modbus client in the Basic Setting Mode Perform the following operation to enter t...

Page 24: ...24 TI 04R01B01 01EN Dec 12 2011 00 l Basic Configuration Setup Screen Communication Ethernet Modbus Client Basic Setting DISP ENTER Settings Read cycle 2s Retry interval 2min...

Page 25: ...Communication Ethernet Modbus Client Modbus server settings DISP ENTER Settings Connection Destination Server 1 Port 502 Modbus Server Name 192 168 0 101 IP address of the YFGW Unit Auto l Setting Tra...

Page 26: ...asic Configuration Mode When the dialog box to confirm whether to save the settings appears select Yes DISP ENTER l Setting the Calculation Expression In the calculation channel set the communication...

Page 27: ...l Setting the Group Set the group for the channels to be displayed Setup Screen MENU key to switch to setting mode Menu tab Group set Trip line DISP ENTER Settings Group No 1 On Off On Group Name Set...

Page 28: ...perating procedures of the MW refer to the instruction manual of the MW n Configuring the Modbus Client l Modbus Client Setting 1 Setup Screen Top window Communication Setting Modbus Client Setting 1...

Page 29: ...29 TI 04R01B01 01EN Dec 12 2011 00 l Modbus Client Setting 2 Setup Screen Top window Communication Setting Modbus Client Setting 2 Settings No 1 Server 192 168 0 101 Set the IP address of the YFGW...

Page 30: ...g Modbus Client Setting 3 Settings No Type Server Unit Register Data Type Channel Top End 001 Read 1 255 30005 Float Big C001 C001 002 Read 30008 C002 C002 003 Read 30011 C003 C003 004 Read 30014 C004...

Page 31: ...s data of the respective channels is to be loaded Setup Screen Top Window Chanel Setting MATH Channel Setting Settings No Action Expression Span Unit Decimal Point Lower Upper A001 On C001 1 0 0 100 0...

Page 32: ...12 2011 00 n Setting the Group Set the calculation channels in the display group No Setup Screen Top Window Display Setting Display Group Setting Settings No Group Name Channel Set 01 Group 1 1 A001 A...

Page 33: ...2011 00 4 Checking the Display of Process Data When configuration of all the parameters is complete check that the process data is displayed on the DX or the MW DX2000 Display Example MW100 Display Ex...

Page 34: ...d Lower 5 30006 AI_02 AI2 Temp 1st word Status 6 30007 UINT16 2nd word PV Upper 7 30008 FLOAT_B 3rd word Lower 8 30009 AI_03 AI3 Temp 1st word Status 9 30010 UINT16 2nd word PV Upper 10 30011 FLOAT_B...

Page 35: ...stalled in a distributed manner to enable all wireless field devices to communicate with the YFGW710 directly Mesh Network For applications where the latency of data is low in the priority list data c...

Page 36: ...on of the DX allows the user to customize the display flexibly by changing the size and layout of the display objects e g trend digital and bar graph Furthermore the display can be turned into an intu...

Page 37: ...Information If you have any questions you can send an E mail to the following address E mail support CENTUM csv yokogawa co jp n If you want have more information about Yokogawa products you can visit...

Reviews: