background image

25

IM 04L21B01-02EN

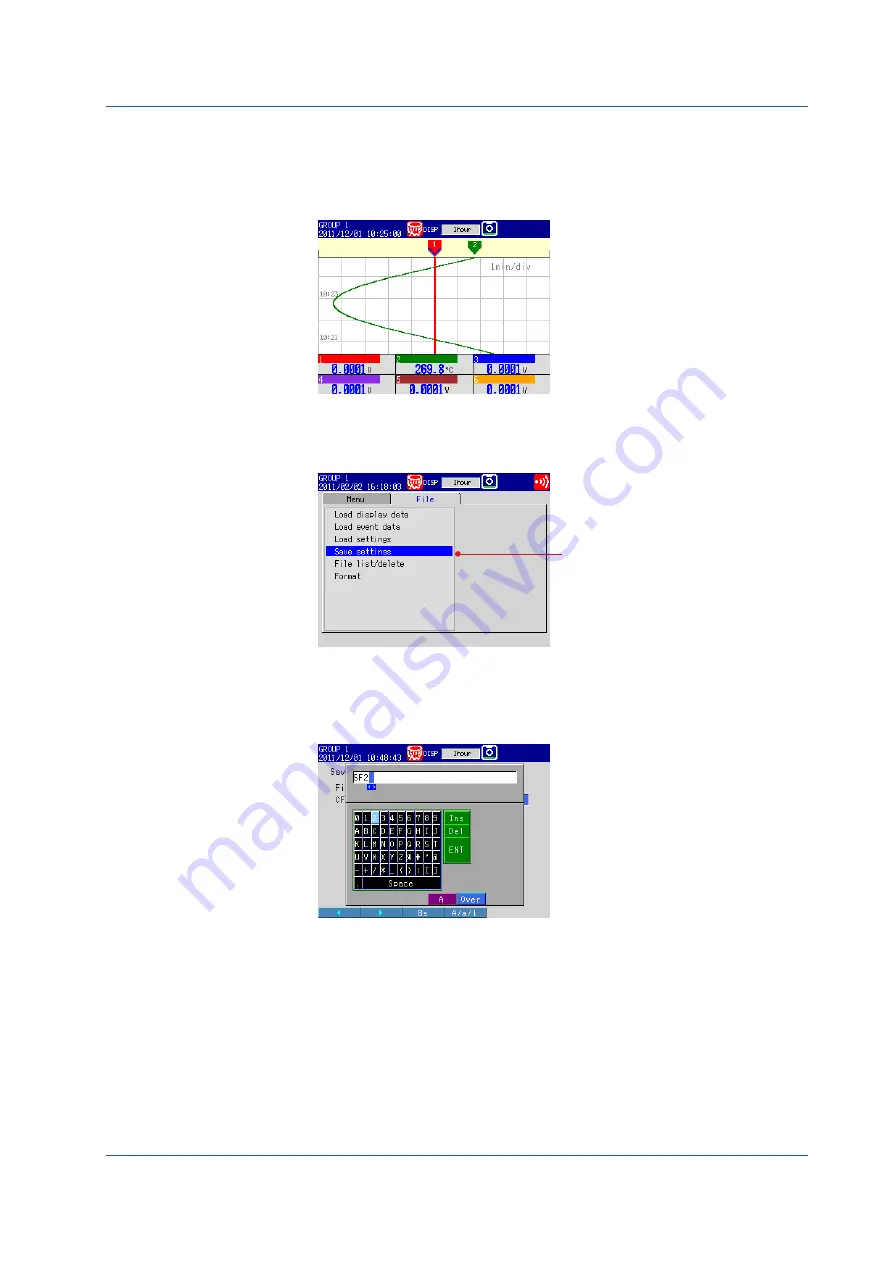
Saving the Setup Data

The following procedure is for FXs that have a CF card slot (suffix code -4.)
In this example, we will save the setup data to a file named “SF2” on the CF card.

1.

  Display the operation mode screen.


2.

  Press 

MENU

 once to display the setting menu.

3.

  Press the 

right arrow key

 once to select the 

File

 tab.

4.

  Press the 

down arrow key

 four times.


Select Save settings.

5.

  Press 

DISP/ENTER

 once.

6.

  Press the 

Input

 soft key once.

7.

   Enter “SF2” for the file name.

For the input procedure, see “Entering Values and Characters” on page 15.


8.

  Press 

DISP/ENTER

 once. The message “Data are being saved to media” 

appears, and the setup data is saved.

9.

  Press 

ESC

 or 

MENU

 twice to return to the operation mode screen.

Operation complete.

Setting the Functions and Operations

Summary of Contents for FX1002

Page 1: ...User s Manual Y okogawa Electric Corporation Models FX1002 FX1004 FX1006 FX1008 FX1010 FX1012 FX1000 First Step Guide IM 04L21B01 02EN 2nd Edition...

Page 2: ...n 12 Panel Keys 12 Display 12 Display on the Status Display Section 13 Run Modes 14 Entering Values and Characters 15 Inserting Removing a CF Card 16 Setting the Functions and Operations 18 Setting th...

Page 3: ...Action and Remote Control Functions R1 and PM1 Options Chapter 8 Using the Security Function Chapter 9 Computation and Report Functions M1 PM1 and PWR1 Options Chapter 10 Troubleshooting Chapter 11 Ca...

Page 4: ...plies to measuring circuits connected to low voltage installation and electrical instruments supplied with power from fixed equipment such as electric switchboards This instrument is an EN61326 1 EMC...

Page 5: ...software on a single PC You must purchase another copy of the software if you are to use the software on another PC Copying the software for any purposes other than backup is strictly prohibited Pleas...

Page 6: ...act 1 A2 Alarm output 4 points C contact 1 A3 Alarm output 6 points C contact 1 3 A4A Alarm output 12 points A contact 1 3 C2 RS 232 interface 2 C3 RS 422A 485 interface 2 C7 Ethernet interface F1 FAI...

Page 7: ...the FX No Name Model Q ty Notes 1 CF card 772093 1 512 MB 772094 1 1 GB 772095 1 2 GB 2 CF card adapter 772090 1 3 Shunt resistor X010 250 3 1 250 0 1 X010 100 3 1 100 0 1 X010 010 3 1 10 0 1 4 Mounti...

Page 8: ...o set the language see section 2 6 Changing the Displayed Language in the FX1000 User s Manual IM 04L21B01 01EN Unit K Denotes 1024 Example 768 KB file size k Denotes 1000 The following markings are u...

Page 9: ...rview display can be used to display and monitor all channels on a single screen Trend display Numeric digital display Overview display Bar graph display Other Functions Mathematical Function M1 PM1 a...

Page 10: ...s that have a CF card slot suffix code 4 Communication Interface User s Manual IM 04L21B01 17EN USB port Alarm output CF card USB flash memory Keyboard Remote input Keys Terminology Memory sample The...

Page 11: ...erial port C2 option RS 232 port Input terminals Used to connect input signal wires from the item you want to measure Rear Panel Operation cover opened LCD Display various operation displays such as t...

Page 12: ...power cord FX1000 Safety Precautions and Installation Guide IM 04L21B01 03EN Chapter 12 in the FX1000 User s manual IM 04L21B01 01EN Set the date time load the CF card and so on Pages 15 through 18 Se...

Page 13: ...he setting mode to the basic setting mode DISP ENTER key and four arrow keys up down left and right Switches the operation screen Selects and enters setup items DISP ENTER key Up arrow key Right arrow...

Page 14: ...of the user logged in When using the login and batch functions Date and time and the display name are shown alternately Displayed when any alarm is activated Blinks when there are alarms that are occ...

Page 15: ...modes Mode Description Operation mode A mode for performing measurements Setting mode A mode in which input range measurement method and so on are configured Settings can be changed when memory sampli...

Page 16: ...When a window for entering a character string appears enter it by performing the following key operation Left and right arrow soft keys Moves the cursor in the text box to select the input position Ke...

Page 17: ...the upside down may cause damage 2 Insert the CF card into the slot Displays the CF card icon If the FX does not recognize the CF card try reinserting it 3 Close the front cover Operation complete Rem...

Page 18: ...ject the CF card the CF card icon disappears Eject button Press the eject button in until it clicks The eject button stops at depressed position Pinch the left and right sides of the CF card and remov...

Page 19: ...etting menu 3 Press the down arrow key once The cursor moves to Date Time 4 Press the right arrow key once Select Date Time 5 Press DISP ENTER once to open the Time set window 6 Change the date from 0...

Page 20: ...tem Description Number in the Figure Channel Use channel 1 1 Tag TI 001 2 Sensor Type T thermocouple 3 Input range 0 0 to 200 0 C 4 1 Input Range Press MENU switch to the setting mode Select the Menu...

Page 21: ...e The cursor moves to Span_L 11 Press the Input soft key once Display the Span_L setting window 12 Enter 0 0 in the Span Lower box Select the input position Press the right arrow key once to move the...

Page 22: ...fter the settings have been configured 2 Tag Select the Menu tab Meas channel Tag Memory Delay 2 Operation complete For more details of the setting input range see Section 3 3 Setting the Input Range...

Page 23: ...0 L H 4 Alarm condition Output an alarm if the measured value is less than or equal to 120 0 L H Output destination Relay contact I03 5 1 Input Range and Alarm Press MENU switch to the setting mode Se...

Page 24: ...Description Number in the Figure Group Assign channel 1 and 2 to group 1 1 1 Group Press MENU to switch to setting mode select the Menu tab Group set Trip line 1 Operation complete For more details of...

Page 25: ...rt memory sampling after configuring the settings as shown above the measured values are displayed as a waveform trend display and are recorded to the internal memory The data recorded to internal mem...

Page 26: ...the right arrow key once to select the File tab 4 Press the down arrow key four times Select Save settings 5 Press DISP ENTER once 6 Press the Input soft key once 7 Enter SF2 for the file name For the...

Page 27: ...e Display the confirmation window 2 Select Mem Math or Memory using the left and right arrow keys Memory Stops memory sampling Mem Math Stops memory sampling and computation option On models without t...

Page 28: ...w key to select the group Select DIGITAL GROUP 1 5 Press DISP ENTER once to show the operation display of the selected group To close the menu without switching the display press ESC Digital display G...

Page 29: ...umbers 1 10 can also be used for free message appears Press DISP ENTER 3 Press the down arrow key With message 1 selected press the Input soft key Enter START Show the message registration window For...

Page 30: ...the trend display Show the trend display first 1 Press FUNC display the FUNC key menu press the Message soft key and press the 1 10 soft key Show the message registration window 1 soft key 2 Press th...

Page 31: ...gure IP address 192 168 1 101 1 Subnet mask 255 255 255 0 Web server function Monitor from a Web browser on the PC using operator page 2 Access to the FX Display the Web page and do not set access pri...

Page 32: ...unication Ethernet Web page 2 3 4 Save the Settings 1 Press ESC twice to return to the basic setting menu 2 Press ESC once more The window appears for you to confirm the saving of the settings 3 Selec...

Page 33: ...end ping 192 168 1 101 Response example Reply from 192 168 1 101 bytes 32 time 10ms TTL 255 7 Displaying the FX Screen on the Browser 1 Start the browser on the PC 2 Enter the following URL http 192 1...

Page 34: ...using the accompanying software program DAQSTANDARD 1 Insert the CF card containing the measured data file into the PC that has DAQSTANDARD installed 2 Start DAQSTANDARD Viewer 3 From the File menu ch...

Reviews: