background image


5.  Run the Th app on the iOS or 


     Android device.   


6.  Connect the iOS or Android device with 


     the 52070F thermal imager.   


7.  Point the thermal imager at the area 


     of interest.


8. Short press the trigger to capture the 


    image.  The display will freeze  


    and the “hold” icon will be displayed. 


9. To discard the image, short press the 


    trigger again and the display will 


    return to live mode.  


10. Press “SHARE” to transfer the image 


     to the iOS or Android device 


     via Bluetooth

®


11. If the image is transfered successfully 


     to the smart devices, the thermal imager 


     display will return to live mode.

TRANSFER IMAGES VIA BLUETOOTH

®

 THAT 

HAVE BEEN SAVED ON THE THERMAL IMAGER


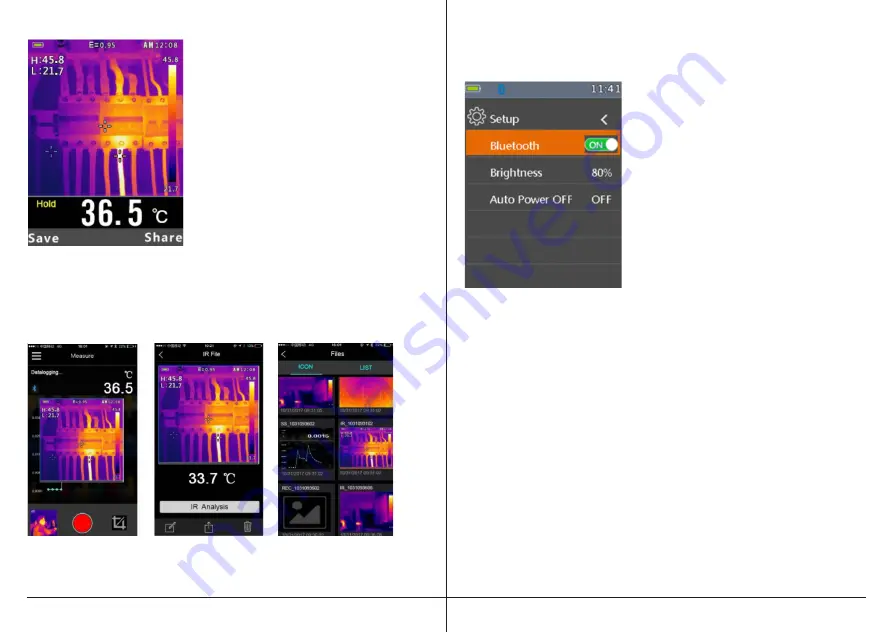
1. Press the OK button to enter the


    Settings Menu


2. Access the Setup Menu buy pressing 


   the Down Arrow button


3. Press the OK button to enter Setup menu.  


    There are three available options: 


    Bluetooth

®

, Brightness, and Auto Off


  4. 

Turn 

Bluetooth

®

 ON


5.  Run the Th app on the iOS


     or Android device


6.  Connect the iOS or Android device with 


     the 52070F thermal imager.


7.  In the Settings Menu, access the Image 


     Review mode


8.  Press the trigger to share the 


     current picture.


9.  Press “SHARE” to transfer the image 


     to the iOS or Android device.

REVIEW OR DELETE IMAGES THAT HAVE BEEN 

SAVED ON THE THERMAL IMAGER

1.  In the Settings Menu, access the Image Review mode
   Use the Review Mode to view or delete stored images. 
2. To access the Settings Menu to review and delete images. 
3. Press the back button to exit the image review mode
4. To delete all images, please access the Settings Menu and reformat 
   the SD card.
 

IMAGE CAPTURED. NOTE: 

 HOLD IS DISPLAYED

RECEIVE, ANALYZE, AND SAVE THE IMAGE

Summary of Contents for 52070F

Page 1: ...ellow JacketTM 52070F Thermal Imager Contents Made in China Fabriqu en Chine Product distributed by Produit distribu par Southwire Company LLC One Southwire Drive Carrollton GA 30119 2020 Southwire Co...

Page 2: ...UTHWIRE COMPANY DOES NOT WARRANT GUARANTEE OR MAKE ANY REPRESENTATIONS REGARDING THE USE OF OR THE RESULT OF THE USE OF THE PROGRAM IN TERMS OF CORRECTNESS ACCURACY RELIABILITY CURRENTNESS OR OTHERWIS...

Page 3: ...person s surface skin temperature at a time Position the person at a fixed distance of 3 feet 1 meter from the thermal imaging system directly facing the camera Recommended viewing angle is approxima...

Page 4: ...Interface 13 Tripod mounting hole THE THERMAL IMAGER DISPLAY 1 Current Emissivity Setting 2 Battery Charge Level Indicator 3 Hot Temperature Point Reading 4 Cold Temperature Point Reading 5 Center Cr...

Page 5: ...sy to use The 52070F has an IR resolution of 80 x 80 or 6400 temperature measurement points Here are the basic steps Covered in more detail later in this Guide 1 Press and hold the Power Button for gr...

Page 6: ...than 2 seconds to turn the imager ON The start up screen will be shown until the shutter resets the image After the startup period the imager will display a real time IR thermal image along with an IR...

Page 7: ...re the image 3 To discard the image short press the trigger again The display will return to a live image 4 Press SAVE to save the image to memory 5 If the image is stored successfully on the internal...

Page 8: ...he Setup Menu buy pressing the Down Arrow button 3 Press the OK button to enter Setup menu There are three available options Bluetooth Brightness and Auto Off 4 Turn Bluetooth ON 5 Run the Thermview a...

Page 9: ...E TEMPERATURE To help in identifying and diagnosing problems the 52070F thermal imager allows you to lock the temperature range of the current scene that you are viewing TO LOCK THE SCENE TEMPERATURE...

Page 10: ...surement is as accurate as possible TEMPERATURE UNITS 1 Press OK Button to open the Settings Menu 2 Press OK Button to select this option The color of option value will change to black C 3 Use the RIG...

Page 11: ...the brightness of the LCD display brightness Press the ESC OK button to exit The avail able brightness range is 10 to 100 in 10 steps Auto Power Off Press OK Button to select this option Use the UP or...

Page 12: ...nload and run Thermview for iOS Please search in Apple store with keyword Thermview download and run DATE AND TIME Press OK Button to enter the Time Date menu The changes that you make to the date and...

Page 13: ...pictures SCREEN CAPTURE While in Thermal imaging mode use HOLD Button to enter the HOLD mode as show below Press the OK Button to capture the image on the LCD display After the image has been saved to...

Page 14: ...ect temperature 0 C MEASUREMENT ANALYSIS Spotmeter Center Spot Automatic Hot Cold Detection Auto hot or cold markers Emissivity Correction 8 pre define level and Variable from 0 01 to 1 0 STORAGE OF I...

Page 15: ...3 74 1 D S measure 1 IFOV measure is the spot size needed to provide an accurate temperature measure Typically D S measure is 2 to 3 times smaller than D S theoretical which means the temperature mea...

Page 16: ...02 2 F de 34 a 39 C La c mara de im genes t rmicas viene calibrada de f brica con una fuente de referencia de temperatura de cuerpo negro No es necesario realizar una calibraci n in situ Cumple con lo...

Page 17: ...pec fico de uso deben determinar la importancia de cualquier caso de fiebre o temperatura elevada seg n la medici n de la temperatura en la piel por termograf a La c mara de im genes t rmicas se debe...

Page 18: ...por mucho tiempo encender la linterna led Si presiona el bot n por mucho tiempo otra vez apagar la linterna led PREPARACI N DE LA PERSONA A EXAMINAR La persona que opera el sistema de diagn stico por...

Page 19: ...e flecha hacia arriba 4 Bot n de encendido y para volver 5 Bot n de flecha hacia abajo 6 Tapa de la bater a 7 Fijaci n de la cuerda de seguridad 8 Linterna led 9 Lente para im genes IR 10 Disparador 1...

Page 20: ...r de nivel de carga de la bater a 3 Lectura de puntos de temperatura de calor 4 Lectura de puntos de temperatura de fr o 5 Punto de mira medio 6 Punto de mira de temperatura de fr o 7 Punto de mira de...

Page 21: ...equipo hacia la zona o el objeto que le interesa y observe la imagen t rmica La temperatura relativa est representada por colores de caliente a fr o La lectura de la temperatura media de gran tama o...

Page 22: ...I N DE TEMPERATURA ELEVADA EN LA PIEL Si desea utilizar el term grafo para la detecci n de temperatura elevada en la piel aseg rese de que el modo de detecci n del men Measure Medir est activado El mo...

Page 23: ...Thermview instalada 1 Presione el bot n OK Aceptar para ingresar al men Settings Ajustes 2 Presione el bot n de la flecha hacia abajo para acceder al men Setup Configuraci n 3 Presione el bot n OK Ac...

Page 24: ...TOOTH 1 Presione el bot n OK Aceptar para ingresar al men Settings Ajustes 2 Presione el bot n de la flecha hacia abajo para acceder al men Setup Configuraci n 3 Presione el bot n OK Aceptar para ingr...

Page 25: ...esta opci n El color del valor seleccionado cambiar a C en negro 3 Use el bot n RIGHT MENU DERECHA MEN para alternar entre C F y k use el bot n ESC OK SALIR ACEPTAR para salir del estado de enfoque y...

Page 26: ...endurece configurar a la emisividad a 0 94 consulte el gr fico que figura a continuaci n para que la medici n sea lo m s precisa posible Substance missivit thermique Substance missivit thermique Aspha...

Page 27: ...00 en incrementos de 10 Apagado autom tico presione el bot n OK Aceptar para seleccionar esta opci n Use los botones de flecha hacia arriba o abajo para configurar el per odo de tiempo despu s del cua...

Page 28: ...memoria INFORMACI N Presione el bot n OK Aceptar para ingresar al men Information Informaci n Este men muestra la versi n del hardware y del software del term grafo FECHA Y HORA Presione el bot n OK...

Page 29: ...seleccionar la imagen previa o la siguiente 2 Presione cualquier otra tecla para salir del modo Image Browser Explorador de im genes 1 Nombre de archivo de la imagen actual 3 2 rea de visualizaci n de...

Page 30: ...MEDICIONES Fot metro Punto medio Detecci n autom tica de fr o o calor Marcadores autom ticos de fr o o calor Correcci n de emisividad Ocho niveles predefinidos y vari ables de 0 01 a 1 0 ALMACENAMIENT...

Page 31: ...ra proporcionar una medici n precisa de la temperatura Por lo general la medici n de D S es de 2 a 3 veces menor que el D S te ri co Esto significa que la zona de medici n de la temperatura del objeti...

Reviews: