


5 Adjustments
5.4.2 Anti-Resonance Control Adjustment Function Operating Procedure
5-26
6
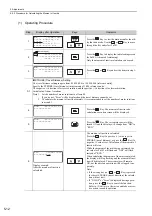
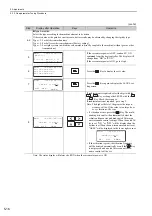
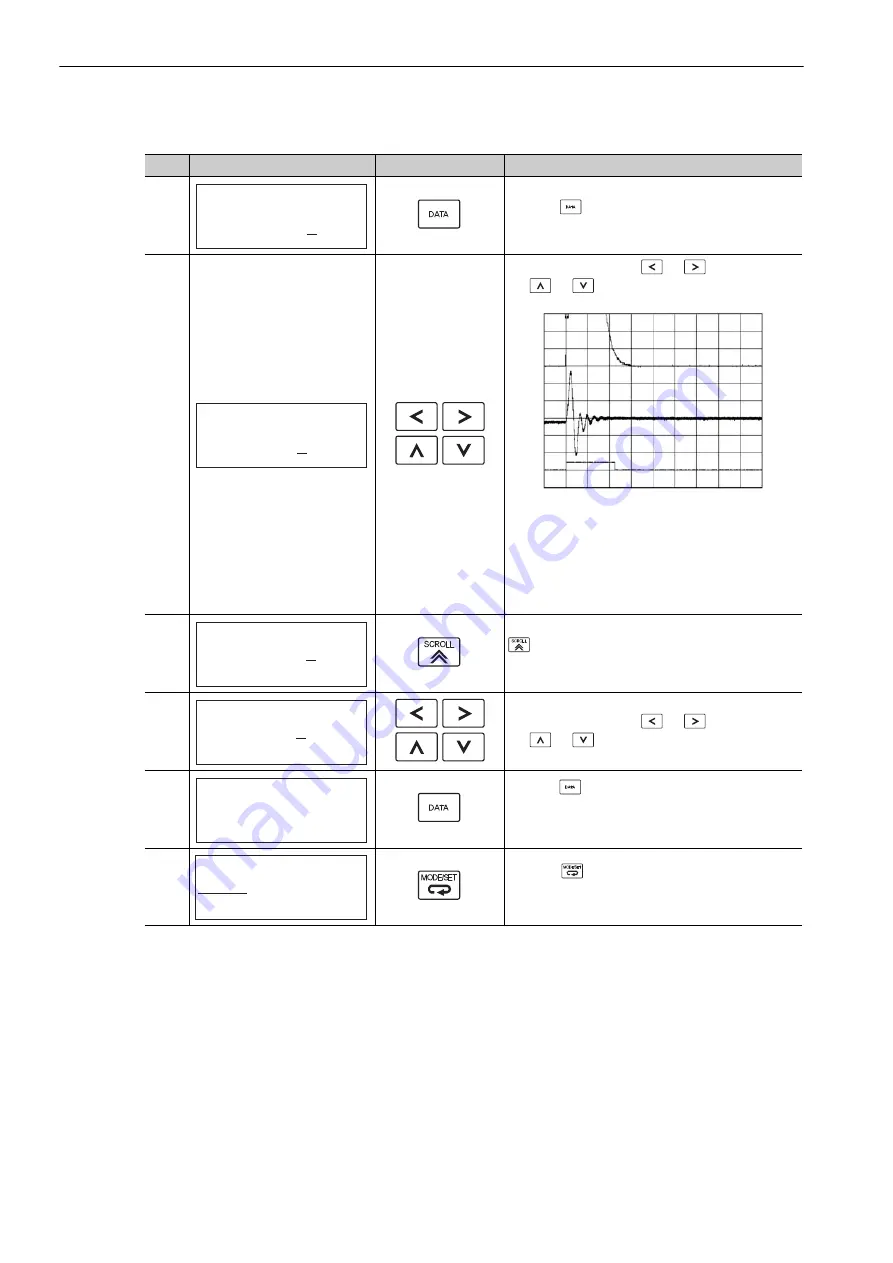
Press the
Key. The cursor will move to "damp,"
and the flashing of "freq" will stop.
7
Select the digit with the
or
Key, and press
the
or
Key to set the damping gain.
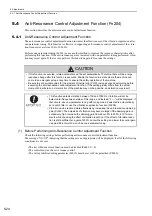
Example of measured waveform
Note: Increase the damping gain from about 0% to
200% in 10% increments while checking the
effect of vibration reduction. If vibration reduc-
tion is still insufficient at a gain of 200%, can-
cel the setting, and lower the control gain by
using a different method, such as one-parame-
ter tuning.
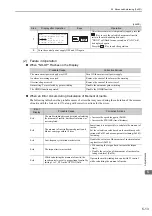
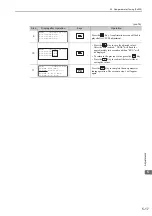
8
If fine tuning of the frequency is necessary, press the
Key. The cursor will move from "damp" to
"freq." If fine-tuning is not necessary, skip step 9 and
go to step 10.
9
Select the digit with the
or
Key, and press
the
or
Key to fine-tune the frequency.
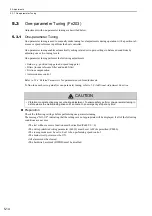
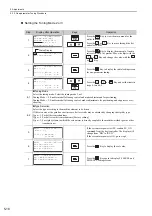
10
Press the
Key to save the adjusted settings in the
multi-winding drive unit. “DONE” will flash for
approximately two seconds and “RUN” will be dis-
played.
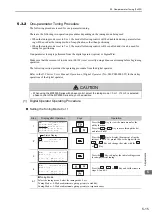
11
Press the
Key to complete the anti-resonance
control adjustment function. The screen in step 1 will
appear again.
(cont’d)
Step
Display after Operation
Keys
Operation
㧾㨁㧺 ̆ 㨂㨕㨎 㧿㨡㨜̆
㨒㨞㨑㨝 㧩 㧜㧠㧜㧜 㧴㨦
㨐㨍㨙㨜 㧩 㧜㧜㧜㧜
㧾㨁㧺 ̆ 㨂㨕㨎 㧿㨡㨜̆
㨒㨞㨑㨝 㧩 㧜㧠㧜㧜 㧴㨦
㨐㨍㨙㨜 㧩 㧜㧝㧞㧜
Error
Error
Torque reference
Torque reference
Positioning completed
Positioning completed
signal
signal
Error
Torque reference
Positioning completed
signal
Ro-
ta-
tion
㧾㨁㧺 ̆ 㨂㨕㨎 㧿㨡㨜̆
㨒㨞㨑㨝 㧩 㧜㧠㧜㧜 㧴㨦
㨐㨍㨙㨜 㧩 㧜㧝㧞㧜
㧾㨁㧺 ̆ 㨂㨕㨎 㧿㨡㨜̆
㨒㨞㨑㨝 㧩 㧜㧠㧞㧜 㧴㨦
㨐㨍㨙㨜 㧩 㧜㧝㧞㧜
㧾㨁㧺 ̆ 㨂㨕㨎 㧿㨡㨜̆
㨒㨞㨑㨝 㧩 㧜㧠㧞㧜 㧴㨦
㨐㨍㨙㨜 㧩 㧜㧝㧞㧜
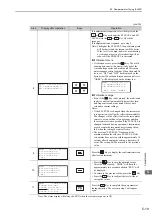
㧾㨁㧺 ̆㧲㨁㧺㧯㨀㧵㧻㧺̆
㧲㨚㧞㧜㧟㧦㧻㨚㨑㧼㨞㨙㨀㨡㨚
㧲㨚㧞㧜㧠㧦㧭㨂㨕㨎ޓ㧿㨡㨜
㧲㨚㧞㧜㧡㧦㨂㨕㨎ޓ㧿㨡㨜
㧲㨚㧞㧜㧢㧦㧱㨍㨟㨥ޓ㧲㧲㨀