background image

INSTALLATION

MOTO

MAN

4-33

ArcWorld IV-6200 XHD DR2C System Manual

4.15

Installing the Operator Station

Motoman recommends anchoring the operator station to the floor. To install the
operator station, proceed as follows:

1. Unload operator station from shipping platform.
2. Carefully remove protective plastic wrapping from operator station.
3. Inspect operator station for shipping damage.

NOTE:

If damage is found, notify shipper immediately.

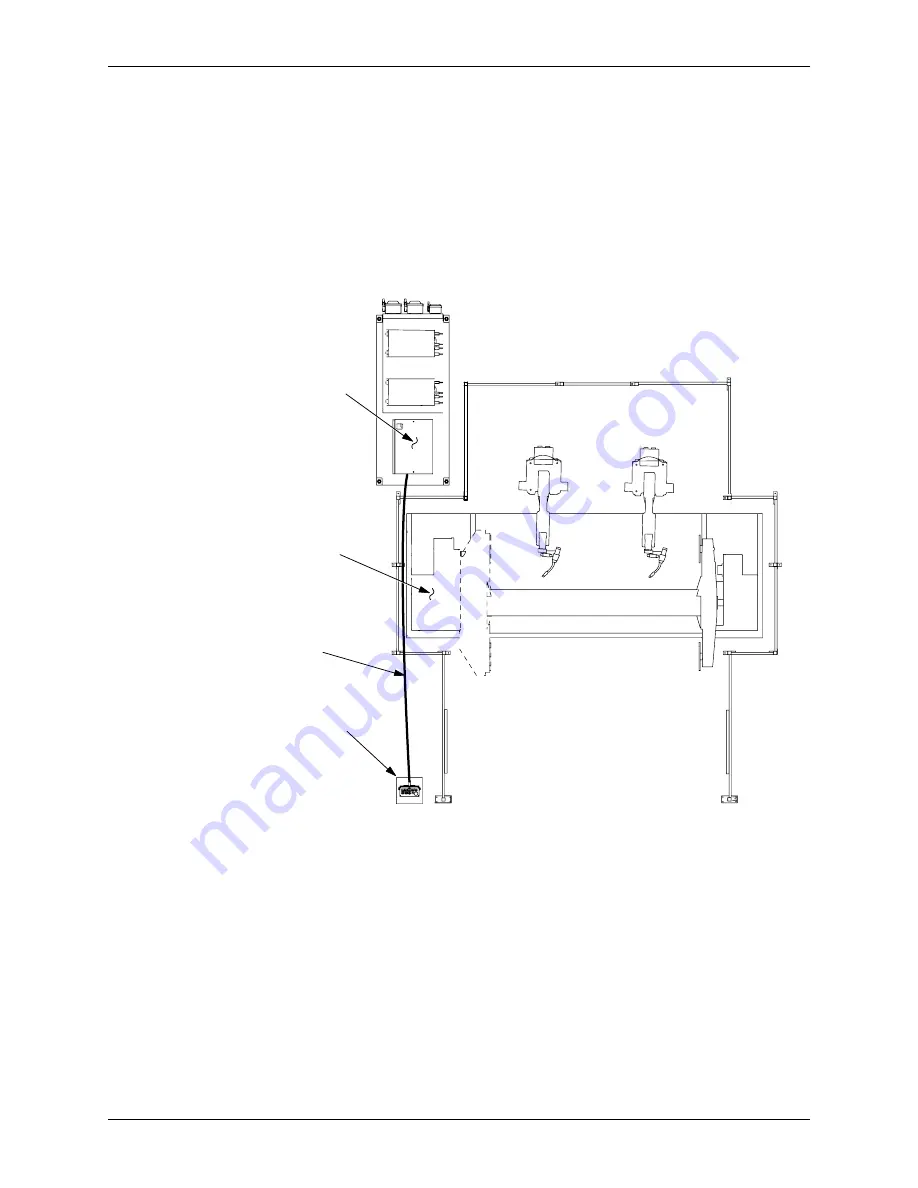
4. Place operator station outside the fence on the floor (see Figure 4-37). 

Figure 4-37   Operation Station Installation

5. Insert a 1/4-inch concrete drill bit through the center of four holes in operator

station base and drill holes for anchors.

6. Vacuum concrete dust from holes.
7. Secure operator station to floor using customer-supplied anchors.

4.15.1

Connecting the Operator Station

The operator station cable is shipped in an accessories box. To install the operator
station cable, proceed as follows:

1. Unpack the operator station cable (labeled CA21) and inspect for damage.

NOTE:

If damage is found, notify shipper immediately.

OPERATOR
STATION

OPERATOR
STATION
CABLE

CONTROLLER

HEADSTOCK

Summary of Contents for Motoman ArcWorld IV-6200 XHD DR2C

Page 1: ...Carrollton OH 45449 TEL 937 847 6200 FAX 937 847 6277 24 Hour Service Hotline 937 847 3200 QVQOCP 4 QPVTQNNGT TE9QTNF 8 4 5 UVGO CPWCN HQT 72 5GTKGU 4QDQVU Part Number 147855 1 Release Date June 17 20...

Page 2: ...produced or transmitted to other parties without the expressed written authorization of Motoman Inc 2003 by MOTOMAN All Rights Reserved Because we are constantly improving our products we reserve the...

Page 3: ...tion Safety 2 4 2 6 Programming Safety 2 4 2 7 Operation Safety 2 5 2 8 Maintenance Safety 2 6 3 EQUIPMENT DESCRIPTION 3 1 UP series Robot Description 3 1 3 2 DR2C XRC 2001 Controllers R1 and R2 3 1 3...

Page 4: ...7 1 Removing the Robot Shipping Brackets UP20 UP20 6 4 9 4 8 Installing the Programming Platforms 4 10 4 9 Installing the Auxiliary Equipment Common Base 4 11 4 10 Connecting the Cables 4 13 4 10 1 Ca...

Page 5: ...s 4 36 4 20 System Check After Power Up 4 37 4 21 Installing the Tooling and Fixtures 4 38 5 OPERATION 5 1 Programming 5 1 5 1 1 I O Assignment 5 2 5 1 2 Sweeping the Positioner 5 4 5 1 3 Rotating the...

Page 6: ...11 Unbolting Auxiliary Equipment Common AEC Base 4 11 Figure 4 12 AEC Base Installation Location 4 12 Figure 4 13 Cable Routing 4 13 Figure 4 14 Ground Welding Cable on Positioner 4 15 Figure 4 15 Po...

Page 7: ...tain Alignment Cable Routing 4 32 Figure 4 37 Operation Station Installation 4 33 Figure 4 38 Anchoring the Light Curtain Fence 4 36 Figure 4 39 Swingarm Guard Location 4 36 Figure 4 40 Swingarm Guard...

Page 8: ...ArcWorld IV 6200 XHD DR2C System Manual vi MOTOMAN NOTES...

Page 9: ...o are familiar with the operation of these Motoman robot models For more detailed robot information refer to the manuals listed in Section 1 3 This manual contains the following sections SECTION 1 INT...

Page 10: ...o prepare and set up parts on one side while the robot welds on the other side The cell provides a full complement of safety features designed to protect both personnel and equipment Figure 1 1 illust...

Page 11: ...mmon base 1 2 2 Major Components The ArcWorld IV 6200 XHD DR2C includes the following major components Motoman UP6 UP20 or UP20 6 manipulators and XRC 2001 controllers MRM2 750 S3X dual station 180 de...

Page 12: ...rameter Manual P N 147626 1 Com Arc Instruction Manual P N 144075 1 Independent Coordinated Motion Manual P N 142969 1 Vendor manuals for system components not manufactured by Motoman 1 4 Customer Ser...

Page 13: ...program and maintain the robot cell The robot must not be operated by personnel who have not been trained We recommend that all personnel who intend to operate program repair or use the robot system b...

Page 14: ...mediate and imminent hazards that if not avoided will result in immediate serious personal injury or loss of life in addition to equipment damage WARNING Information appearing under the WARNING captio...

Page 15: ...Inputs and Outputs The robot must be placed in Emergency Stop E STOP mode whenever it is not in use In accordance with ANSI RIA R15 06 section 6 13 4 and 6 13 5 use lockout tagout procedures during e...

Page 16: ...l supervisors and anyone working near the robot must become familiar with the operation of this equipment All personnel involved with the operation of the equipment must understand potential dangers o...

Page 17: ...ator s manuals the system equipment and options and accessories are permitted to operate this robot system Check all safety equipment for proper operation Repair or replace any non functioning safety...

Page 18: ...ram changes are made A backup must always be made before any servicing or changes are made to options accessories or equipment to avoid loss of information programs or jobs Do not enter the robot cell...

Page 19: ...re 3 1 features dual channel safety circuitry The controller coordinates the operation of the ArcWorld IV 6200 XHD DR2C system and is configured so that one controller directs the action of both robot...

Page 20: ...2001 P N 146822 1 For more information please call the Motoman service staff at 937 847 3200 3 2 1 Top Mount External Axis Cabinet The external axis cabinet on the R1 controller contains the amplifie...

Page 21: ...t s mode of operation NOTE Changing modes from PLAY to TEACH during playback will cause the program to cease execution similar to HOLD to resume operation press PLAY and then START Alarm The ALARM ind...

Page 22: ...or the system The pendant has a 4x5 inch 12 line 40 character LCD display and keypad The system uses the INFORM II robot language and a menu driven interface to simplify operator interaction with the...

Page 23: ...isplay to the initial start up menu The cursor key can then be used to choose from the following menu icons JOB This icon accesses job selections including Master Job Select Job Job Capacity and Creat...

Page 24: ...can not be applied in TEACH mode unless TEACH LOCK is ON RS 232C Serial Port This 9 pin serial port is used for data communication between the controller and a floppy disk controller FC1 or FC2 FDE F...

Page 25: ...shbuttons and knobs are used exclusively to change cell activities The following paragraphs describe the operator station controls Figure 3 7 Operator Station Control Panel WARNING The operation of th...

Page 26: ...s the CYCLE START command into the controller The CYCLE LATCHED light will illuminate on the operator station indicating CYCLE START latching The positioner sweeps after the robots finish the current...

Page 27: ...ng of production parts Air lines and wiring can be routed to the fixtures if required Depending on part s size and weight single multiple or a combination of parts can be mounted to the frame NOTE In...

Page 28: ...ith fixture locking pins that prevent the trunion from turning when the robot is welding 3 4 3 Arc Shield DANGER Do not operate this equipment unless the arc shield is in place or eye damage can occur...

Page 29: ...cables from the torch shock sensor are often run together or close to the feeder wires cables The MotoWeld II feeder includes a Shock Sensor Override switch and an inch button The override switch all...

Page 30: ...TRATI ON CRATE R ALARM INDICA TOR CURR ENT INPUT CABLE HEAT WATE R FUSE CRATER VOLTAG E CRATER CURRE NT A V POWER ALARM ON OFF CONTROL POWER AMMETER VOLTMETER 0 _ ON OFF ON OFF CO2 MAG FLOW AUTO SOLO...

Page 31: ...orking order 3 6 1 Service Disconnect Switches The ArcWorld IV 6200 XHD DR2C cell has three service disconnect switches that turn electricity on off for shut down or power up Listed below are the disc...

Page 32: ...light curtains help prevent serious injury to anyone entering the positioner area during the sweeping process In PLAY or TEACH mode if the positioner is sweeping and the safety light curtain is activa...

Page 33: ...efined interference zones an output is turned on in the controller These outputs can be used to interlock the activity of other manipulators or peripheral devices The controller has 24 possible cubes...

Page 34: ...ights illuminate and all positioner motion is stopped The following is a list of their locations The playback panel on the R1 controller The programming pendant The operator station To reset an E STOP...

Page 35: ...R2C system is included with the system Section 4 1 1 identifies customer supplied items and tools required to complete installation 4 1 1 Customer Supplied Items Gas bottles for the welding torches In...

Page 36: ...cell see Figure 4 1 The component names and quantities are as follows Qty Component Description 1 Robot Common Base 1 Auxiliary Equipment Base 1 Positioner 2 Programming Base 1 Fence 1 Operator Statio...

Page 37: ...s 1 Clear the floor space needed for the unit see Figure 4 2 Figure 4 2 Area Needed for Installation NOTE It is recommended to keep an additional 2 to 3 m 8 to 10 ft of clear distance on all sides of...

Page 38: ...ll arc curtains on fencing see Section 4 13 Install light curtains see Section 4 14 Install the operator station see Section 4 15 Connect the power see Section 4 16 Conduct a system check before syste...

Page 39: ...shipping skid be removed at the positioner s permanent location 1 Move the positioner to its permanent location using capable lifting devices 2 Locate all shipping bolts see Figure 4 6 and remove them...

Page 40: ...ioner If the possibility exists that the positioner will be moved after initial setup keep the positioner shipping brackets for future use 4 6 3 Positioner Leveling 1 Using a M36 socket to turn each l...

Page 41: ...ot common base proceed as follows WARNING The robot common base weighs 1500 kg 3307 lbs Be sure that your lifting device is capable of handling this much weight or damage to the equipment or injury to...

Page 42: ...Base Leveling Points 6 Insert a 1 2 inch concrete drill bit through the center of each leveling bolt see Figure 4 3 and drill holes at least four inches deep into concrete for anchor bolts 7 Vacuum co...

Page 43: ...t drive mechanisms The UP20 and UP20 6 robots have two yellow shipping brackets see Figure 4 9 to stabilize it during shipping One bracket secures the S axis to the L axis Use an 8 mm Allen wrench to...

Page 44: ...Install Programming Platforms 1 Unbolt programming platforms from the shipping skid using a 3 4 inch socket 2 Using a forklift remove the programming platforms from the shipping skid 3 Using a M24 soc...

Page 45: ...ghten the nut clockwise on each anchor until tight 4 9 Installing the Auxiliary Equipment Common Base The auxiliary equipment common AEC base contains two controllers two welders and four service disc...

Page 46: ...nspect AEC base components for any shipping damage NOTE If damage is found notify shipper immediately 6 Using an M36 socket to turn each leveling bolt level the AEC base 7 Insert a 1 2 inch concrete d...

Page 47: ...routed close to equipment when possible CAUTION Route wires and cables away from hazardous work areas to avoid wire breakage and unnecessary interruption of cell operation Figure 4 13 Cable Routing 4...

Page 48: ...0 3 Connecting the Programming Pendant Cable Unwrap the programming pendant and place it on the pendant holder located on the R1 controller Connect the pendant cable to the R1 controller at the connec...

Page 49: ...See Figure 4 13 for cable routing preferences Check that the connection is tight Figure 4 14 Ground Welding Cable on Positioner o Figure 4 15 Positive and Negative Terminals on the Welding Power Sour...

Page 50: ...5 Check that the connection is tight 5 Route the R2 positive welding cable beneath the robot common base and programming platform to Welder 2 6 Connect the R2 positive welding cable to the Welder 2 po...

Page 51: ...g platform and robot common base to the back of each robot 2 Carefully engaging connectors connect two cables labeled 1BC A and 2BC A to 1BC A and 2BC A connections on back of each robot see Figure 4...

Page 52: ...ure it to the base of the headstock cabinet using hardware removed in Step 2 see Figure 4 17 for proper orientation Figure 4 17 Positioner Interface Panel Installation 5 Route the PL21 and CN11 cables...

Page 53: ...he metal bands To unpack the fencing cut the bands securing metal fencing and remove all items from skid 4 11 2 Fence Wall Identification Use Figure 4 19 to identify fence components and location afte...

Page 54: ...o install the fence for left side of ArcWorld IV 6200 XHD DR2C cell proceed as follows CAUTION Two people are required to safely assemble the fence 1 Connect the rear wall to two fence posts one on ea...

Page 55: ...se Figure 4 19 as a guide for fence wall orientation See Figure 4 21 for fence post connections Figure 4 21 Fence Post Connections Left Side 5 Align the holes in fence post feet with holes in programm...

Page 56: ...Wall Assembly Steps C through E SECURE FENCE HERE SECURE FENCE HERE ANCHOR FENCE HERE ANCHOR FENCE HERE ANCHOR FENCE HERE PROGRAMMING PLATFORM ROBOT COMMON BASE FENCE POST REAR POSITIONER WALL MIDDLE...

Page 57: ...rear positioner wall wIth the spot welded nuts oriented towards the positioner side back side of the fence 12 Connect a fence post to front positioner wall see Figure 4 23 Step E 13 Raise the front p...

Page 58: ...hored into the concrete after the light curtains are properly aligned To anchor remaining fence except light curtain wall to the floor proceed as follows 1 Prepare a factory supplied anchor and nut as...

Page 59: ...lish safely 1 Connect the rear wall to two fence posts one on each side of wall see Figure 4 26 Step A Figure 4 26 Right Side Fence Wall Assembly Steps A and B 2 Have an assistant raise the rear wall...

Page 60: ...6 Secure assembled fence section to the programming platform and robot common base using factory supplied M16 x 30 screws M24 wrench socket Figure 4 28 Fence Anchor Points Right Side 7 Connect a fenc...

Page 61: ...o the rear positioner wall wIth the spot welded nuts oriented towards the positioner side back side of the fence 12 Connect a fence post to front positioner wall see Figure 4 29 Step E 13 Raise the fr...

Page 62: ...l Assembly Step F 16 Raise the light curtain wall and connect perpendicularly to front positioner wall Use Figure 4 19 as a guide for fence wall orientation 17 Measure to ensure remaining unanchored c...

Page 63: ...in fence post NOTE Do not anchor the light curtain walls to the floor until after the light curtains have been properly aligned 2 Insert a 7 16 inch drill bit through the hole of each fence post and...

Page 64: ...nel and damage equipment The arc curtains are shipped in an accessories box To install the arc curtains 1 Unfold arc curtains and install one curtain on inside of each cell wall section using supplied...

Page 65: ...to it a spacer and mounting bracket These components must be removed and the spacer rotated before installation to the fence Refer to the system prints for the exact location of light curtains on fen...

Page 66: ...ated inside the headstock tailstock cabinets Each cable is pulled into the headstock tailstock cabinet and secured with a cord grip during shipping Only the connectors will be visible on the outside T...

Page 67: ...outside the fence on the floor see Figure 4 37 Figure 4 37 Operation Station Installation 5 Insert a 1 4 inch concrete drill bit through the center of four holes in operator station base and drill ho...

Page 68: ...and or local electrical codes The three phase incoming power must be shut OFF or electric shock could occur 1 Make sure the three service disconnect box switches are set to OFF position 2 Route an inc...

Page 69: ...he main power ON proceed as follows 1 Turn the R1 controller ON OFF switch to ON 2 Turn the R2 controller ON OFF switch to ON 3 Turn the XRC POWER service disconnect switch to ON 4 Turn the WELD 1 POW...

Page 70: ...38 Anchoring the Light Curtain Fence 4 19 3 Installing the Swingarm Guards Two swingarm guards must be installed on the positioner side of the light curtain fence walls Refer to Figure 4 39 and syste...

Page 71: ...h Figure 4 40 Swingarm Guard Installation 5 Check swingarm guard location using system prints and adjust if necessary 4 20 System Check After Power Up Now that system power is ON and the light curtain...

Page 72: ...peration as follows WARNING When loading fixturing and or tooling on the positioner weighing over 90 7 kg 200 lbs per side the arcscreen must be removed and the fixturing loaded on the robot side Do n...

Page 73: ...be supplied by the customer 5 1 Programming The operation of this system is programming dependent The operating instructions included in this section are based on one possible configuration of this s...

Page 74: ...e ArcWorld IV 6200 XHD DR2C cell uses the following user and dedicated inputs and outputs see Table 5 1 and Table 5 2 For more information on user and dedicated I O s refer to the Concurrent I O Param...

Page 75: ...012 R2 SCHEDULE SELECT BIT B Refer to Miller manual for schedule select description if applicable OUT 013 R2 SCHEDULE SELECT BIT C Refer to Miller manual for schedule select description if applicable...

Page 76: ...NOTE Cycle Start latching does not operate in Manual mode 3 Press CYCLE START button on operator station The controller sweeps the positioner each time the CYCLE START button is pressed NOTE The Cube...

Page 77: ...The first two types of moves assume a robot plus station group axis specification The last type of move is called station synchronous and should be programmed with a station plus robot group axis spe...

Page 78: ...axis speed while teaching The headstock can now be moved using S or S X or X motion keys on programming pendant e Press S or S X or X motion keys on programming pendant to move headstock Jog speed is...

Page 79: ...Section 5 2 2 Robot to Safe Position see Section 5 2 3 Selecting Job to be Operated Initial set up only see Section 5 2 4 Starting Master Job see Section 5 2 5 Perform Operation Cycle see Section 5 2...

Page 80: ...A B In position Switch 1 Put controller in TEACH mode 2 Turn servo power on 3 Rotate headstock side A B out of Home position 4 Block the light curtain Verify that servo power goes off 5 Turn servo po...

Page 81: ...operation is enabled 7 Press SERVO ON READY button on playback panel 8 Place ENABLE DISABLE switch on operator station in ENABLE position The controller is placed in REMOTE mode and system control is...

Page 82: ...down 5 3 System Recovery Under certain conditions you will be required to clear an alarm or error The paragraphs below describe the different types of alarms and errors you may encounter and how to re...

Page 83: ...sages User Message Indication Remedy Move Robot to Home Robots not in Home when trunion sweep is required Move Robot to Home Safe position Table 5 4 Alarm Messages Alarm Indication Remedy Shot Pin Sen...

Page 84: ...ide the shock sensor and move the robot s clear of the impact To override the shock sensor proceed as follows WARNING Some feeders have a Shock Sensor Override Switch It is possible to crash the robot...

Page 85: ...servo power is OFF 2 Provide adequate support for axis to be released Support should withstand payload of robot and approximate weight of robot Listed below is the weight of each robot available UP6 1...

Page 86: ...OPERATION ArcWorld IV 6200 XHD DR2C System Manual 5 14 MOTOMAN NOTES...

Page 87: ...S3X Positioner Manual P N 147988 1 Welder For troubleshooting and maintenance information for the welding power source refer to your Owner s Manual 6 1 1 Periodic Maintenance See Table 6 1 for periodi...

Page 88: ...MAINTENANCE ArcWorld IV 6200 XHD DR2C System Manual 6 2 MOTOMAN NOTES...

Page 89: ...ng the Programming Pendant Cable 4 14 Connecting the Welding Ground 4 14 Conversion DR2C 3 2 Coordinated Motion 3 9 C continued Coordinated System Symbols Cylindrical 3 5 Joint 3 5 Tool 3 5 User Frame...

Page 90: ...7 Installing the Swingarm Guards 4 36 Installing the Tooling and Fixtures 4 38 Interference Cubes 3 15 Interlocked Cell Door 3 15 Introduction 1 1 J Job Configurations 5 5 JOB Icon Menu 3 5 Joint Symb...

Page 91: ...ot Shipping Brackets Removal 4 9 ROBOT Icon Menu 3 5 Robotic Industries Association 2 1 R continued Rotating the Headstock 5 4 Rotation of the Positioner During Air Cut Moves 5 6 Rotation of the Posit...

Page 92: ...larm 3 5 E Stop 3 5 Hold 3 5 Running Start 3 5 Stop 3 5 T TEACH LOCK Key 3 6 Tool Symbol Coordinate System 3 5 Top Menu Key 3 5 Torch Mount 3 11 Troubleshooting Maintenance 6 1 Trunion 3 9 U Unpacking...

Reviews: