background image

•  Antes de retirar as coberturas e efectuar a lubrificação ou quaisquer outras intervenções de servi

ço indicadas nestas instruções de utilização, desconecte sempre a máquina de costura da corrente.

CONSERVE CUIDADOSAMENTE ESTAS INSTRUÇÕES!
Esta máquina de COSTURA SÓ SE DESTINA A UTILIZAÇÃO NO LAR.

INSTRUÇÕES IMPORTANTES DE SEGURANÇA

Antes de utilizar a máquina de costura, leia todas as instruções e ao trabalhar respeite sempre as

medidas básicas de segurança.

PERIGO

– protecção contra lesão provocada pela corrente eléctrica:

• Se a máquina de costura estiver conectada à corrente, não deve ser deixada sem controlo. Imedia

tamente após a conclusão do trabalho ou antes de limpá-la, desconecte a máquina da corrente.

• Também deve desconectar sempre a máquina antes de substituir a lâmpada.

ADVERTÊNCIA

– Para reduzir o risco de queimaduras, incêndio, acidentes provocados pela 

corrente eléctrica ou lesões de pessoas:

• Não permita que esta máquina de costura seja usada como brinquedo. Se, enquanto trabalha com

a máquina, houver crianças nas proximidades, deve ter muito cuidado.

• Use esta máquina de costura apenas de acordo com o seu objectivo, descrito nestas instruções. Use

apenas os acessórios recomendados pelo fabricante e indicados nestas instruções.

• Nunca trabalhe com a máquina de costura se o cabo eléctrico ou a ficha estiverem danificados, se

a máquina não trabalhar correctamente, se caiu ao chão, se foi danificada ou esteve em contacto 
com a água. Nestes casos, devolva a máquina de costura ao vendedor autorizado mais próximo ou
entregue-a a um centro de assistência técnica para que seja revista, reparada ou mecanicamente 
ajustada.

• Nunca trabalhe com a máquina se os seus orifícios de ar estiverem tapados. Os orifícios de ventila

ção e o pedal de comando devem-se conservar sempre limpos, sem restos de têxteis, pó ou peda
ços de tecido soltos.

• Não introduza objectos em nenhum orifício.
• Não use esta máquina de costura sob a acção de intempéries.
• Não use esta máquina de costura em ambientes de aplicação de produtos de aerossol (sprays) ou

de oxigénio.

• Se quiser desconectar a máquina de costura da corrente, comute primeiramente o conector princi

pal para a posição "O", isto é, desconectada, e só depois retire a ficha da tomada.

• Ao desconectar a ficha, não puxe pelo cabo. Para desconectar a máquina da corrente, agarre bem

a ficha e puxe-a, e não pelo cabo.

• Não aproxime os dedos de nenhuma parte móvel. É necessária uma atenção especial à proximida

de da agulha da máquina de costura. 

• Use sempre a placa de pontos apropriada. Usando placa incorrecta, a agulha poderá quebrar-se. 
• Não use agulhas tortas.
• Ao coser, não puxe o tecido nem o empurre. Poderia desviar a agulha e esta quebrar-se.
• Antes de efectuar várias acções nas proximidades da agulha como, por exemplo, introduzir o fio, 

comute a máquina para a posição de desconectada.

1

Bedien. PORTO/ENGL.713/723  16.04.2004  14:31 Uhr  Seite 3

Summary of Contents for FY750

Page 1: ......

Page 2: ...s se a máquina não trabalhar correctamente se caiu ao chão se foi danificada ou esteve em contacto com a água Nestes casos devolva a máquina de costura ao vendedor autorizado mais próximo ou entregue a a um centro de assistência técnica para que seja revista reparada ou mecanicamente ajustada Nunca trabalhe com a máquina se os seus orifícios de ar estiverem tapados Os orifícios de ventila ção e o ...

Page 3: ...ing machine with any of the air openings blocked Keep the ventilation openings of the sewing machine and foot controller free from the accumulation of lint dust and loose cloth Never drop or insert any object into any openings Do not use this machine outdoors Do not operate this machine where areosol spray products are being usecl or where oxygen is being administered To disconnect turn the main s...

Page 4: ...ector rotativo de pressão da patilha 23 Capítulo III Início da costura Ponto recto 24 Mudança do sentido da costura 25 Utilização do guia fios na placa de pontos 26 Ponto em ângulo recto 26 Ponto em ziguezague 27 Capítulo IV Costura de tecidos Ponto em ziguezague de debruns 28 Ponto em ziguezague de três pontos 29 Debruado 30 Ponto elástico recto de três pontos Modelo 723 31 Costura de botões 32 C...

Page 5: ...5 Remove and attach the bobbin case 14 Zipper insertion 36 Wind the bobbin 15 Blind hem 37 Attach bobbin into bobbin case 16 Chapter V Machine threading 17 Decorative stitching Draw up lower threading 18 Shell stitchin 38 Upper threading tension 19 Double Action stitching Model 723 39 Pattern selection dial 20 Net stitching Model 723 40 Select double action stitch 20 Box shaped elastic stitching M...

Page 6: ...ca dos fios disc 10 Tensão do fio 11 Top cover 11 Cobertura da lâmpada 12 Presser foot pressure 12 Patilha regulation selection dial 13 Elevador da patilha 13 Ripper 14 Dispositivo para descoser 14 Presser foot lever 15 Placa de pontos 15 Needleplate 16 Painel móvel do tecido gaveta dos acessórios 16 Extendakle cloth plate 17 Asa accessory case 18 Volante manual l7 Lifter 19 Tomada do pedal de com...

Page 7: ...er roundshaped costumes Darn knees elbows and children clothes Painel de alongamento do tecido O painel móvel do tecido pode aumentar o posto de trabalho e é fácil de desmontar Também se pode usar o suporte independente do tecido para coser em zonas de acesso difícil Desmontagem do painel móvel do tecido Desmonte o painel para tecido da forma indicada no desenho Instalação do painel para tecido In...

Page 8: ...sas de botões 3 Alça de desvio 4 Dispositivo para corte de casas de botões 5 Chaves de parafusos 6 Bobinas 7 Jogo de agulhas 8 Óleo 1 Zipper foot 2 Buttonhole foot 3 Deflector gate 4 Buttonhole cutter 5 Screw driver 6 Shuttle 7 Needle 8 Oil Bedien PORTO ENGL 713 723 16 04 2004 14 31 Uhr Seite 9 ...

Page 9: ...6 Pedal de comando Pedal de comando Pedal de comando Com a ajuda do pedal de comando pode determinar a velocidade da costura Quanto mais carregar no pedal de comando maior será a velocidade da costura It is to be determined that the voltage and frequency indicated on the machine should be identical to the supply prior to connected to the power 1 Connect machine plug 5 to machine interface 4 2 Conn...

Page 10: ...ir a lâmpada desconecte a alimentação Retirar a lâmpada Pegue na lâmpada e desenrosque a rodando para a esquerda Colocar uma lâmpada nova Pegue na lâmpada e enrosque a rodando para a direita Sewing lamp Sewing lamp hulb stands at the back of top cover Take the top cover when changing the bulb fronl screw Note Switch off the power before replacing a bulb Take out a bulb Hold it and screw off to the...

Page 11: ... sua cavilha plana fique directamente frente à ranhura Baixe a alavanca da patilha para que esta fique fixa no seu lugar Removing Turn forward the balance wheel while raising the needle to the highest position Leveling up the presser foot Hold back the lever on the foot bearer while releasing the presser foot Installing Fit over the presser foot so that its plate dowel is just opposite to the groo...

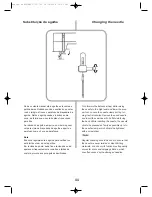
Page 12: ...ina e tecidos de seda aparecem frequentemente nozinhos e falhas de costura provocados por agulhas danificadas Turn forward the balance wheel while raising the needle to the high level and lower the pres ser foot Loosen the needle clamp bolt by tur ning it anti clockwise Remove the used needle and insert the new one with its flat side facing the back While inserting the needle the needle should be ...

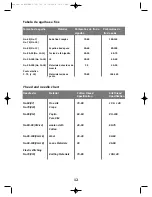
Page 13: ...s de tecidos de 30 45 50 mescla Ponto elástico C 70 c 10 Materiais tecidos a 70 80 100 140 ponto Thead and needle char Thead and needle chart t Needle size Material Cotton thread Silk thread Specification Specification No 60 7 Fine silk 70 80 1 00 1 40 No 70 10 Crepe No 80 12 Poplin 50 6U 8O 100 Pure Silk No 8U 90 12 14 woolen cloth 40 50 60 70 Cotton No 90 100 14 16 Wool 30 40 50 60 No 90 100 14 ...

Page 14: ... o fio usado se enredar facilmente ou se ficar travado no passador de bobinas pode passar o fio pelo orifício desta forma ver o desenho Neste caso deve se orientar o orifício para a bobina Spool holder is used lo hold spools Pulling up the spool holder when sewing Pressdown the machine when it is packed 1 upper tread 2 hole 3 knot Instruction In case that the thread in use is easily tangled with s...

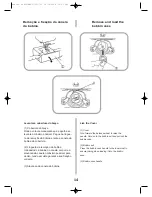
Page 15: ...em vista garantir a sua fixação correcta 3 Alavanca da canela da bobina Live the Cover 1 Cover Turn forward the balance wheel to raise the needle Hold on to the bobbin exit and pull out the bobbin case 2 Bobbin exit Press the bobbin case handle to the innermost to ensure jcining when loading it into the bobbin case 3 Bobbin case handle Remoção e fixação da canela Remoção e fixação da canela Remove...

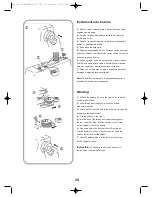
Page 16: ...ção original Nota Concluído o enchimento é necessário empurrar o passador da bobina para a esquerda W Winding inding 1 Pull out the balance wheel to the right so as to break contact with machine 2 Draw thread from the spool through the bobbin winder tension disc 3 Pull thread through the hole in the bobbin and insert the bobbin into the bobbin shaft 4 Turn the bobbin to the right 5 Hold the end of...

Page 17: ...0 cm do fio retirados para fora Load bobbin in bobbin case Make sure that the thread is pulled out in the direction indicated by the arrowhead clockwise 2 Pull thread into the slit of bobbin case 3 And then pull thread through bobbin tension regulator spring to the outlet hole Instruction pull thread out about 10 cm Introdução do fio na canela Introdução do fio na canela Put thread into the Put th...

Page 18: ...com uma tesoura afiada para que se torne mais fácil a sua introdução Machine threading Machine threading Turning forward the balance wheel and move thread take up lever to the highest positon Raise presser foot and insert the spool into spoolholder as shown in the illustration Draw thread from the back side of the spool 1 Wind thread past thread retainer by both hands 2 Hold the thread and pull it...

Page 19: ...sser foot and hold the upper thread lightly with your left hand 2 Keep turning forward the balance wheel until thread take up Iever is at its highest position Pull the upper thread so as to pull up the lower thread 3 Leave about 5 cm of both threads and pull them under the presser foot then toward the back of the presser foot Leave 5 cm of both threads Passagem do fio inferior para cima Passagem d...

Page 20: ...icar visível do lado oposto While doing straight stitching both upper and lower threads must be knotted between the two layers of garment 1 Adjust selection dial of thread tension disc within the window 1 Regulated indicator 2 The smaller the tension of upper thread is big ger turn up the ındıcator 3 The tension of upper thread ıs smaller turn down the indicator The tension of upper thread in case...

Page 21: ...Needle is pulled out from fabric and the desired size of stitching should he selected on the selec tion dial Select Double Action stitching Model 723 As for stitching Double Action stitching its length should be adjusted into 1 10 Wıth the following adjustment the length of stitch could be selected as you like refers to thick stitch in Iength refers to sparse stitch in length Instruction Width of ...

Page 22: ...argu ra conveniente do ponto Quanto maior for o número do valor ajustado tanto mais largo será o ponto Com um ponto mais estreito o seu aspecto no lado direito pode mudar exemplo Nota Usando o selector rotativo a agulha deveria parar em altura sobre o tecido Selection dial for length of stitch Turn the selection dial with help adjust stitch to its ideal length The bigger the number is the longer t...

Page 23: ... o alimentador deveria estar levantado If the reverse button is always pressed down the machine will do reverse stitching all the time Lower feed dog Lower feed dog 1 Life the cover 1 Cover 2 Lower the feed dog by pulling down the shaft and moving it towards the direc tion inclicated by the arrow head as shown in the illustration 2 Lower teeth lever 3 Raise the feed dog by pulling down the lower t...

Page 24: ...riais finos pode se regular o selector para o valor 3 Ao coser flanela de algodão e têxteis de linho pode regular o selector para o valor 1 1 Indicação do valor de regulação For ordinary sewing selection dial is present at 3 And its pressure drops to 2 when sewing appliques mesh fabrics and embroidery As for chiffon lace yarn and other miscellaneous fine materials you may put the dial to 3 Cotton ...

Page 25: ...Raise presser foot and put cloth beside leg wire of needle plate Turn forward the balance wheel and lower the nee dle down into the fabric Lower presser foot and make sure that thread is placed backward Step down fool con troller Fabric will go along leg wire and is carned forward automatically by feed dog In order to make end of thread firm please press the reverse stitch buton and do several rev...

Page 26: ...r baixar a agulha até ao teci do Levante a patilha e rode o tecido no sentido desejado Faça baixar a patilha e continue a coser Stop the machine and turn the balance wheel to bring the needle down into the fabric Raise the presser foot Turn the fabric to change direction as desired Lower the presser foot to resume sewing Bedien PORTO ENGL 713 723 16 04 2004 14 32 Uhr Seite 27 ...

Page 27: ...0 1 3 1 6 1 9 Número na placa 10 15 20 3 8 4 8 5 8 6 8 de pontos 1 0 1 5 2 0 1 0 1 3 1 6 1 9 Ponto em ângulo r Ponto em ângulo recto ecto Right angle stitch Right angle stitch Usando pontos em ângulo recto dever se á manter a While doing right stitches a space of distância de 1 6 cm da orla do tecido 1 6 cm should bekept apart from Quando a orla do tecido coincidir com o ângulo pare the edge of fa...

Page 28: ...vão de disco do fio 2 6 1 pattern selection dial 3 model 713 3 5 model 73 3 2 stitch length IIIIIIIIII 1 4 3 presser foot zigzag 4 thread tension disc 2 6 Os pontos simples em ziguezague são usados com frequência para fazer orlas coser casas de botões e aplicar fitas elásticas Simple zigzag stitches are often used for hemming Making button holes and elastic bends Bedien PORTO ENGL 713 723 16 04 20...

Page 29: ...tilha ziguezague 5 travão de disco do fio 4 6 1 pattern selection dial 3 model 713 3 58 model 723 2 stitch length Ml 2 3 presser foot zigzag 4 thread tension disc 4 6 Este ponto é usado para debruar evitando a deterioração do fio na orla do tecido The stitch is used for making over lock so that thread at the edge of cloth shall not fall apart Ponto em ziguezague de debruns Zigzag over lock Bedien ...

Page 30: ... em materiais sintéticos e outros para evitar dobras Também se usa para debruar evi tando a deterioração dos fios É conveniente para a aplicação de fitas elásticas e para cerzir Deveria ficar um espaço de 1 5 cm do ponto marginador Corte o ao concluir a costura The stitch is used for synthetic materials and other mate rials that get folds easily It also suits over lock so as to avoid threads falli...

Page 31: ...disco do fio 4 6 1 pattern selection dial 1 or 2 2 stitch length 1 10 3 presser foot zigzag 4 thread tension disc 4 6 Dois pontos para a frente e depois um para trás garantem que o ponto fique fixo Antes de coser acople as partes com alfinetes Este tipo de ponto é o mais conveniente para montar nesgas Two stitches forward and then one stitch backward will make the stitching firm Prior to stitching...

Page 32: ...pressure 1 3 5 lower feed dog See page 16 Tape the button over the marked position A pin can be placed on the presser foot to form a stem to make winding thread around the button easier Coloque o botão no sítio desejado Com a ajuda de uma agulha junto à patilha de botões cria se uma via que cosendo facilita a dobagem do fio na parte inferior do botão Nos modelos 713 723 regule o selector de pontos...

Page 33: ...o fio superior pelo furinho do botão para baixo e enrole o com várias voltas na fixação do botão Volte a passar o fio para cima e faça um nozinho Nota Depois de ter cosido os botões volte a levantar a patilha To get a thicker button handle cut the thread wıth 20 cm left Bring the upper thread down through the button hole and wind it around the button han dle for several turns Draw the thread to th...

Page 34: ...mais apertados regule o selector rotativo para 0 Para casas de botões de mate rial leve são convenientes pontos de cetim 2 Em pontos menos apertados regule o selector rotativo para 1 Os pontos separados são con venientes para materiais mais firmes Nota Se quiser conseguir o melhor resultado possível faça um teste com um bocado de tecido Stitch width is to be chosen arbitranly with in range accordi...

Page 35: ...o abrir a casa corte a extremidade do fio Abra cuidadosamente a casa com o dispositivo de corte de casas 1 Make the marks of buttonhole carefully on the material 2 Pull forward slide A keep the mark C on it in conformity to the initial mark B The mark on the presser foot should be aligned with that of the material Lower the presser foot Instruction marks on the slide should be carved in cm 3 Adjus...

Page 36: ...ue cada lado dos furinhos coincida com os fios introduzidos 6 Retire o tecido e corte o fio de coser 7 Puxe os fios introduzidos a partir da esquerda segurando os com firmeza 8 A extremidade do fio deveria ficar dobada junto à agulha de cerzir Passe o fio para trás e corte o Nota Ao cortar as casas siga as instruções da página 25 1 Raise the foot plate of buttonholes sewing hang the laid in thread...

Page 37: ...e o fio para trás e faça baixar a patilha Cosa a parte esquerda da cremalheira o mais próximo possível dos dentes Simultaneamente cosa a cremalheira ao tecido Depois vire o teci do e proceda da mesma forma para o lado direito Stick a zipper or needle it to the fabrics and place it under foot plate Draw the thread to be back and lower the presser foot Sew on the left sıde of the zıpper by guıdıng t...

Page 38: ...cloth ıs ıroned upward its stitches are hardly to be perceived Ponto cego Ponto cego Blind hemming Blind hemming 1 selector rotativo do desenho 5 6 modelo 713 2 comprimento do ponto 1 3 3 largura do ponto 5 no modelo 713 723 não está disponível 4 patilha ziguezague fita guia 5 pressão do travão de disco do fio 4 6 1 Forma de dobrar os tecidos 1 Face traseira do tecido 2 0 4 0 7 cm 2 Faça baixar a ...

Page 39: ...co do fio 6 8 1 pattern selection dial 7 mod 713 9 mod 723 2 stitch length 2 3 presser foot zigzag 4 thread tension disc pressure 6 8 A borda do tecido dobrado deveria ser colocada junto à patilha e à agulha à direita do tecido para se conseguir fazer o ponto concoidal Folded cloth lace should be placed beside the pres ser foot and needle on the right of the cloth so as to work out shell stitching...

Page 40: ...dos pontos de acordo com as suas neces sidades Ajuste a significa pontos apertados no comprimento Ajuste a significa pontos separados no comprimento 1 pattern selection dial 1 10 2 stitch length 1 10 3 presser foot zigzag 4 thread tension disc pressure 2 6 With following adjustment the stitch length could be selected as you like Adjustment to reters to thick stitch in length Adjustment to refers t...

Page 41: ...e o fio inferior pela outra ponta para fazer dobras regulares Depois fixe o fio no outro lado Faça os pontos reticulares e de adorno através da parte central das dobras Depois retire os fios auxiliares Nota Reduzindo a tensão do fio superior facilita se a criação de dobras decorativas Straight stitch the tucked side with spacing of 1 cm Select 4 for its stitch length Knot the thread on one side Ti...

Page 42: ...zag 4 thread tension disc pressure 4 6 Estes pontos são os mais convenientes para coser fitas elásticas de largura superior a 3 mm em mangas de roupa infantil Depois da costura aperte a fita Estes pontos também são convenientes para coser tecidos pesados Dobre dois tecidos sem pontas e cosa os The stitches are most suitable to sewing the elastic cords over 3 mm of children s sleeves Tighten the el...

Page 43: ... Cosa cuidadosamente de acordo com a orla da aplicação Corte o tecido que ultrapasse a orla Introduza a agulha no tecido se tiver que mudar o sentido de costura Levante a patilha e rode o tecido para a esquerda ou para a direita Nota Para coser seleccione o valor 3 de pres são da patilha Adhere tightly the decorative parts to the fabrics or iron it with solvable non woven textiles Stitch around th...

Page 44: ...e ser facili tada com a regulação do selector rotativo do com primento dos pontos para 1 8 Dobre os dois lados em 1 5 cm e passe a ferro as dobras Os lados dobrados deveriam ficar fixos a têxtil sem trama com um espaço de 0 3 cm Cosa lentamente certificando se de que os pon tos atingem a orla dobrada Fold in both sides with 1 5 cm each and iron it The folded sides should be fixed to non woven text...

Page 45: ...out the pendular shuttle Raise needle to its highest position and lift shuttle Gover Remove the bobbin case from the machine Uncover shuttle lever and draw out the shuffle retaining ring Instruction clean the feed dog with a brush and soft and dry rag 1 Bobbin case 2 Shuttle lever 3 Shuttle retaining ring 4 Pendular shuttle 5 Shuttle carrıer Installation of the pendular shuttle hold shuttle cen te...

Page 46: ...er garantir um resultado excelente do trabalho limpe a frequentemente Instruction switch off lamp and pull plug out bef lore cleaning Ihe feed dog Remove the needle and presser foot Remove the screw on the left hand side of the needle plate with the screwdriver Remove the needle plate Clean the feed dog teeth with a brush and refit the needle plate Fit the presser foot and it is ready for sewing I...

Page 47: ...ificação do alimentador Lubrificação do alimentador Ver a descrição do desenho na página 32 É necessário lubrificar as partes indicadas 4 Cobertura Oil the works Oil the works Instruction Apply only one or two drops of machi ne oil or cloth will be stai ned If the machine should not run well after being out of use for a long period apply a few drops of oil before running it and the result will be ...

Page 48: ... da bobina Substitua a bobina 1 A agulha não está correctamente instalada Ver a página 11 2 A agulha está torta ou sem ponta Ver a página 11 3 O parafuso da braçadeira afrouxou se Ver a página 11 A agulha parte se 4 O fio superior está sob tensão excessiva Ver a página 19 5 Cosendo o tecido não avança Ver a página 24 6 A agulha é demasiado fina para o tecido a coser Ver a página 11 7 O selector ro...

Page 49: ...e hook Clean the bobbin 3 Bobbin is damaged and reperation out of case order Replace bobbin I Needle is not correctly installed See Page 11 2 Needle is bent or dull See Page l l Needlebreaks 3 Needle clamp screw goes loose See Page 11 4 Upper thread tension is tov tight See Page 19 5 Pabrics are not pivoted backward after See Page 24 sewing 6 Needle is too thin to the cloth to be stitched See Page...

Page 50: ...o é a correcta Ou são demasiado grossos ou demasiado finos O tecido não 1 O alimentador está obstruído por pêlos finos Ver a página 8 avança 2 O alimentador não está activo levantado Ver a página 45 correctamente 3 Os pontos são demasiado curtos Ver a página 15 A máquina não 1 O interruptor principal está desconectado Ver a página 8 funciona 2 O fio no gancho está enredado Ver a página 44 3 O vola...

Page 51: ... size thread See Page 12 Loop in seam size fabric is incorrect either too thick or too thin 1 Feed dog is stained by tine hair See Page 45 Fabric does not feed ptoperly 2 Feed dog is not hoisted See Page 22 3 Stitching is too small See Page 21 l Main power switch is turned off See Page 8 Machine does not work 2 thread in the hook is tangled See Page 44 3 Clutch release switch ıs set at bobbin See ...

Reviews: