FRONT FORK
4-47
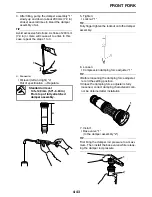
23.Install:
• Collar “1”
• Fork spring “2”
(to the damper assembly “3”)
TIP
Install the collar with its larger dia. end “a” fac-
ing the fork spring.
24.Install:
• Damper assembly “1”
(to the inner tube “2”)
ECA
NOTICE
Allow the damper assembly to slide slowly
down the inner tube until it contacts the bot-
tom of the inner tube. Be careful not to dam-
age the inner tube.
25.Loosen:
• Rebound damping force adjuster “1”
TIP
• Before loosening the damping force adjuster,
record the setting position.
• Unless the damping force adjuster is fully
loosened, correct damping characteristic can-
not be obtained after installation.
26.Install:
• Damper adjusting rod “1”
• Copper washer “2”
• Adjuster “3”
(to the damper assembly “4”)
TIP
• While compressing the inner tube “5”, set the
cap bolt ring wrench “7” between the inner
tube and locknut “6”.
• Fully finger tighten the adjuster onto the
damper assembly.
27.Measure:
• Gap “a” between the adjuster “1” and the
locknut “2”
Out of specification
Retighten and read-
just the locknut.
TIP
If it is installed with a gap out of specification,
correct damping force cannot be obtained.
1
2
3
a
1
2
Cap bolt ring wrench
90890-01501
YM-01501
Gap “a” between the adjuster and
the locknut
0.5–1.0 mm (0.02–0.04 in)
1
New
Summary of Contents for YZ 2016 Series
Page 6: ...EASB296006 YAMAHA MOTOR CORPORATION U S A YZ MOTORCYCLE LIMITED WARRANTY...
Page 10: ......
Page 31: ...CONTROL FUNCTIONS 1 19 a 2...
Page 63: ...LUBRICATION POINTS AND LUBRICANT TYPES 2 22...
Page 66: ...LUBRICATION SYSTEM CHART AND DIAGRAMS 2 25...
Page 68: ...LUBRICATION SYSTEM CHART AND DIAGRAMS 2 27...
Page 70: ...LUBRICATION SYSTEM CHART AND DIAGRAMS 2 29...
Page 72: ...CABLE ROUTING DIAGRAM 2 31 EASB296066 CABLE ROUTING DIAGRAM...
Page 74: ...CABLE ROUTING DIAGRAM 2 33...
Page 76: ...CABLE ROUTING DIAGRAM 2 35...
Page 78: ...CABLE ROUTING DIAGRAM 2 37...
Page 80: ...CABLE ROUTING DIAGRAM 2 39...
Page 82: ...CABLE ROUTING DIAGRAM 2 41...
Page 84: ...CABLE ROUTING DIAGRAM 2 43...
Page 86: ...CABLE ROUTING DIAGRAM 2 45...
Page 262: ...OIL PUMP AND BALANCER GEAR 5 63 a 2 10 b 2 9 1 b 5 3 a 4 10 5 9 3 E c d 6 7 8 8 b 6...
Page 282: ...TRANSMISSION 5 83...
Page 302: ...8 CHECKING THE INTAKE AIR TEMPERATURE SENSOR 8 68 CHECKING THE FUEL INJECTOR 8 68...
Page 317: ...CHARGING SYSTEM 8 15...
Page 321: ...COOLING SYSTEM For JPN 8 19...
Page 351: ...FUEL PUMP SYSTEM 8 49...
Page 352: ...ELECTRICAL COMPONENTS 8 50 EASB296346 ELECTRICAL COMPONENTS EASB296347 7 8 9 1 3 2 4 5 6...
Page 354: ...ELECTRICAL COMPONENTS 8 52 11 10 9 2 3 1 6 7 8 4 5...
Page 356: ...ELECTRICAL COMPONENTS 8 54 EASB296348 CHECKING THE SWITCHES 4 1 3 2 B B Sb B B B B B B B B...
Page 378: ...LIST OF SELF DIAGNOSTIC AND FAIL SAFE ACTIONS 9 7...

