17
Also, once a Group has been set, you can access
any of the outputs from the individual delay units
that make up the group.
23.
Confirm that Effect Bands 1 and 2 are still com-
bined into a Group (
1-2
) as explained above.
Next, press the [EFFECT BAND 2] button to
switch ON Effect Band 2. Since Effect Bands 1
and 2 the same delay time, two delay sounds,
of the same level, can be heard simultaneously.
Using the same technique as explained in the
“Setting the Tap” section (
→
page 14) use the
TAP knob to create a shuffle rhythm. You can
also use the PAN knob to create a ping-pong
delay effect. The difference between the TAP
setting and the previous one is that in this step,
changing the Delay Time lets you alter the
tempo of the shuffle rhythm without changing
the rhythm itself.
Now press the [EFFECT BAND 1] button and
rotate the TIME FINE knob and listen to what
happens.
Patch “
9.21
” produces a 16-beat type effect
that can also be set to different tempos for keep-
ing rhythm.
* When Effect Bands are combined into a Group, TIME
COARSE/FINE, FILTER LOW CUT/HIGH CUT and
FEEDBACK knob settings are applied to the lowest num-
bered Effect Band in the Group.
Syncing Multiple Effect Bands
(SYNC)
When modulation is used in multiple delays, the
SYNC function let’s you sync the modulation speed
of multiple delay bands.
24.
Recall patch number “
9.22
”
This patch uses two Effect Bands; one panned
left the other right and each using a monaural
chorus effect with synchronized modulation.
In this patch, the modulation of Effect Band 2 is
synchronized with Effect Band 1. Let’s switch
the synchronization OFF in Effect Band 2 and
see what happens.
25.
Select Effect Band 2 then hold the [SYNC] but-
ton and use the [UP] button to set the value in
the display to “
2
”. This indicates that Effect Band
2 is synchronized with Effect Band 2 and no
longer synchronized to another Effect Band.
In this condition, the modulation can be heard
in the left channel but not in the right because
Effect Band 2’s SPEED setting is set to “
0.0
”.
Try setting the SYNC again.
26.
Hold the [SYNC] button and press the [DOWN]
button to set the value in the display to “
1
”. Now
the modulation in Effect Band 2 is synchronized
with the modulation in Effect Band 1.
When the modulation is synchronized, the
SPEED knob can be used to create differences
in the phase between the synchronized bands.
Rotating the SPEED knob creates a greater ste-
reo effect. At this time the modulation speed is
the same. The difference in their phase can be
set between greater than 0
°
and less than 360
°
.
Setting the SPEED knob to “
5.0
” creates a re-
verse phase (180
°
). After setting the SPEED to
“
5.0
”, next select Effect Band 1 and rotate the
SPEED knob and in this reverse phase condi-
tion, the speed can be changed simultaneously
in both left and right sides.
Selecting a Wave (WAVE)
When the delay uses modulation, you can choose
the wave that is used in the modulation.
27.
Recall patch number “
9.23
”.
The sound in the left channel of this patch os-
cillates. This heavy modulation uses a sine
wave. Let’s try changing the wave type.
28.
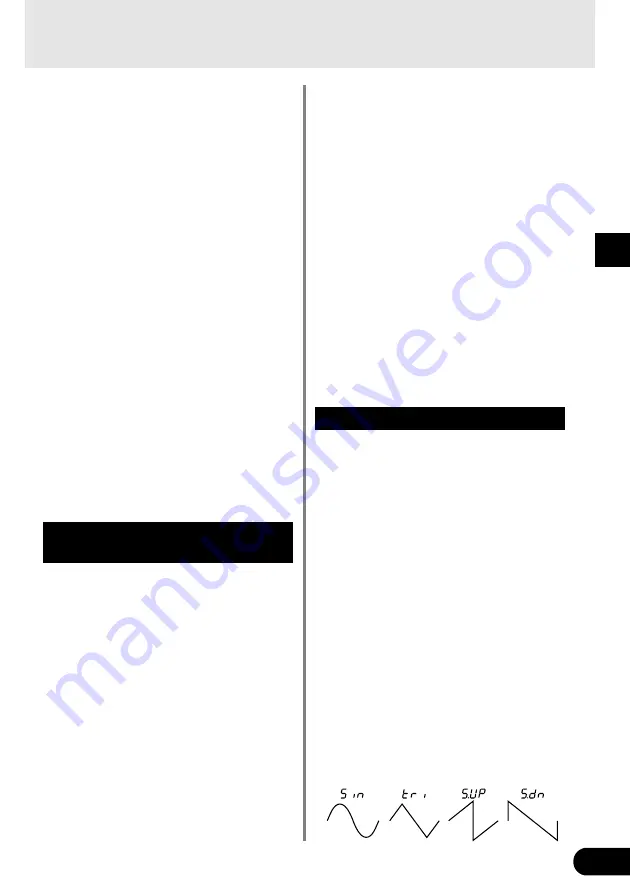
Select Effect Band 1 then holding the [WAVE]
button, press the [UP]/[DOWN] buttons and
compare the difference between the four waves
described below.
* The [WAVE] + [UP] buttons select progress through the
waves in the following order,
tri
→
S.UP
→
S.dn
→
tri
.
The [WAVE] + [DOWN] buttons select
Sin
.
•
Sin
… .. A sine wave. The pitch goes
smoothly up and down following
the curve of a sine wave.
•
tri
… .. A triangle wave. The pitch jumps
up and down.
•
S.UP
… .. Saw Up. Raises the pitch.
•
S.dn
… .. Saw Down. Lowers the pitch.
Using the UD-Stomp
Summary of Contents for UD-Stomp
Page 1: ......
Page 32: ...Printed in Taiwan V839860 ...


