background image

19

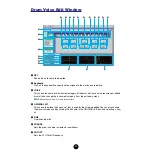
PITCH EG Settings

The PITCH EG (Envelope Generator) determines the transition in pitch while the key is 
being held down. There are five square marks, each controlling a different stage in the 
envelope. The first square mark (furthest to the left) controls the “Initial Level.” The second 
controls the “Attack Rate/Level.” The third controls the “Decay 1 Rate/Level.” The fourth 
controls the “Decay 2 Rate/Sustain Level.” The last square mark (furthest to the right) 
controls the “Release Rate/Level.” Drag the square marks vertically to adjust levels, and 
horizontally to adjust the transition times.

n

To set these values directly, select the “PITCH” tab of the “EL Detail” dialog.

FILTER EG Settings

The FILTER EG (Envelope Generator) determines the transition in timbre while the key is 
being held down. There are five square marks, each controlling a different stage in the 
envelope. The first square mark (furthest to the left) controls the “Hold Rate/Initial Level.” 
The second controls the “Attack Rate/Level.” The third controls the “Decay 1 Rate/Level.” 
The fourth controls the “Decay 2 Rate/Sustain Level.” The last square mark (furthest to the 
right) controls the “Release Rate/Level.” Drag the square marks vertically to adjust levels, 
and horizontally to adjust the transition rates.

n

To set these values directly, select the “FILTER EG” tab of the “EL Detail” dialog.

AMPLITUDE EG Settings

The AMPLITUDE EG (Envelope Generator) determines the transition in amplitude over 
time. There are five the square marks, each controlling a different stage in the envelope. 
The first square mark (furthest to the left) controls the “Key-on Delay” and “Init Level.” The 
second controls the “EG Attack Rate.” The third controls the “EG Decay 1 Rate/Level.” The 
fourth controls the “Decay 2 Rate/Sustain Level.” The last square mark (furthest to the right) 
controls the “EG Release Rate.” Drag the square marks vertically to adjust levels, and 
horizontally to adjust the transition rates.

n

To set these values directly, select the “AMP EG” tab of the “EL Detail” dialog.

Summary of Contents for S08 Voice Editor

Page 1: ...ing of the commercially available music sequence data and or digital audio files is strictly prohibited except for your personal use OMS and are trademarks of Opcode Systems Inc The company names and...

Page 2: ...rt a voice Edit Window Voice Element dialog Set the effects parameters MUSIC SYNTHESIZER EXIT ENTER KEYBOARD 0 1 2 3 4 5 6 7 8 9 PRESET USER GM2 XG DRUM MUTE COMMON INC YES DEC NO DEMO UTILITY CONTROL...

Page 3: ...tosh computer open the Chooser from the Apple menu and turn off Apple Talk Open the Voice Editor for S08 folder in the YAMAHA Tools folder and double click the VoiceEditorforS08 icon Menu Bar The Menu...

Page 4: ...this item is grayed out Paste Copies the voice from the clipboard to Voice Editor Edit This is the same as the Edit Window button in the toolbar page 12 Library This is the same as the Library Window...

Page 5: ...nitor This is the same as the Monitor button in the toolbar page 12 OMS Port Setup Macintosh only Opens the OMS Port Setup window for Voice Editor Refer to the section OMS Port Setup page 24 for furth...

Page 6: ...hese to view the voice list for that group 3 Voice list This area shows all the voices in the selected group as a scrollable list The name number and Category of each voice are shown You can rearrange...

Page 7: ...mber and Category information To do this right click on any part of the voice list and choose List This may be useful when choosing voices quickly since you will have less scrolling to do n To switch...

Page 8: ...with extension S3V n If you are using a Macintosh the typical Macintosh Open dialog will appear 1 Look in Click this and choose the folder containing the Voice Editor files 2 List box Shows the conten...

Page 9: ...brary file 2 List box Shows the contents of the folder you wish to save to 3 Save button Click this to save the Library file with the name specified in the File name 4 File name Specify the name of th...

Page 10: ...tion 2 MIDI Out Port Click this and choose the MIDI Out port You can use the Voice Editor to control and edit the device connected to this port Select the port which has been assigned to your synthesi...

Page 11: ...r shows how much of the data has been transmitted Finally click the Close button to quit the dialog 1 Transmit Type Shows the voice data Normal Drum All to be transmitted 2 Progress bar Shows how much...

Page 12: ...set Drum to receive 2 Progress bar Shows how much of the data has been received 3 Start button Click this to receive the data 4 Close button Click this to close this dialog n The MIDI Device Number ha...

Page 13: ...indow by drag and drop Multiple voices can also be imported this way In Windows you can alternatively copy the voice by selecting it and pressing CTRL C on the computer keyboard and then switch to the...

Page 14: ...ing the Edit Window 1 Editor Setup button See item 3 in The Toolbar of The Library Window page 14 2 Library Window button Click this to bring the Library Window back into view 3 Store button Click thi...

Page 15: ...o editing will be sent to on your synthesizer Click it again to send the bulk data for your edited voice This button is useful for making A B comparisons between the original and edited voices Normal...

Page 16: ...of control over the filter cutoff modulation EF the depth of control over the variation effect 7 ELEMENT unit This section is explained in more detail in Element Unit page 16 8 VARIATION EFFECT unit...

Page 17: ...he LFO s waveform 2 SPEED Click on the SPEED text box and specify its speed 3 PHASE INIT Click on the PHASE INIT text box to switch LFO key sync on or off If switched on the LFO waveform is restarted...

Page 18: ...on the WAVE text box and choose the source waveform One of the square marks is used to set VEL LIMIT LOW and NOTE LIMIT LOW Set the lowest note velocity response by dragging this square mark verticall...

Page 19: ...he left controls the Hold Rate Initial Level The second controls the Attack Rate Level The third controls the Decay 1 Rate Level The fourth controls the Decay 2 Rate Sustain Level The last square mark...

Page 20: ...ialog System Effect Unit 1 VOLUME Sets the output level of the signal from Variation Effect or the by passed signal sent to the System Effect Unit 2 SEND REVERB Sets the Reverb Send Level 3 SEND CHORU...

Page 21: ...kit and change the instrument category from the pull down menu n Kit names can consist of up to 8 characters 4 ORIGINAL KIT This shows the preset kit s wave set that is used for the kit being edited...

Page 22: ...sage KEY ASSIGN Selects Single key assignment or Multi key assignment ALTERNATE GROUP Selects an alternate group number This is used to prevent a pair of drum sounds such as an open and closed hi hat...

Page 23: ...l commonly recognize the new configuration You can have different Studio Setups to choose one from to switch to a different MIDI routing patches between MIDI devices and software fast and easily Every...

Page 24: ...Click OFF It will take some time for AppleTalk to be disabled 2 Choose OMS Port Setup from Voice Editor s MIDI menu then select the port settings In the following example the tone generator is an S08...

Page 25: ...ialogs The Element dialogs are linked to the EL Detail dialogs so changes in one dialog are immediately reflected in the other You can simultaneously view the graphs and the EL Detail dialogs side by...

Page 26: ...ly assigned page 24 Open the Editor Setup Dialog and check that the Device No has been properly assigned page 10 Voice Editor does not start up when Library File extension S6V is double clicked Change...

Reviews: