background image

PREPARATIONS

Optimizing the speaker settings automatically (YPAO)

En

30

The Yamaha Parametric room Acoustic Optimizer (YPAO) function 
detects speaker connections, measures the distances from them to 
your listening position(s), and then automatically optimizes the 
speaker settings, such as volume balance and acoustic 
parameters, to suit your room.

• Please note the following when using YPAO.

– Use YPAO after connecting a TV and speakers to the unit.

– During the measuring process, test tones are output at high volume. Ensure that 

the test tones do not frighten small children. Also, refrain from using this function 
at night when it may be a nuisance to others.

– During the measuring process, you cannot adjust the volume.

– During the measuring process, keep the room as quiet as possible.

– Do not connect headphones.

1

Press RECEIVER

z

 to turn on the unit.

2

Turn on the TV and switch the TV input to display 
video from the unit (HDMI OUT jack).

• Operations with TV screen are available only when your TV is connected to 

the unit via HDMI. If not, carry out operations while viewing the front display.

3

Turn on the subwoofer and set the volume to half. If 
the crossover frequency is adjustable, set it to 
maximum.

• (RX-V573 only)

If you are using bi-amp connection or Zone B speakers, set “Power Amp 
Assign” (p.69) in the “Setup” menu to the appropriate setting before starting 
YPAO.

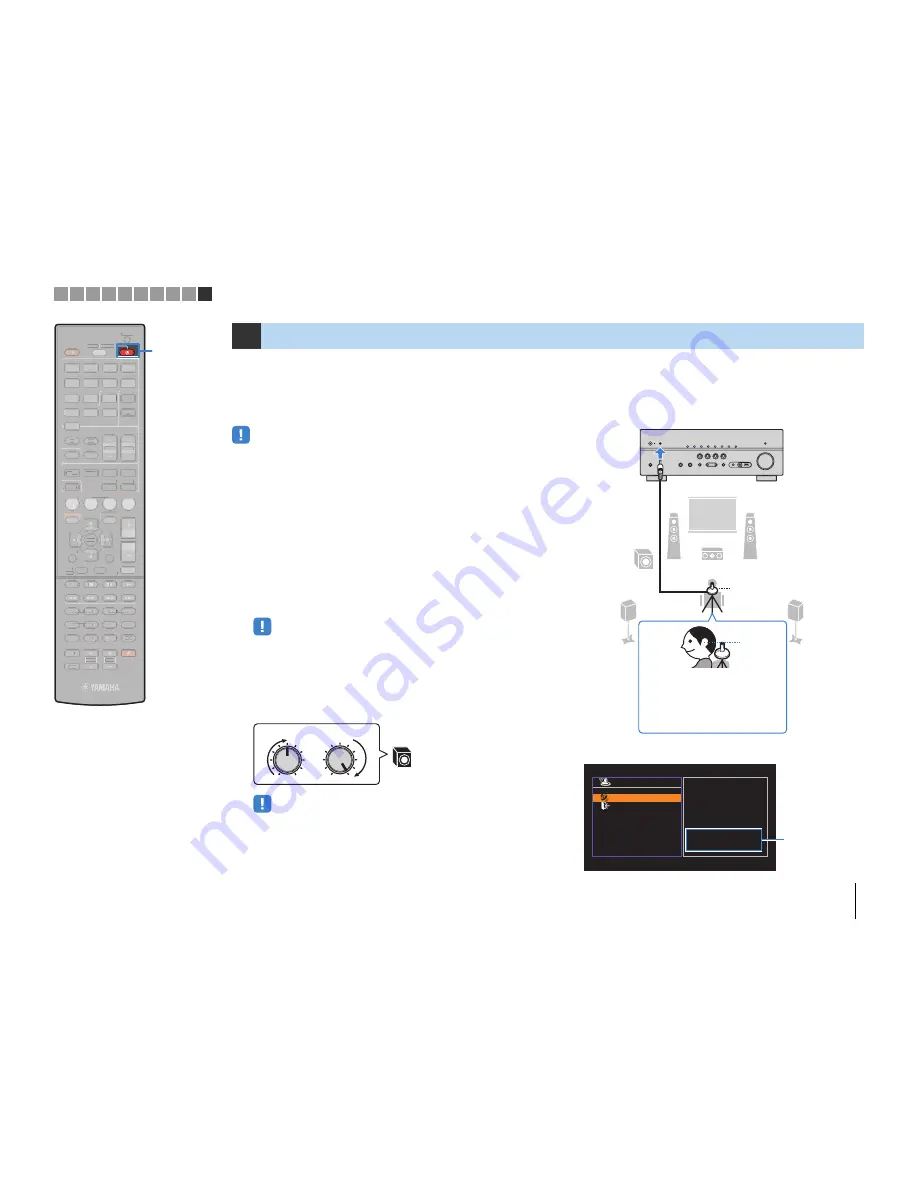
4

Place the YPAO microphone at your listening 
position (same height as your ears) and connect it 
to the YPAO MIC jack on the front panel.

The following screen appears on the TV.

10

Optimizing the speaker settings automatically (YPAO)

VOLUME

HIGH CUT

CRO

SS

OVER/

MIN

MAX

MIN

MAX

9

1

2

3

9

4

5

YPAO microphone 
Listening 
position

Ear height

Place the YPAO microphone at 
your listening position (same height 
as your ears). We recommend the 
use of a tripod as a microphone 
stand. You can use the tripod 
screws to stabilize the microphone.

The unit (front)

A u t o   S e t u p

S t a r t

E x i t

P r e s s   S E T U P   k e y  

t o   S t a r t

“Power Amp Assign” 
setting (p.69)
(RX-V573 only)

P o w e r   A m p   A s s i g n

B a s i c

1 2 3 4 5 6 7 8 9 10

Automatic speaker setup

SCENE

RETURN

VOLUME

ENHANCER

DIRECT

HDMI

AV

FM

INFO

MEMORY

AM

PRESET

MOVIE

MUSIC

BD

DVD

MUTE

ENTER

TV

TV VOL

TV CH

TOP

MENU

POP-UP

MENU

DISPLAY

SOURCE

RECEIVER

CODE SET

OPTION

SETUP

TUNING

STRAIGHT

SUR. DECODE

INPUT

MUTE

9

0

10

ENT

5

6

8

7

1

2

3

4

MODE

TV

NET

RADIO

TUNER

1

2

3

NET

USB

V-AUX

6

A

B

ZONE

5

4

1

2

3

4

SLEEP

AUDIO

SCENE

RETURN

VOLUME

ENHANCER

DIRECT

HDMI

AV

FM

INFO

MEMORY

AM

PRESET

MOVIE

MUSIC

BD

DVD

MUTE

ENTER

TV

TV VOL

TV CH

TOP

MENU

POP-UP

MENU

DISPLAY

SOURCE

RECEIVER

CODE SET

OPTION

SETUP

TUNING

STRAIGHT

SUR. DECODE

INPUT

MUTE

9

0

10

ENT

6

5

8

7

1

2

3

4

MODE

TV

NET

RADIO

TUNER

1

2

3

NET

USB

V-AUX

6

A

B

ZONE

5

4

1

2

3

4

SLEEP

AUDIO

RECEIVER 

z


RECEIVER 

z


Summary of Contents for RX-V473

Page 1: ...AV Receiver Owner s Manual English Read the supplied booklet Safety Brochure before using the unit ...

Page 2: ... 9 Selecting an on screen menu language 29 10 Optimizing the speaker settings automatically YPAO 30 Error messages 32 Warning messages 33 PLAYBACK 34 Basic playback procedure 34 Switching information on the front display 34 Selecting the input source and favorite settings with one touch SCENE 35 Configuring scene assignments 35 Selecting the sound mode 36 Enjoying sound field effects CINEMA DSP 37...

Page 3: ...P IMP 80 Selecting the remote control ID REMOTE ID 80 Changing the FM AM tuning frequency setting TU 81 Switching the video signal type TV FORMAT 81 Restoring the default settings INIT 81 Updating the firmware UPDATE 81 Checking the firmware version VERSION 81 Controlling external devices with the remote control 82 Registering the remote control code for a TV 82 Registering the remote control code...

Page 4: ...within the operating range shown below The illustrations of the main unit and remote control used in this manual are of the RX V573 U S A model unless otherwise specified Some features are not available in certain regions Due to product improvements specifications and appearance are subject to change without notice This manual explains operations using the supplied remote control This manual descr...

Page 5: ...nly Wide variety of supported content iPod iPhone iPad p 46 USB p 50 Media server PC NAS p 53 Internet radio p 56 AirPlay p 58 iPod iPhone iPad USB device Audio Network contents Supports 2 to 5 1 channel to 7 1 channel speaker system Allows you to enjoy your favorite acoustic spaces in various styles Automatically optimizing the speaker settings to suit your room YPAO p 30 Reproducing stereo or mu...

Page 6: ...g the on screen menu Low power consumption The ECO mode power saving function reduces the unit s power consumption and helps to create an eco friendly home theater system p 76 BD DVD player Game console Camcorder Set top box TV CD player HDMI Control TV audio Video from external device Useful tips The combination of video audio input jacks does not match an external device Use Audio In in the Opti...

Page 7: ...lays information p 8 A DIRECT key Enables disables the direct playback mode p 40 B PHONES jack For connecting headphones C INPUT keys Select an input source D TONE CONTROL key Adjusts the high frequency range and low frequency range of output sounds p 63 E SCENE keys Select the registered input source and sound program with one touch Also turns on the unit when it is in standby mode p 35 F PROGRAM...

Page 8: ...ker output is enabled and SP B lights up when the Zone B speaker output is enabled p 61 7 SLEEP Lights up when the sleep timer is on 8 MUTE Blinks when audio is muted 9 Volume indicator Indicates the current volume 0 Cursor indicators Indicate the remote control cursor keys currently operational A Information display Displays the current status such as input name and sound mode name You can switch...

Page 9: ...OOFER jack For connecting to a subwoofer with built in amplifier p 15 0 MONITOR OUT jacks COMPONENT VIDEO jacks For connecting to a TV that supports component video and outputting video signals p 22 VIDEO jack For connecting to a TV that supports composite video and outputting video signals p 22 A SPEAKERS terminals For connecting to speakers p 15 The SURROUND BACK BI AMP ZONE B jacks are availabl...

Page 10: ...program with one touch Also turns on the unit when it is in standby mode p 35 9 SETUP key Displays the setup menu p 66 0 Menu operation keys Cursor keys Select a menu or a parameter ENTER Confirms a selected item RETURN Returns to the previous screen A MODE key Switches between Stereo and Mono for FM radio reception p 42 Switches the iPod operation modes p 48 B External device operation keys Let y...

Page 11: ...eo devices such as BD DVD players and audio devices such as CD players to the unit 5 Connecting the FM AM antennas p 26 Connect the supplied FM AM antennas to the unit 6 Connecting to a network p 27 Connect the unit to a network 7 Connecting recording devices p 28 Connect recording devices to the unit 8 Connecting the power cable p 28 After all the connections are complete plug in the power cable ...

Page 12: ... the front speakers For details see Setting the speaker impedance p 14 Except for U S A and Canada models Use speakers with an impedance of at least 6 Ω Speaker type Abbr Function Speaker system the number of channels 7 1 6 1 5 1 4 1 3 1 2 1 Front L 1 Produce front right left channel sounds stereo sounds Front R 2 Center 3 Produces center channel sounds such as movie dialogue and vocals Surround L...

Page 13: ...573 only 6 1 channel system RX V573 only 5 1 channel system 4 1 channel system 4 5 1 2 3 9 6 7 30 cm 1 ft or more 10 to 30 10 to 30 4 5 1 2 3 9 8 10 to 30 10 to 30 4 5 1 2 3 9 10 to 30 10 to 30 4 5 1 2 9 10 to 30 10 to 30 1 Speaker placement 2 3 4 5 6 7 8 9 10 ...

Page 14: ...lso use 4 ohm speakers as the front speakers 1 Before connecting speakers connect the power cable to an AC wall outlet 2 While holding down STRAIGHT on the front panel press z power 3 Check that SP IMP is displayed on the front display 4 Press STRAIGHT to select 6 Ω MIN 5 Press z power to set the unit to standby mode and remove the power cable from the AC wall outlet You are now ready to connect t...

Page 15: ... power cable from an AC wall outlet and turn off the subwoofer before connecting the speakers Ensure that the core wires of the speaker cable do not touch one another or come into contact with the unit s metal parts Doing so may damage the unit or the speakers If the speaker cables short circuit Check SP Wires will appear on the front display when the unit is turned on FRONT CENTER SURROUND SINGLE...

Page 16: ...y When using front speakers that support bi amp connections connect them to the FRONT jacks and SURROUND BACK BI AMP ZONE B jacks To enable the bi amp function set Power Amp Assign p 69 in the Setup menu to BI AMP after connecting the power cable to an AC wall outlet Connecting Zone B speakers RX V573 only The Zone A B function allows you to playback an input source in the room where the unit is i...

Page 17: ...ansmit video signals separated into three components luminance Y chrominance blue PB and chrominance red PR Use a component video cable with three plugs VIDEO jacks Transmit analog video signals Use a video pin cable Audio jacks OPTICAL jacks Transmit digital audio signals Use a digital optical cable Remove the tip protector if available before using the cable COAXIAL jacks Transmit digital audio ...

Page 18: ...ks or the VIDEO AUX VIDEO of the unit you also need to connect the TV to the MONITOR OUT VIDEO jack p 22 Does your TV support Audio Return Channel ARC Does your TV support HDMI Control Does your TV have an HDMI input jack Connection Method 3 p 21 Connection Method 2 p 20 Connection Method 1 p 18 Connection Method 4 p 22 Yes Yes Yes No No No About HDMI Control HDMI Control allows you to operate ext...

Page 19: ...r adjusting the TV volume with the TV remote control This completes the necessary settings If you select a TV program with the TV remote control the input source of the unit will be automatically switched to AV 4 and the TV audio will be played back on the unit If you cannot hear the TV s audio check that ARC p 73 in the Setup menu is set to On If HDMI Control does not work properly try turning of...

Page 20: ...he TV input to display video from the unit b Press SETUP c Use the cursor keys to select HDMI and press ENTER d Press ENTER again e Use the cursor keys q w to select HDMI Control and the cursor keys e r to select On as shown below f Press SETUP AV 1 AV 2 AV 3 AV 5 AV 6 OPTICAL COAXIAL COAXIAL OPTICAL TV COMPONENT VIDEO PB Y VIDEO A O AV 4 PR HDMI 1 BD DVD HDMI 2 HDMI OUT ARC FM ANTENNA AM HDMI HDM...

Page 21: ... TV audio input at the factory If you have connected any external device to the AV 4 jacks or if you want to use another input jack other than OPTICAL for connecting the TV use TV Audio Input p 72 in the Setup menu to change the TV audio input assignment To use the SCENE function p 35 you also need to change the input assignment for SCENE TV Connection Method 3 TV with HDMI input jacks Connect the...

Page 22: ...e of the AV 1 6 and AUDIO jacks To use the SCENE function p 35 you also need to change the input assignment for SCENE TV COMPONENT VIDEO connection with a component video cable VIDEO composite video connection with a video pin cable AV 2 AV 3 AV 5 AV 6 COAXIAL COAXIAL OPTICAL TV COMPONENT VIDEO VIDEO AV MONITOR OUT OUT AUDIO AV 4 PB Y PR HDMI 1 BD DVD HDMI 2 HDMI 3 HDMI 4 HDMI OUT ARC FM ANTENNA A...

Page 23: ...a component video cable and an audio cable digital optical or digital coaxial Choose a set of input jacks on the unit depending on the audio output jacks available on your video device If you select the input source by pressing AV 1 2 the video audio played back on the video device will be output from the unit To watch videos input to the AV 1 2 COMPONENT VIDEO jacks you need to connect your TV to...

Page 24: ...put jacks on the unit Video Audio Composite video Digital coaxial AV 3 VIDEO COAXIAL Digital optical AV 4 VIDEO OPTICAL Analog stereo AV 5 6 VIDEO AUDIO AV 1 AV 2 AV 3 AV 5 AV 6 OPTICAL COAXIAL COAXIAL OPTICAL TV COMPONENT VIDEO PB Y VIDEO AV OUT AV 4 PR HDMI 1 BD DVD HDMI 2 HDMI OUT ARC FM ANTENNA AM R L COAXIAL OPTICAL R L COAXIAL OPTICAL VIDEO VIDEO C C L R L R O O V V The unit rear AV 3 6 VIDE...

Page 25: ...s If you select the input source by pressing AV 1 6 or AUDIO the audio played back on the audio device will be output from the unit RETURN VOLUME BD DVD ENTER TOP POP UP DISPLAY OPTION SETUP TV NET RADIO RETURN VOLUME BD DVD TOP POP UP DISPLAY SETUP TV NET RADIO HDMI AV 1 2 3 6 A 5 4 1 2 3 4 AUDIO HDMI AV 1 3 6 A 5 4 1 2 3 4 AUDIO ENTER OPTION AV 2 Cursor keys VOL Audio In VOL Audio AV5 Audio outp...

Page 26: ...elected as the input source video signals input to the VIDEO AUX VIDEO jack are output from the MONITOR OUT VIDEO jack Connect the supplied FM AM antennas to the unit Fix the end of the FM antenna to a wall and place the AM antenna on a flat surface Assembling and connecting the AM antenna Unwind only the length of cable needed from the AM antenna unit The wires of the AM antenna have no polarity ...

Page 27: ... as IP address are properly assigned to the unit in Information p 79 in the Setup menu Some security software installed on your PC or the firewall settings of network devices such as a router may block the access of the unit to the network devices or the Internet In these cases configure the security software or firewall settings appropriately Each server must be connected to the same subnet as th...

Page 28: ...V 4 PB Y PR HDMI 1 BD DVD HDMI 2 HDMI 3 HDMI 4 HDMI OUT ARC FM ANTENNA AM SUBWOOFER R L AUDIO AV OUT VIDEO V V L R L R The unit rear AV OUT jacks Video audio input Video recording device 8 Connecting the power cable Before connecting the power cable General model only Set the switch position of VOLTAGE SELECTOR according to your local voltage Voltages are AC 110 120 220 240 V 50 60 Hz Make sure yo...

Page 29: ...L a n g u a g e E n g l i s h F r a n ç a i s D e u t s c h E s p a ñ o l Р у с с к и й 中 文 S e t u p S p e a k e r H D M I S o u n d E C O F u n c t i o n N e t w o r k L a n g u a g e E n g l i s h F r a n ç a i s D e u t s c h E s p a ñ o l Р у с с к и й 中 文 1 2 3 4 5 6 7 8 9 Language setting 10 SCENE RETURN VOLUME ENHANCER DIRECT HDMI AV FM INFO MEMORY AM PRESET MOVIE MUSIC BD DVD MUTE ENTER T...

Page 30: ...in the Setup menu to the appropriate setting before starting YPAO 4 Place the YPAO microphone at your listening position same height as your ears and connect it to the YPAO MIC jack on the front panel The following screen appears on the TV 10 Optimizing the speaker settings automatically YPAO VOLUME HIGH CUT CROSSOVER MIN MAX MIN MAX 9 1 2 3 9 4 5 YPAO microphone Listening position Ear height Plac...

Page 31: ...ave the measurement results use the cursor keys e r to select SAVE and press ENTER The adjusted speaker settings are applied To finish the measurement without saving the result select CANCEL 7 Disconnect the YPAO microphone from the unit This completes optimization of the speaker settings 1 2 3 4 A u t o S e t u p S t a r t E x i t M e a s u r e m e n t F i n i s h e d Result 3 2 0 1 ch 3 0 10 5 m...

Page 32: ...rround back speaker is connected to the R side only When using only one surround back speaker you need to connect it to the SINGLE jack L side Exit YPAO turn off the unit and then reconnect the speaker E 5 Noisy E 5 NOISY The noise is too loud Keep the room quiet and retry YPAO If you select PROCEED YPAO takes the measurement again and ignores any noise detected E 6 Check Sur E 6 CHECK SUR Surroun...

Page 33: ... denote indicators on the front display Warning message Cause Remedy W 1 Out of Phase W 1 PHASE A speaker cable may be connected with the reverse polarity Check the cable connections of the problem speaker If the speaker is connected incorrectly exit YPAO turn off the unit and then reconnect the speaker cable Depending on the type of speakers or room environment this message may appear even if the...

Page 34: ...rce group Item HDMI 1 4 AV 1 6 AUDIO V AUX Input input source name DSP Program sound mode name Audio Decoder decoder name USB SERVER AirPlay Song song title Artist artist name Album album name DSP Program sound mode name Audio Decoder decoder name During simple playback of iPod Input input source name DSP Program sound mode name Audio Decoder decoder name NET RADIO Song song title Album album name...

Page 35: ...g the scene hold down the corresponding SCENE key and input selection key together for more than 3 seconds Once the setting is completed successfully SOURCE RECEIVER blinks twice If you have not registered the remote control code of the playback device yet see Registering the remote control codes for playback devices p 83 to register it Selecting the input source and favorite settings with one tou...

Page 36: ...h input source When you play back audio signals with a sampling rate of higher than 96 kHz or playing back DTS Express the straight decode mode p 39 is automatically selected You can check which speakers are currently outputting sound by looking at the speaker indicators on the unit s front panel p 8 Selecting the sound mode SCENE RETURN VOLUME ENHANCER DIRECT HDMI AV FM INFO MEMORY AM PRESET MOVI...

Page 37: ...ed widely to the left and right The restrained depth creates a clear and powerful space while also maintaining the articulation of the sounds and the separation of the channels SW C L SL SR R Sci Fi VOL Sound program category Sound program CINEMA DSP lights up Drama This program features stable reverberations that match a wide range of movie genres from serious dramas to musicals and comedies The ...

Page 38: ...he front row in front of a small stage The Roxy Theatre This program creates the sound field of a 460 seat rock music concert venue in Los Angeles The listener s virtual seat is at the center left of the hall The Bottom Line This program creates the sound field at stage front in The Bottom Line a famous New York jazz club once The floor can seat 300 people to the left and right in a sound field of...

Page 39: ...l sources such as CDs and produces unprocessed multichannel sounds for multichannel sources 1 Press STRAIGHT Each time you press the key the straight decode mode is enabled or disabled RX V573 only To enable 6 1 7 1 channel playback from 5 1 channel sources when surround back speakers are used set Extended Surround p 63 in the Option menu to a setting other than Off SW C L SL SR R 3 Hall in Vienna...

Page 40: ...nd programs Adjusting the tone control Operating the on screen menu Viewing information on the front display when not in operation bPro Logic Uses the Dolby Pro Logic decoder suitable for all sources bPLII Movie Use the Dolby Pro Logic II decoder or Dolby Pro Logic IIx decoder suitable for movies bPLIIx Movie bPLII Music Use the Dolby Pro Logic II decoder or Dolby Pro Logic IIx decoder suitable fo...

Page 41: ... You can enjoy surround or sound field effects like a multichannel speaker system with stereo headphones by connecting the headphones to the PHONES jack and selecting a sound program or a surround decoder SW C L SL SR ENHANCER R Enhancer On VOL ENHANCER lights up SCENE RETURN VOLUME ENHANCER DIRECT HDMI AV FM INFO MEMORY AM PRESET MOVIE MUSIC BD DVD MUTE ENTER TV TVVOL TV CH TOP MENU POP UP MENU D...

Page 42: ...a frequency directly For example to select 98 50 MHz press 9 8 5 and 0 or ENT TUNED lights up when a signal is received from a radio station STEREO also lights up when a stereo signal is received Wrong Station appears when you enter a frequency that is out of reception range You can switch between Stereo stereo and Mono monaural for FM radio reception by pressing MODE When the signal reception for...

Page 43: ...lecting a frequency for reception p 42 to tune into the desired radio station 2 Hold down MEMORY for more than 2 seconds The first time that you do register a station the selected radio station will be registered to the preset number 01 Thereafter each radio station you select will be registered to the next empty unused preset number after the most recently registered number To select a preset num...

Page 44: ...reset station is cleared Cleared appears and then the next in use preset number is displayed 5 Repeat step 4 until all desired preset stations are cleared 6 To exit from the menu press OPTION STEREO VOL TUNED SW C L R SL SR 01 FM 98 50MHz PRESET VOL Clear Preset STEREO TUNED VOL SW L SL C SR R 01 FM 98 50MHz Preset station to be cleared VOL SW L SL C SR R 01 Cleared SCENE RETURN VOLUME ENHANCER DI...

Page 45: ...s ENTER again to start the search immediately To search upward downward from the current frequency press the cursor keys q w while READY is displayed To cancel the search press RETURN Texts in parentheses denote indicators on the front display The following screen appears for about 3 seconds when the search finishes TP Not Found appears for about 3 seconds when no traffic information stations are ...

Page 46: ...ode p 48 Connecting an iPod Connect your iPod to the unit with the USB cable supplied with the iPod 1 Connect the USB cable to the iPod 2 Connect the USB cable to the USB jack The iPod charges while it is connected to the unit If you set the unit to standby mode while the iPod is charging the iPod continues to charge up to 4 hours If Network Standby p 78 in the Setup menu is set to On it continues...

Page 47: ...s Display the current shuffle repeat settings p 49 and playback status such as play pause 5 Operation menu Use the cursor keys to select an icon and press ENTER to confirm the selection i P o d M u s i c P l a y l i s t s A r t i s t s A l b u m s S o n g s G e n r e s C o m p o s e r s 1 6 A r t i s t N a m e A l b u m N a m e S o n g T i t l e 2 3 0 i P o d N o w P l a y i n g 5 1 0 D I S P L A ...

Page 48: ...N a m e S o n g T i t l e 2 3 0 5 1 0 D I S P L A Y t o L i s t B r o w s e Operational remote control keys Function Cursor keys Select an item ENTER Confirms the selection RETURN Returns to the previous screen External device operation keys a Starts playback or stops playback temporarily d s Stops playback f Skips forward backward g h Searches forward backward while holding down j SCENE RETURN VO...

Page 49: ... appears in the TV screen Albums Albums Plays back albums in random order x appears in the TV screen Repeat Repeat Off Off Turns off the repeat function One One Plays back the current song repeatedly c appears in the TV screen All All Plays back all songs repeatedly v appears in the TV screen SCENE RETURN VOLUME ENHANCER DIRECT HDMI AV FM INFO MEMORY AM PRESET MOVIE MUSIC BD DVD MUTE ENTER TV TVVO...

Page 50: ...when your TV is connected to the unit via HDMI If not carry out operations while viewing the front display _ underscore will be displayed for characters not supported by the unit 1 Press USB to select USB as the input source The browse screen is displayed on the TV If playback is ongoing on your USB storage device the playback screen is displayed Playing back music stored on a USB storage device R...

Page 51: ...a y i n g D I S P L A Y t o L i s t B r o w s e Icon Function Moves 10 pages backward Moves to the previous page of the list Moves to the next page of the list Moves 10 pages forward Moves to the playback screen 1 4 5 2 3 D I S P L A Y t o N o w P l a y i n g 1 1 2 B l u e s C l a s s i c a l E l e c t r o n i c a J a z z P o p R o c k S o u n d t r a c k S p e a k i n g U S B T o p SCENE RETURN V...

Page 52: ... i n g A r t i s t N a m e A l b u m N a m e S o n g T i t l e 2 3 0 D I S P L A Y t o L i s t B r o w s e Item Setting Function Shuffle Shuffle Off Off Turns off the shuffle function On On Plays back songs in the current album folder in random order x appears on the TV screen Repeat Repeat Off Off Turns off the repeat function One One Plays back the current song repeatedly c appears on the TV scr...

Page 53: ...ayback of PC music contents Follow the procedure below to operate the PC music contents and start playback You can control the PC NAS with the menu displayed on the TV screen Operations with TV screen are available only when your TV is connected to the unit via HDMI If not carry out operations while viewing the front display _ underscore will be displayed for characters not supported by the unit 1...

Page 54: ... D I S P L A Y t o L i s t B r o w s e Icon Function Moves 10 pages backward Moves to the previous page of the list Moves to the next page of the list Moves 10 pages forward Moves to the playback screen 1 4 5 2 3 D I S P L A Y t o N o w P l a y i n g 1 1 4 B l u e s C l a s s i c a l E l e c t r o n i c a J a z z P o p R o c k S o u n d t r a c k S p e a k i n g S E R V E R N A S A SCENE RETURN VO...

Page 55: ...ily f Skips forward backward g 1 2 S E R V E R N o w P l a y i n g A r t i s t N a m e A l b u m N a m e S o n g T i t l e 2 3 0 D I S P L A Y t o L i s t B r o w s e Item Setting Function Shuffle Shuffle Off Off Turns off the shuffle function On On Plays back songs in the current album folder in random order x appears on the TV screen Repeat Repeat Off Off Turns off the repeat function One One Pl...

Page 56: ...avorite Internet radio stations to the Bookmarks folder by accessing the following website with the web browser on your PC To use this feature you need the vTuner ID of the unit and your e mail address to create your personal account You can check the vTunerID MAC address of the unit in Information p 79 in the Setup menu http yradio vtuner com Listening to Internet radio 1 7 B o o k m a r k s L o ...

Page 57: ... o N o w P l a y i n g 1 7 B o o k m a r k s L o c a t i o n s G e n r e s N e w S t a t i o n s P o p u l a r S t a t i o n s P o d c a s t s H e l p N E T R A D I O T o p 1 2 S t a t i o n N a m e A l b u m N a m e S o n g T i t l e 2 3 0 N E T R A D I O N o w P l a y i n g D I S P L A Y t o L i s t B r o w s e SCENE RETURN VOLUME ENHANCER DIRECT HDMI AV FM INFO MEMORY AM PRESET MOVIE MUSIC BD D...

Page 58: ...it the AirPlay icon appears If the icon does not appear check whether the unit and PC iPod are connected to the router properly 2 On the iTunes iPod click tap the AirPlay icon and select the unit network name of the unit as the audio output device 3 Select a song and start playback The unit automatically selects AirPlay as the input source and starts playback The playback screen is displayed on th...

Page 59: ...ontrols to adjust volume the volume may be unexpectedly loud This could result in damage to the unit or speakers If the volume suddenly increases during playback stop playback on the iTunes iPod immediately External device operation keys Function a Resumes playback from pause s Stops playback d Stops playback temporarily f Skips forward backward g 2 1 A r t i s t N a m e A l b u m N a m e S o n g ...

Page 60: ... Preparing Zone B Connect the device that will be used in Zone B to the unit Connect the speakers placed in Zone B to the unit with speaker cables To utilize the SURROUND BACK BI AMP ZONE B jacks for Zone B speakers set Power Amp Assign p 69 in the Setup menu to ZoneB after connecting the power cable to an AC wall outlet Playing back music in multiple rooms RX V573 only Living room Zone A Study ro...

Page 61: ...ext in parentheses denotes indicators on the front display 3 Use the cursor keys q w to select ZoneB Trim ZB Trim and the cursor keys e r to adjust the setting Setting range 10 0 dB to 10 0 dB 0 5 dB increments Default 0 0 dB 4 To exit from the menu press OPTION VOL SW C L R SL SR SP A SP B HDMI1 SP A and or SP B light up SCENE RETURN VOLUME ENHANCER DIRECT HDMI AV FM INFO MEMORY AM PRESET MOVIE M...

Page 62: ...und DSP Level DSP Level Adjusts the sound field effect level 63 Adaptive DRC A DRC Sets whether the dynamic range from maximum to minimum is automatically adjusted when the volume is adjusted 63 Extended Surround EXTD RX V573 only Selects how to play back 5 1 to 7 1 channel sources when surround back speakers are used 63 Enhancer Enhancer Enables disables Compressed Music Enhancer 64 Volume Trim V...

Page 63: ... the iPod p 49 USB storage device p 52 or media server p 55 Shuffle Shuffle Configures the shuffle setting for the iPod p 49 USB storage device p 52 or media server p 55 Volume Interlock Interlock Enables disables volume controls from iTunes iPod via AirPlay 65 Item Function Page On On Automatically adjusts the dynamic range Off Off default The dynamic range is not automatically adjusted Auto Auto...

Page 64: ...pplied separately to each input source Setting range 6 0 dB to 6 0 dB 0 5 dB increments Default 0 0 dB Subwoofer Trim SW Trim Fine adjusts the subwoofer volume Setting range 6 0 dB to 6 0 dB 0 5 dB increments Default 0 0 dB Lipsync Lipsync Enables disables the adjustment configured in Lipsync p 74 in the Setup menu This setting is applied separately to each input source Settings Signal Info Signal...

Page 65: ...input audio through a digital coaxial jack Select AV 2 or AV 3 and connect the device to the unit s corresponding audio jacks with a digital coaxial cable To input audio through analog audio jacks Select AV 5 AV 6 or AUDIO and connect the device to the unit s corresponding audio jacks with a stereo pin cable Video Out Video Out Selects a video to be output with radio sounds Settings Volume Interlo...

Page 66: ...eys to select an item and press ENTER To return to the previous screen during menu operations press RETURN 4 Use the cursor keys e r to select a setting and press ENTER 5 To exit from the menu press SETUP Configuring various functions Setup menu S e t u p S p e a k e r H D M I S o u n d E C O F u n c t i o n N e t w o r k L a n g u a g e C o n f i g u r a t i o n D i s t a n c e L e v e l E q u a ...

Page 67: ...o Small 70 Subwoofer Phase Sets the phase of the subwoofer 70 Extra Bass Sets the speakers to produce the front channel low frequency components 70 Distance Sets the distance between each speaker and listening position 71 Level Adjusts the volume of each speaker 71 Equalizer Adjusts the tone with an equalizer 71 Test Tone Enables disables the test tone output 71 HDMI Configuration HDMI Control Ena...

Page 68: ...r when this receiver is turned on 75 ECO Auto Power Down Sets the amount of time for the auto standby function 75 ECO Mode Enables disables the eco mode power saving mode 76 Function Input Rename Changes the input source name displayed on the front display 76 Dimmer Adjusts the brightness of the front display 77 Memory Guard Prevents accidental changes to the settings 77 Network IP Address Configu...

Page 69: ... B speakers p 60 in addition to the speaker system in the main zone Zone A S e t u p S p e a k e r H D M I S o u n d E C O F u n c t i o n N e t w o r k L a n g u a g e C o n f i g u r a t i o n D i s t a n c e L e v e l E q u a l i z e r T e s t T o n e Use default Select this option when a subwoofer is connected The subwoofer will produce LFE low frequency effect channel audio and low frequency ...

Page 70: ...ver Large Select this option for large speakers The surround speakers will produce all of the surround channel frequency components None Select this option when no surround speakers are connected The front speakers will produce surround channel audio Virtual CINEMA DSP works when you select a sound program Small x1 Select this option when one small speaker is connected The subwoofer or front speak...

Page 71: ...qualizer to be used Settings PEQ is available only when the YPAO has been performed p 30 Manual equalizer adjustment 1 Set EQ Select to GEQ 2 Use the cursor keys q w to select Channel and the cursor keys e r to select the desired speaker channel 3 Use the cursor keys q w to select the desired band frequency and the cursor keys e r to adjust the gain Setting range 6 0 dB to 6 0 dB 4 To exit from th...

Page 72: ...nks Settings This setting is available only when HDMI Control is set to Off TV Audio Input Selects an audio input jack of the unit to be used for TV audio input when HDMI Control is set to On The unit s input source automatically switches to TV audio when the TV input is switched to its built in tuner Settings AV 1 6 AUDIO Default AV 4 When using ARC to input TV audio to the unit you cannot use th...

Page 73: ...output settings DSP Parameter Configures the surround decoder settings CINEMA DSP 3D Mode Enables disables CINEMA DSP 3D p 39 If this function is set to On CINEMA DSP 3D functions with the selected sound programs except 2ch Stereo and 7ch 5ch Stereo Settings Panorama Enables disables the broadening effect of the front sound field When this function is enabled you can wrap front right left channel ...

Page 74: ...ect This setting is effective when Neo 6 Music is selected Setting range 0 0 to 1 0 Default 0 3 Lipsync Adjusts the delay between video and audio output You can enable disable the Lipsync function by input sources in Lipsync p 64 in the Option menu Select Selects the method to adjust the delay between video and audio output Setting range Select is automatically set to Manual depending on the TV co...

Page 75: ...tdown starts in the front display Maximum default Produces audio without adjusting the dynamic range Standard Optimizes the dynamic range for regular home use Min Auto Sets the dynamic range for clear sound even at night or at low volumes When playing back Dolby TrueHD signals the dynamic range is automatically adjusted based on the input signal information Off default Sets the level to the volume...

Page 76: ...me displayed on the front display Input sources HDMI 1 4 AV 1 6 AUDIO USB V AUX Procedure 1 Use the cursor keys q w to select an input source to be renamed and press ENTER To select a name from the presets use the cursor keys q w to select an input source and the cursor keys e r to select a preset name 2 Use the cursor keys e r to move the edit position and the cursor keys q w to select a characte...

Page 77: ... cursor keys q w to select a value 4 To exit from the menu press SETUP Off default Does not protect the settings On Protects the settings until Off is selected o M e m o r y G u a r d M e m o r y G u a r d O n B a c k R E T U R N Icon Off Does not use a DHCP server Configure the network parameters manually For details see Manual network settings On default Uses a DHCP server to automatically obtai...

Page 78: ... can control playback of the unit from DMCs such as Windows Media Player 12 on the same network Network Standby Selects whether the unit can be turned on from other network devices network standby Settings Network Name Edits the network name the unit s name on the network displayed on other network devices Procedure 1 Press ENTER to enter the name edit screen 2 Use the cursor keys e r to move the ...

Page 79: ...ation such as song titles cannot be displayed The information on the front display is provided in English only MAC Address MAC address IP Address IP address Subnet Mask Subnet mask Default Gateway The IP address of the default gateway DNS Server P The IP address of the primary DNS server DNS Server S The IP address of the secondary DNS server Status The connection status of the NETWORK jack vTuner...

Page 80: ...e Otherwise the setting will be automatically canceled 1 Press CODE SET on the remote control using a pointed object such as the tip of a ballpoint pen 2 Press SOURCE RECEIVER 3 Use the numeric keys to enter 5019 ID1 or 5020 ID2 Once the remote control ID is registered successfully SOURCE RECEIVER blinks twice If it blinks six times registration failed Repeat from Step 1 The registered remote cont...

Page 81: ...twork For details refer to the information supplied with updates Firmware update procedure Do not perform this procedure unless firmware update is necessary Also make sure you read the information supplied with updates before updating the firmware 1 Press STRAIGHT repeatedly to select USB or NETWORK and press INFO to start firmware update Choices If the unit detects newer firmware over the network...

Page 82: ...le remote control codes register the first code in the list If that does not work try the other codes 2 Press CODE SET using a pointed object such as the tip of a ballpoint pen SOURCE RECEIVER blinks twice Perform each of the following steps within 1 minute Otherwise the setting will be canceled If this happens repeat from Step 2 3 Press TV z 4 Use the numeric keys to enter the 4 digit remote cont...

Page 83: ...the following keys after selecting the input source or scene By pressing SOURCE RECEIVER you can switch the devices the unit or external device that are operated by the menu operation keys DISPLAY and numeric keys You can operate the unit when SOURCE RECEIVER lights up in orange and an external device when SOURCE RECEIVER lights up in green For example if you register the remote control code of yo...

Page 84: ...at from Step 1 To reset the remote control to factory default settings a Press CODE SET using a pointed object such as the tip of a ballpoint pen b Press SOURCE RECEIVER c Use the numeric keys to enter 9981 SCENE RETURN VOLUME ENHANCER DIRECT HDMI AV FM INFO MEMORY AM PRESET MOVIE MUSIC BD DVD MUTE ENTER TV TVVOL TV CH TOP MENU POP UP MENU DISPLAY SOURCE RECEIVER CODE SET OPTION SETUP TUNING STRAI...

Page 85: ... unit or disconnect the power cable or network cable during firmware update Firmware update takes about 20 minutes or more depending on your Internet connection speed To perform the following procedure your TV must be connected to the unit via HDMI If not perform the update from the ADVANCED SETUP menu p 81 p U p d a t e E N T E R N e t w o r k U p d a t e P e r f o r m U p d a t e F i r m w a r e...

Page 86: ...er connecting HDMI Control compatible devices such as BD DVD players to the unit enable HDMI Control on each device and perform the HDMI Control link setup This setup is required every time you add a new HDMI Control compatible device to your system For information on how HDMI Control works between your TV and playback devices refer to the instruction manuals for each device I want to display a de...

Page 87: ...puter has frozen due to an external electric shock such as lightning or excessive static electricity or to a drop in the power supply voltage Hold down z power on the front panel for more than 10 seconds to initialize and reboot the unit The power turns off standby mode immediately The unit was turned on while a speaker cable was shorted Twist the bare wires of each speaker cable firmly and reconn...

Page 88: ...to change the speaker settings p 69 The volume of the speaker is set too low Perform YPAO p 30 or use Level in the Setup menu to adjust the speaker volume p 71 RX V573 only Audio output to Zone A or Zone B is disabled Press ZONE A ZONE B to enable audio output to Zone A or Zone B The speaker cable connecting the unit and the speaker is defective If there is no problem with the connection replace w...

Page 89: ...cable connecting the unit and playback device is defective If there is no problem with the connection replace with another cable The sound is distorted The volume of the unit is too high Turn down the volume If ECO Mode is set to On set it to Off p 76 A device connected to the unit s output jacks is not turned on This may happen due to the nature of AV receivers Turn on all devices connected to th...

Page 90: ...lect the station manually p 42 Use an outdoor antenna We recommend using a sensitive multi element antenna The AM radio signal is weak Adjust the AM antenna orientation Select the station manually p 42 Use an outdoor AM antenna Connect it to the ANTENNA AM jack together with the supplied AM antenna AM radio stations cannot be registered as presets Auto Preset has been used Auto Preset is for regis...

Page 91: ...on later or select another station Access to the network is restricted by the firewall settings of your network devices such as the router Check the firewall settings of your network devices The Internet radio can be played only when it passes through the port designated by each radio station The port number varies depending on the radio station Problem Cause Remedy The unit cannot be controlled u...

Page 92: ...t the USB device Turn off the unit and reconnect your USB device If the problem persists try another USB device The unit cannot detect the iPod Turn off the iPod and then turn it on again Please wait The unit is preparing for connecting to the network Wait until the message disappears If the message stays more than 3 minutes turn off the unit and turn it on again RemID Mismatch The remote control ...

Page 93: ...DTS Express is a compressed digital audio format that supports 5 1 channel audio and allows a higher compression rate than the DTS Digital Surround format developed by DTS Inc This technology is developed for audio streaming services on the Internet and secondary audio on BD Blu ray discs DTS HD High Resolution Audio DTS HD High Resolution Audio is a compressed digital audio format developed by DT...

Page 94: ...led 0 1 because it is limited to only low frequency audio Lip sync Video output sometimes lags behind audio output due to the complexity of signal processing caused by an increase in video signal capacity Lip sync is a technique for automatically correcting the timing lag between audio and video output HDMI and video information Component video signal With the component video signal system the vid...

Page 95: ...ges CINEMA DSP 3D mode achieves the reproduction of the accurate height of the sound images so that it creates the accurate and intensive 3D sound fields in a listening room Compressed Music Enhancer The Compressed Music Enhancer feature compensates for missing harmonics in compression music formats such as MP3 As a result this technology provides improved performance for the overall sound system ...

Page 96: ... mute Switching to input audio from the TV when the TV input is switched to its built in tuner Switching to input video audio from the selected playback device Switching between audio output devices the unit or TV speaker Example Operations available from the unit s remote control Starting playback on the playback device and turning on the TV with a scene selection p 35 Switching the TV input to d...

Page 97: ...e unit 6 Check the followings On the unit The input to which the playback device is connected is selected If not select the input source manually On the TV The video from the playback device is displayed 7 Check that the unit is properly synchronized with the TV by turning off the TV or adjusting the TV volume with the TV remote control If HDMI Control does not work properly try unplugging the TV ...

Page 98: ...nals directly does not decode the bitstream signals on the playback device For details refer to the instruction manual for the playback device Audio signal type Audio signal format Compatible media example 2ch Linear PCM 2ch 32 to 192 kHz 16 20 24 bit CD DVD Video DVD Audio Multichannel Linear PCM 8ch 32 to 192 kHz 16 20 24 bit DVD Audio BD Blu ray disc HD DVD DSD 2 5 1ch 2 8224 MHz 1 bit SACD Bit...

Page 99: ... connections Reference diagram rear panel FRONT CENTER SURROUND SINGLE SURROUND BACK BI AMP ZONE B AV 1 AV 2 AV 3 AV 5 AV 6 OPTICAL COAXIAL COAXIAL OPTICAL TV COMPONENT VIDEO COMPONENT VIDEO PB Y VIDEO AV MONITOR OUT OUT AUDIO AV 4 PR PB Y PR HDMI 1 BD DVD HDMI 2 HDMI 3 HDMI 4 NETWORK HDMI OUT ARC FM ANTENNA AM SUBWOOFER SPEAKERS RX V573 U S A model ...

Page 100: ...veloper to meet Apple performance standards Apple is not responsible for the operation of this device or its compliance with safety and regulatory standards Please note that the use of this accessory with iPod iPhone or iPad may affect wireless performance AirPlay the AirPlay logo iPad iPhone iPod iPod nano and iPod touch are trademarks of Apple Inc registered in the U S and other countries MPEG L...

Page 101: ...25 Hz 24 Hz 4096 x 2160p 24 Hz Audio Format Dolby TrueHD Dolby Digital Plus Dolby Digital DTS HD Master Audio DTS HD High Resolution Audio DTS Express DTS DSD 6 ch PCM 2 ch to 8 ch Max 192 kHz 24 bit Content Protection HDCP compatible Link Function CEC supported TUNER Analog Tuner U K and Europe models FM AM with Radio Data System x 1 TUNER Other models FM AM x 1 TUNER USB Capable of iPod Mass Sto...

Page 102: ...o 100 kHz 0 3 dB Signal to Noise Ratio IHF A Network AV 5 etc Input Shorted 250 mV Speaker Out 100 dB or more Residual Noise IHF A Network Front L R Speaker Out 150 µV or less Channel Separation AV 5 etc Input 5 1 kΩ Shorted 1 kHz 10 kHz 60 dB 45 dB or more Volume Control Range MUTE 80 dB to 16 5 dB Step 0 5 dB Tone Control Characteristics Bass Boost Cut 6 dB 0 5 dB Step at 50 Hz Bass Turnover 350...

Page 103: ... 50 Hz Asia model AC220 to 240 V 50 60 Hz Power Consumption U S A and Canada models 270 W 320 VA Other models 280 W Standby Power Consumption HDMI Control Off Standby Through Off 0 1 W or less HDMI Control On Standby Through On No Signals 1 0 W Typical Network Standby On 2 0 W Typical Dimensions W x H x D 435 x 161 x 315 mm 17 1 8 x 6 3 8 x 12 3 8 Weight RX V573 8 2 kg 18 1 lbs RX V473 8 1 kg 17 9...

Page 104: ...mation 64 Banana plug 16 Bass Option menu 63 Battery 4 BI AMP Setup menu 69 Bi amp speaker connections 16 Bi amplification connection 94 Bitrate Signal information 64 C CAT 5 Network cable 27 Cellar Club Sound program 38 Center Setup menu Speaker 69 Center Image Setup menu DSP Parameter 74 Center Width Setup menu DSP Parameter 74 Chamber Sound program 38 CHAN Signal information 64 Channel Signal i...

Page 105: ...aker 70 F Firmware update 85 Firmware version 81 FM antenna 26 FORMAT Signal information 64 Format Signal Information 64 Frequency FM AM radio 42 Frequency step setting FM AM radio 42 Front Setup menu Speaker 69 Front display Part name and functions 8 Front display information 34 Front panel Part names and functions 7 Function Setup menu 76 G GEQ Setup menu Equalizer 71 H Hall in Munich Sound prog...

Page 106: ...ck device operations Remote control 83 PLII Game Surround decoder 40 PLII Movie Surround decoder 40 PLII Music Surround decoder 40 PLIIx Game Surround decoder 40 PLIIx Mo Extended Surround 63 PLIIx Movie Extended Surround 63 PLIIx Movie Surround decoder 40 PLIIx Mu Extended Surround 63 PLIIx Music Extended Surround 63 PLIIx Music Surround decoder 40 Power Amp Assign Setup menu Speaker 69 Preparati...

Page 107: ...ol Option menu 63 TONE CONTROL key 63 TP Traffic Program 45 Traffic information 45 Traffic Program Option menu 45 Treble Option menu 63 TU ADVANCED SETUP 42 Tuning FM AM radio 42 TV Audio Input Setup menu HDMI 72 TV connection 18 TV FORMAT ADVANCED SETUP 81 TV operation keys 10 TV operations Remote control 82 TV with HDMI input jacks Connection 21 TV without HDMI input jacks Connection 22 U UPDATE...

Page 108: ...APPENDIX Index En 108 ZoneB Setup menu 69 ZoneB Trim Option menu 61 ...

Page 109: ... 2012 Yamaha Corporation YE161B0 EN ...

Page 110: ...or written permission THIS SOFTWARE IS PROVIDED BY THE COPYRIGHT HOLDERS AND CONTRIBUTORS AS IS AND ANY EXPRESS OR IMPLIED WARRANTIES INCLUDING BUT NOT LIMITED TO THE IMPLIED WARRANTIES OF MERCHANTABILITY AND FITNESS FOR A PARTICULAR PURPOSE ARE DISCLAIMED IN NO EVENT SHALL THE FOUNDATION OR CONTRIBUTORS BE LIABLE FOR ANY DIRECT INDIRECT INCIDENTAL SPECIAL EXEMPLARY OR CONSEQUENTIAL DAMAGES INCLUD...

Page 111: ...t restriction including without limitation the rights to use copy modify merge publish distribute sublicense and or sell copies of the Software and to permit persons to whom the Software is furnished to do so subject to the following conditions The above copyright notice and this permission notice shall be included in all copies or substantial portions of the Software THE SOFTWARE IS PROVIDED AS I...

Page 112: ...r any purpose including commercial applications and to alter it and redistribute it freely subject to the following restrictions 1 The origin of this software must not be misrepresented you must not claim that you wrote the original software If you use this software in a product an acknowledgment in the product documentation would be appreciated but is not required 2 Altered source versions must b...

Page 113: ...wise specified The supplied FM antenna varies depending on the region of purchase Cables required for connections Easy Setup Guide English AV Receiver This document explains how to set up a 5 1 or 7 1 channel system RX V573 only and play back surround sound from a BD DVD on the unit To reduce the impact on natural resources the Owner s Manual for this product is supplied on CD ROM For more informa...

Page 114: ...speaker R 3 Center speaker 4 Surround speaker L 5 Surround speaker R 6 Surround back speaker L 7 Surround back speaker R 9 Subwoofer 2 Placing speakers 5 1 channel system 1 2 3 9 4 5 10 to 30 10 to 30 7 1 channel system RX V573 only 4 5 1 2 3 9 6 7 30 cm 1 ft or more 10 to 30 10 to 30 RX V473_573_esg_U fm Page 2 Monday January 23 2012 2 40 PM Black process 45 0 240 0 LPI ...

Page 115: ...nnecting speakers subwoofer U S A and Canada models only Under its default settings the unit is configured for 8 ohm speakers When connecting 6 ohm speakers set the unit s speaker impedance to 6 Ω MIN For details see Setting the speaker impedance in Owner s Manual Except for U S A and Canada models Use speakers with an impedance of at least 6 Ω Use a subwoofer equipped with built in amplifier Befo...

Page 116: ...URROUND OR OUT PB Y SUBWOOFER SPEAKERS 1 2 3 4 5 9 The unit rear FRONT CENTER SURROUND OR OUT PB Y SUBWOOFER SPEAKERS 1 2 3 4 5 9 Audio pin cable The unit rear For 7 1 channel system RX V573 only FRONT CENTER SURROUND SINGLE SURROUND BACK BI AMP ZONE B OR OUT PB Y SUBWOOFER SPEAKERS 1 6 7 2 3 4 5 9 The unit rear RX V473_573_esg_U fm Page 4 Monday January 23 2012 2 40 PM Black process 45 0 240 0 LP...

Page 117: ...connect it to this unit b Connect a TV to the unit with the other HDMI cable c Connect a TV to the unit with a digital optical cable This connection is required to play back TV audio on the unit This connection is not required if your TV supports ARC Audio Return Channel d Connect the power cable to an AC wall outlet For information on how to connect radio antennas or other external devices see PR...

Page 118: ...ars on the TV when the measurement finishes A u t o S e t u p S t a r t E x i t P r e s s S E T U P k e y t o S t a r t P o w e r A m p A s s i g n B a s i c VOL SW L SL C SR R SETUP Start A u t o S e t u p S t a r t E x i t M e a s u r e m e n t F i n i s h e d Result 3 2 0 1 ch 3 0 10 5 m 3 0 10 0 dB VOL SW L SL C SR R Finished SCENE RETURN VOLUME ENHANCER DIRECT HDMI AV FM INFO MEMORY AM PRESET...

Page 119: ...s of the problem speaker If the speaker is connected correctly You can save the current settings Proceed to step 3 If the speaker is connected incorrectly Turn off the unit reconnect the speaker cable and then try YPAO measurement again The YPAO microphone is sensitive to heat so should not be placed anywhere where it could be exposed to direct sunlight or high temperatures such as on top of AV eq...

Page 120: ...9 0 10 ENT 5 6 8 7 1 2 3 4 MODE TV NET RADIO TUNER 1 2 3 NET USB V AUX 6 A B ZONE 5 4 1 2 3 4 SLEEP AUDIO SCENE RETURN ENHANCER DIRECT HDMI AV FM INFO MEMORY AM PRESET MOVIE MUSIC BD DVD MUTE ENTER TV TVVOL TV CH TOP MENU POP UP MENU DISPLAY SOURCE RECEIVER CODE SET OPTION SETUP TUNING SUR DECODE INPUT MUTE 9 0 10 ENT 6 5 8 7 1 2 3 4 MODE TV NET RADIO TUNER 1 2 3 NET USB V AUX 6 A B ZONE 5 4 2 3 4...

Page 121: ...0320 0328 0351 Belcor 0008 Bell Howell 0019 0054 Benq 0097 0242 0361 Beon 0320 0349 0350 Best 0161 Bestar 0161 0320 0350 Binatone 0282 0342 Blue Sky 0320 0340 Blue Star 0348 Boots 0282 0342 BPL 0320 0348 Bradford 0058 0179 Brandt 0322 0345 Brillian 0182 Brinkmann 0320 Brionvega 0320 0339 0349 0350 Britannia 0277 0282 0342 Brockwood 0008 Broksonic 0109 0179 Bruns 0339 BTC 0340 Bush 0269 0282 0283 0...

Page 122: ...i 0171 0277 0336 0339 0342 0349 Formenti Phoenix 0277 Fortress 0336 0339 Fraba 0161 0320 Friac 0161 Frontech 0282 0323 0337 0343 0346 0347 Fujitsu 0059 0069 0074 0075 0282 Fujitsu General 0282 Fujitsu Siemens 0504 0505 0507 0510 0511 Funai 0051 0058 0059 0112 0113 0115 0118 0119 0179 0337 0488 0489 Futuretech 0058 0179 Galaxi 0320 0351 Galaxis 0161 0320 Gateway 0176 0177 0241 GBC 0323 0343 0344 GE...

Page 123: ...026 0027 0031 0049 0111 M Electronic 0342 0343 0345 0347 0349 0350 MAG 0096 Magnadyne 0339 0341 0349 Magnafon 0171 0277 0341 0342 Magnavox 0008 0009 0010 0013 0026 0032 0033 0048 0050 0128 0211 0212 0224 0226 0239 Magnum 0337 0343 Majestic 0054 Mandor 0337 Manesth 0282 0320 0337 0342 0349 0350 Marantz 0008 0010 0026 0050 0204 0320 0349 0350 Marelli 0339 Mark 0277 0282 0320 0323 0349 0350 Masuda 02...

Page 124: ...dialva 0320 RadioShack 0019 0021 0031 0050 0179 0320 RadioShack Realistic 0007 0008 0012 0026 0049 0058 Radiola 0282 0320 0349 0350 Radiomarelli 0320 0339 Radiotone 0161 0320 0323 0350 Rank 0344 RCA 0008 0021 0024 0025 0026 0027 0042 0049 0052 0053 0063 0136 0225 Realistic 0019 0031 0050 0179 Recor 0320 Redstar 0320 Reflex 0320 Revox 0161 0320 0349 0350 Rex 0337 0346 0347 RFT 0161 0168 0339 Rhapso...

Page 125: ...293 0304 0306 0307 0329 0344 0355 0454 0491 Totevision 0007 Towada 0282 0347 Trakton 0282 Trans Continens 0282 0320 Transtec 0277 Trident 0282 Triumph 0320 Uher 0161 0171 0320 0347 0350 Ultravox 0277 0320 0339 0341 0342 Unic Line 0320 United 0349 Universum 0161 0171 0282 0320 0337 0349 0350 0351 Univox 0320 Vector Research 0050 Vestel 0282 0320 0346 0347 0349 0350 0351 Vexa 0320 0323 0343 0349 Vic...

Page 126: ... Hisawa 1024 Hitachi 1011 1026 1027 1028 1046 1062 HNS 1110 Howard Computers 1016 HP 1016 HTS 1018 Hughes 1111 1113 1122 Hughes Network Systems 1110 1116 Humax 1012 1110 1113 Hush 1016 Hypson 1008 1009 1024 1029 iBUYPOWER 1016 Impego 1030 Imperial 1026 Inno Hit 1008 1009 1025 1028 1029 1030 Innovation 1024 Instant Replay 1068 Interbuy 1008 1031 Interfunk 1028 Intervision 1009 1026 Irradio 1008 102...

Page 127: ... 1083 1108 1118 1216 Stack 1016 Stack 9 1016 Standard 1009 1025 Stern 1009 STS 1068 Sunkai 1024 Sunstar 1026 Suntronic 1026 Sunwood 1008 1029 Superscan 1020 Sylvania 1020 1068 1069 1102 1126 Symphonic 1008 1069 1126 Systemax 1016 Tagar Systems 1016 Taisho 1024 Tandberg 1009 Tandy 1065 Tashiko 1026 1071 Tatung 1026 1027 1028 TCM 1015 1024 1042 Teac 1009 1069 Tec 1008 1009 1030 Technics 1068 Teknika...

Page 128: ...74 2316 2359 2380 Hiteker 2130 Home Tech Industries 2364 Hyundai 2366 Ilo 2245 Initial 2131 2245 Innovation 2182 Insignia 2002 2137 2253 Integra 2157 Irradio 2053 iSymphony 2246 JBL 2135 JVC 2020 2096 2097 2099 2100 2101 2102 2103 2106 2107 2160 2257 2260 2262 2263 2321 2324 2326 2327 2343 2464 2465 2468 2469 2471 Jwin 2198 Kansai 2360 Kawasaki 2149 Kennex 2362 Kenwood 2041 2151 2348 KeyPlug 2362 ...

Page 129: ...Spectra 2363 Spectroniq 2201 Standard 2355 Star Cluster 2355 Starmedia 2358 2364 Sungale 2204 Sunkai 2362 Superscan 2150 Supervision 2355 Sylvania 2012 2137 2150 2178 2230 2239 Symphonic 2108 2230 Synn 2355 T D E Systems 2366 Tatung 2001 2362 TCM 2182 2297 Teac 2149 2333 2355 2383 Tec 2356 Technics 2151 Technika 2362 2367 Telefunken 2353 Tensai 2362 Tevion 2182 2355 2357 Theta Digital 2157 Thomson...

Page 130: ... 3072 3084 3090 3096 3119 3123 JVC 3099 Kabel Deutschland 3024 3027 3121 Macab 3101 Magnavox 3079 Maspro 3099 Matsui 3099 MegaCable 3117 Memorex 3076 3122 Minerva 3099 Mnet 3107 Motorola 3025 3026 3084 3088 3090 3095 3117 Movie Time 3077 3109 Mr Zapp 3101 Multichoice 3107 Multitech 3127 NEC 3064 NET Brazil 3085 Nokia 3097 Noos 3101 NSC 3077 Oak 3074 Pace 3006 3089 3121 Palladium 3099 Panasonic 311...

Page 131: ...Einhell 4001 4005 4011 4217 4218 Elap 4216 4217 Elekta 4010 Elsat 4217 Elta 4001 4008 4024 4048 4053 4055 Emanon 4001 Emme Esse 4008 4024 Engel 4217 Ep Sat 4006 EURIEULT 4031 Eurodec 4052 Europa 4053 4218 4219 Europhon 4219 Eurosat 4011 Eurosky 4008 4011 4215 4218 4219 4024 Eurostar 4011 4215 4219 Eutelsat 4217 Exator 4001 4004 Expressvu 4117 Fenner 4024 4212 4217 Ferguson 4006 4052 4214 Fidelity ...

Page 132: ...06 Prosat 4005 4007 Proscan 4066 4093 4122 4197 Protek 4051 Proton 4016 Provision 4010 Quadral 4005 4007 4008 4216 4024 Quelle 4015 4215 4219 Quiero 4052 RadioShack 4019 Radiola 4053 4055 Radix 4014 4037 Rainbow 4004 RCA 4066 4093 4112 4113 4116 4118 4119 4197 4122 4207 Realistic 4078 Redpoint 4009 Redstar 4008 4024 RFT 4005 4053 4055 Roadstar 4217 Roch 4031 Rover 4024 4217 Saba 4010 4215 4216 421...

Page 133: ...4098 Visiosat 4013 4048 4216 4217 Voom 4019 Vortec 4001 Welltech 4212 WeTeKom 4212 4218 Wevasat 4006 Wewa 4006 Winersat 4013 Wisi 4006 4014 4015 4218 4219 Woorisat 4010 Worldsat 4216 Xrypton 4024 XSat 4217 Zehnder 4008 4209 4010 4215 4024 Zenith 4102 4107 4195 Zodiac 4004 CD Yamaha 5082 5095 CD Recorder Yamaha 5083 MD Yamaha 5080 5081 5086 Tape Yamaha 5084 5087 Tuner Yamaha 5066 5085 5088 5090 509...

Page 134: ...w yamaha com VEC registration Yamaha is committed to doing it s part in protecting the environment and reducing the impact on our natural resources As a result this product is supplied with an electronic copy of the manual on the enclosed disc for use on your computer We appreciate your business and look forward to hearing from you soon Product registration applies to USA customers only Failure to...

Page 135: ......

Page 136: ... such as radiators heat registers stoves or other apparatus including amplifiers that produce heat 9 Do not defeat the safety purpose of the polarized or grounding type plug A polarized plug has two blades with one wider than the other A grounding type plug has two blades and a third grounding prong The wide blade or the third prong are provided for your safety If the provided plug does not fit in...

Page 137: ...LY to those products distributed by Yamaha Corporation of America or its subsidiaries FOR CANADIAN CUSTOMERS To prevent electric shock match wide blade of plug to wide slot and fully insert This Class B digital apparatus complies with Canadian ICES 003 POUR LES CONSOMMATEURS CANADIENS Pour eviter les chocs clectriqucs introduire Ia lame Ia plus large de Ia fiche dans Ia borne corrcspondantc de Ia ...

Page 138: ...in voltage BEFORE plugging into the AC wall outlet Voltages are 110 120 220 240V 50 60Hz 19 Condensation will form when the surrounding temperature changes suddenly Disconnect the power cable from the outlet then leave this unit alone 20 When using this unit for a long time this unit may become warm Turn the power off then leave this unit alone for cooling 21 Install this unit near the AC outlet a...

Page 139: ...ormation on Disposal in other Countries outside the European Union These symbols are only valid in the European Union If you wish to discard these items please contact your local authorities or dealer and ask for the correct method of disposal Note for the battery symbol bottom two symbol examples This symbol might be used in combination with a chemical symbol In this case it complies with the req...

Page 140: ...e improper use of either certified or uncertified equipment if applicable or g interference arising from the use of wireless communication devices e g 2 4 gHz cordless telephones or other radio frequency emitting products such as microwave ovens whether such interference impairs the operation of the product or vice versa Consult the Owner s Manual for guidance on set up procedures for minimizing t...

Reviews: