5.2.5 A General Approach To Setting
Levels In a Sound System
Just because individual pieces of sound equipment
are listed as having certain headroom or noise and
maximum output capability, there is no assurance that
the sound system assembled from these components
will yield performance anywhere near as good as that of
the least capable component. Volume control and fader
settings throughout a sound system can dramatically
affect that performance.
To provide the best overall system performance, level
settings should be optimized for each component in the
system. One popular approach is to begin by adjusting
levels as close as possible to the signal source. In this
case, the primary adjustments are made on the console
input module. Set the input PAD and GAIN trim
controls for the maximum level that will not produce
clipping (i.e., avoid overdriving the input stage); this
can be seen by examining the green “signal” and red
“peak” LEDs, and in some cases it can be heard by
listening for distortion while making PAD and GAIN
adjustments. The next step is to set the level of the
console input channel (the channel fader and/or the
appropriate aux send control) so that it properly drives
the mixing busses. You can refer to the VU meters to
examine the bus levels.
If line amplifiers, electronic crossovers, equalizers or
other signal processing devices are inserted in the
signal chain, signal levels at the input of these units
should be set so the dynamic range of each unit is
optimized. In other words, set the input level at each
device as high as possible without producing clipping,
and, if an output level control is provided, also set it as
high as possible without clipping the output - and
without causing clipping in the input of the next device
to which it is connected.
Check the operating manual of each piece of equip-
ment to determine the specified nominal and maximum
input levels. An accurate AC voltmeter is often helpful
for verifying levels. As a rule, keep signal levels as high
as possible throughout the system, up to the input of
the power amplifier(s); at that point, reduce the pro-
gram level, as required to achieve a given headroom
value, using the amplifier’s input attenuators. Input
attenuators should be set so that maximum program
levels from the source equipment won’t drive the
amplifiers to clipping (or at least, won’t do it very often).
This keeps overall system noise as low as possible.
Page 5-4
5.2.6 How To Select a Headroom Value
and Adjust Levels Accordingly
Recall that headroom is the amount of level available
for peaks in the program that are above the average
(nominal) signal level.
The choice of a headroom figure depends on the type
of program material, the application, and the available
budget for amplifiers and speakers. For a musical
application where high fidelity is the ultimate consider-
ation, 15 dB to 20 dB of headroom is desirable. For most
sound reinforcement applications, especially with large
numbers of amplifers, economics play an important
role, and a 10 dB headroom figure is usually adequate;
in these applications, a limiter can help hold program
peaks within the chosen headroom value, and thus
avoid clipping problems. For the extreme situation (as
in a political rally) where speeches and other program
material must be heard over very high noise levels from
the crowd, as well as noise from vehicular and air
traffic, yet maximum levels must be restricted to avoid
dangerously high sound pressure levels, a headroom
figure of as low as 5 or 6 dB is not unusual. To achieve
such a low headroom figure, an extreme amount of
compression and limiting will be necessary; while the
sound may be somewhat unnatural, the message will
“cut through.”
Figure 5-2. Headroom In Different Applications
Let’s go through an actual setup procedure for a high
quality, music reproduction system. First choose a
headroom figure. For maximum fidelity when reproduc-
ing music, it is desirable to allow 20 dB of headroom
above the average system output. While some extreme
musical peaks exceed 20 dB, the 20 dB figure is ad-
equate for most programs, and allowing for greater
headroom can be very costly. A 20 dB headroom figure
represents a peak level that is one hundred times as
powerful as the average program level. This corre-
sponds to an average 0 VU indication on the PM4000
meters (0 VU +4 dBu, which allows 20 dB headroom
before the console reaches its m24 dBu output
level).
Summary of Contents for PM4000
Page 1: ...PROFESSIONAL AUDIO MIXING CONSOLE PM4000 OPERATING MANUAL YAMAHA ...
Page 2: ...PM4000 OPERATING MANUAL ...
Page 7: ...Section 1 Introduction ...
Page 11: ...Section 2 Brief Operating Instruction ...
Page 47: ...Section 3 Specifications ...
Page 51: ...Dimensional Drawings PM4000 Console all versions Page 3 4 ...
Page 52: ...Page 3 5 ...
Page 53: ...Page 3 6 PM4000 Console Rear Profiles ...
Page 54: ...Module Block Diagrams See back of the manual for overall system block diagram Page 3 7 ...
Page 55: ...Page 3 8 ...
Page 56: ...Page 3 9 ...
Page 57: ...Page 3 10 ...
Page 58: ...Page 3 11 ...
Page 59: ...Page 3 12 ...
Page 60: ...Section 4 Installation Notes ...
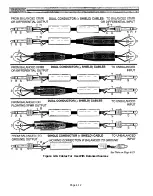
Page 72: ...Figure 4 13 Cables For Use With Balanced Sources Page 4 12 ...
Page 79: ...SECTION 5 Gain Structure and Levels ...
Page 82: ...Figure 5 1 Dynamic Range and Headroom in Sound Systems Page 5 3 ...
Page 86: ...Section 6 Optional Functions ...
Page 106: ...Section 7 Operating Notes and Hints ...
Page 119: ...Section 8 Applications ...
Page 127: ...Section 9 Maintenance ...
Page 131: ......
Page 132: ...YAMAHA VN02300 ...


