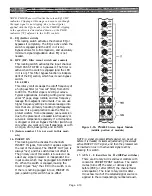
mixing buses, and the inner rotary control on
the right serves to PAN that signal between the
L & R sides of that stereo pair.
When the send is set for dual mono mode, the
inner rotary control on the left sets the LEVEL
applied to the AUX ST L bus (i.e., LEVEL-L),
and the inner rotary control on the right sets
the LEVEL applied to the AUX ST R bus (i.e.,
LEVEL-R).
19. AUX ST 2
These two pair of concentric controls and
switches function just like AUX ST 1, but affect
the #2 auxiliary stereo bus pair.
Note: By setting AUX ST 1 and AUX ST 2 to dual mono
mode, you have a total of 12 independent auxiliary
mixing busses.
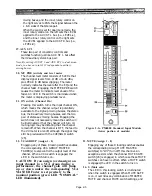
20. MT PRE (switch) and level meter
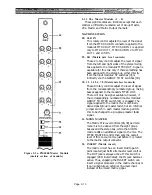
The channel level meter consists of 6 LEDs that
display signal levels from
-20
dB u to +6 dBu,
plus PEAK (3 dB below clipping). The meter
normally indicates the level after the EQ and the
channel fader. Engaging the METER PRE switch
causes the meter to indicate level ahead of the
fader. An LED in the switch is illuminated when
the meter is displaying pre-fader level.
21. ON switch (Channel On)
Pressing this switch turns the input channel ON,
which means the channel output is potentially
available to the 8 group mixing busses, the stereo
bus, the 8 auxiliary mixing busses, and the two
pair of stereo aux mixing busses. Engaging the
switch does not necessarily mean the switch will
be illuminated or that the channel will turn on;
muting logic may be dictating that the channel
remain off. When the channel is OFF, the feed to
the VU meter is also off, although the signal may
still be previewed with the CUE/SOLO switch
[26].
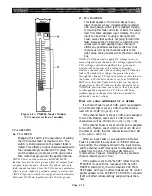
Figure 2-1c. PM4000 Standard Input Module
(lower portion of module)
22. VCA GROUP (Assign 1 - 8)
Engaging any of these 8 locking switches enables
the corresponding VCA GROUP MASTER
FADER(s) to also control the output level of this
channel. When a VCA switch is engaged, the
LED in the switch turns on.
CAUTION: If you assign (or deassign) an
input channel to a VCA group during a
performance, the channel gain will jump
up or down unless the corresponding VCA
MASTER Fader is set precisely to the
nominal position (green LED "NOMINAL"
LED illuminated).
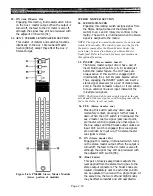
23. MUTE (Assign 1 - 8)
Engaging any of these 8 locking switches enables
the corresponding Group MUTE MASTER
switch(es) to “kill” (turn off’) this channel. An
exception exists when the channel MUTE SAFE
switch [24] is engaged, in which case these MUTE
switches can have no effect. When a MUTE switch
is engaged, the LED in the switch turns on.
24. S (Mute safe)
The LED in this locking switch is illuminated
when the switch is engaged. When MUTE SAFE
is on, it overrides any combination of MASTER
MUTE and channel MUTE switch settings, and
Page 2-5
Summary of Contents for PM4000
Page 1: ...PROFESSIONAL AUDIO MIXING CONSOLE PM4000 OPERATING MANUAL YAMAHA ...
Page 2: ...PM4000 OPERATING MANUAL ...
Page 7: ...Section 1 Introduction ...
Page 11: ...Section 2 Brief Operating Instruction ...
Page 47: ...Section 3 Specifications ...
Page 51: ...Dimensional Drawings PM4000 Console all versions Page 3 4 ...
Page 52: ...Page 3 5 ...
Page 53: ...Page 3 6 PM4000 Console Rear Profiles ...
Page 54: ...Module Block Diagrams See back of the manual for overall system block diagram Page 3 7 ...
Page 55: ...Page 3 8 ...
Page 56: ...Page 3 9 ...
Page 57: ...Page 3 10 ...
Page 58: ...Page 3 11 ...
Page 59: ...Page 3 12 ...
Page 60: ...Section 4 Installation Notes ...
Page 72: ...Figure 4 13 Cables For Use With Balanced Sources Page 4 12 ...
Page 79: ...SECTION 5 Gain Structure and Levels ...
Page 82: ...Figure 5 1 Dynamic Range and Headroom in Sound Systems Page 5 3 ...
Page 86: ...Section 6 Optional Functions ...
Page 106: ...Section 7 Operating Notes and Hints ...
Page 119: ...Section 8 Applications ...
Page 127: ...Section 9 Maintenance ...
Page 131: ......
Page 132: ...YAMAHA VN02300 ...


