background image

3

INT

R

ODUCT

ION

1

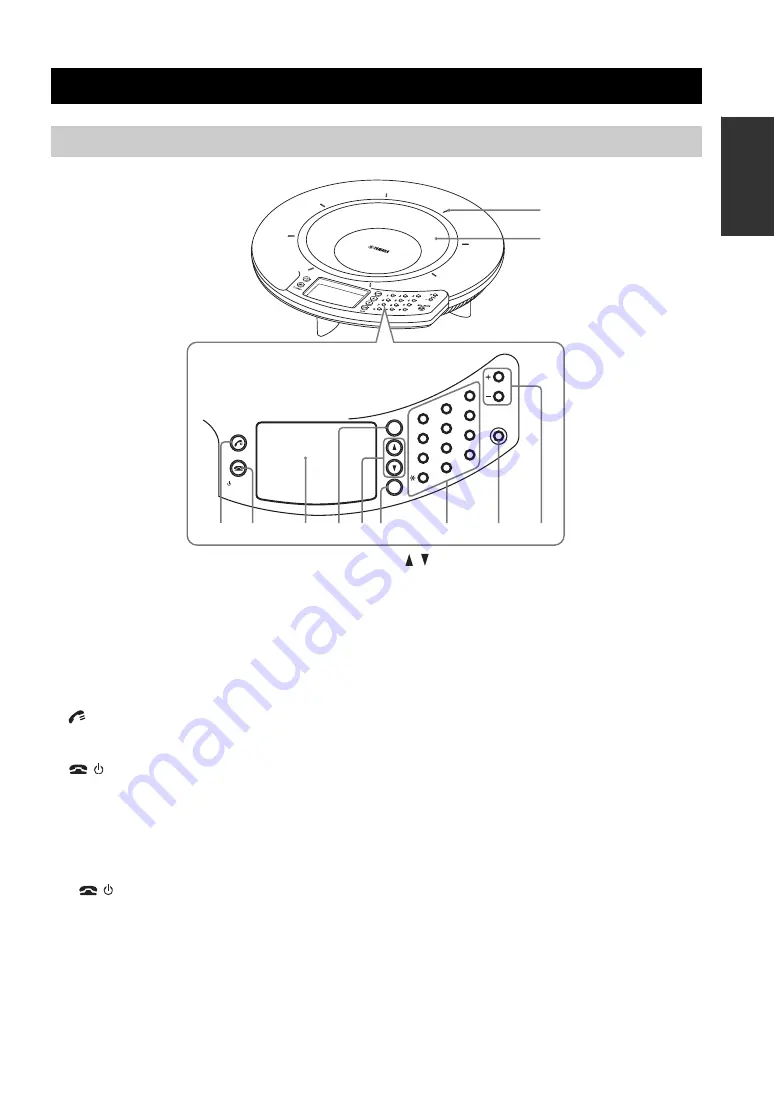
Microphone indicators

When this unit is turned on, the LEDs light in blue. The 
LEDs are turned off while the microphones are being 
muted.

2

Arrayed microphones

The eight microphones on the top panel pick up the voices 
of the talkers.

3

Reserved for future extension.

4

/

 STANDBY

While the setting item is being displayed, press the key 
to return to the top screen.

Hold down the key to set the system to the standby 
mode.

y

Hold 

/

 STANDBY to exit the standby mode.

5

Display

The LCD shows the current status of this unit.

6

CLEAR

Press the key to cancel a setting without saving it or to 
return to the previous screen.

7

/

Press either key to select a setting item or move the cursor 
up or down.

8

ENTER/MENU

Press the key to enter a setting.

Press the key to display the setting menu.

9

Numeric keys

Press the key to select a setting item.

0

MIC MUTE

Press the key to temporarily defeat (mute) the 
microphones of this unit. The key lights in orange when 
muted.
Pressing the key when the microphones are muted releases 
the mute and turns the LED off.

A

VOL +/–

Press either key to adjust the speaker volume. Holding 
either key increases or decreases the volume continuously.

Controls and Functions

Top panel

MIC  MUTE

STANDBY

MENU

ENTER

CLEAR

VOL

4

7

0

8

5

2

6

3

9

#

1

2

1

3 4

5 6 78

0

A

9

Summary of Contents for PJP-50USB

Page 1: ...PJP 50USB Conference Microphone Speaker 1 2 3 4 5 6 7 8 9 0 MIC MUTE VOL CLEAR ENTER MENU STANDBY User s Manual...

Page 2: ......

Page 3: ...ing Menu List 15 Selecting the audio pickup area Mic Area 15 Configuring the acoustic echo cancellation setting AEC Effect 15 Changing the audio input level 15 Changing the audio output level 15 Using...

Page 4: ...alkers and listeners Audio conference that is easy to talk and easy to hear This unit employs arrayed microphones with high voice capturing capability and speakers with high voice reproduction capabil...

Page 5: ...ss the key to cancel a setting without saving it or to return to the previous screen 7 Press either key to select a setting item or move the cursor up or down 8ENTER MENU Press the key to enter a sett...

Page 6: ...ed speakers The four arrayed speakers on the bottom panel for use in output of the audio 3Adjuster If you cannot place this unit stably because of the shape of the desk or other reasons adjust the foo...

Page 7: ...video conference system Note that the plugs connected to the Projectphone should always be the stereo mini plugs System requirement The PC connected to this unit should meet the following system requi...

Page 8: ...Connect the power cable to the AC adapter 4 Connect the power cable to the AC outlet This unit is turned on The start up sound plays and the microphone indicators light up y You do not need to install...

Page 9: ...Audio tab 5 Configure the settings as shown below Default device in Sound playback Yamaha PJP 50USB Default device in Sound recording Yamaha PJP 50USB y Normally Yamaha PJP 50USB is automatically sele...

Page 10: ...elow Select Yamaha PJP 50USB in Speakers and then click Set Default y Normally Yamaha PJP 50USB is automatically selected when this unit is connected to the PC 6 Click the Recording tab 7 Configure th...

Page 11: ...a case adjust AUDIO IN LEVEL and AUDIO OUT LEVEL in Settings For details see page 15 To use this function you need to change the settings of the audio input output of the PC and video conference syst...

Page 12: ...the following description refer to the instruction manuals of your PC or the sound card installed to your PC and set the parameters as follows When using Windows XP 1 Click Start Control Panel 2 Clic...

Page 13: ...he connection method When using Windows 7 Windows Vista In this section Windows Vista is used as an example 1 Click Start Control Panel 2 Click Classic View 3 Double click Sound The Sound screen appea...

Page 14: ...onnection method and then click Properties The Microphone Properties screen appears 10 Click the Levels tab 11 In the Microphone field click to cancel the mute function The items displayed in the scre...

Page 15: ...elow this unit If you cannot place this unit stably because of the shape of the desk or other reasons adjust the foot height using the adjuster equipped on the bottom Position of the talkers This unit...

Page 16: ...3 Select Settings and then press ENTER The Settings screen appears 4 Press or to select a setting item and then press ENTER For the composition of the setting menus see Setting Menu List page 15 5 Ch...

Page 17: ...rations High Select this setting if echo is still produced at the other party when this unit is used in Mid Mid and High can improve the echo processing capability but lowers the communication quality...

Page 18: ...ct Menu Settings Environment Japanese Select this setting to display the menus in Japanese English default Select this setting to display the menus in English Chinese Select this setting to display th...

Page 19: ...oblem Cause Remedy The audio from the other unit cannot be heard The microphones are muted on the other unit The speaker mute function is working Cancel the speaker mute function The audio is interrup...

Page 20: ...download the firmware program to control the functions of this unit to use the latest features For details refer to PJP 50USB Writer Instruction Manual included in the supplied CD ROM Using the Lates...

Page 21: ...AC adapter 1 4 kg 3 09 lbs Power source 100 to 240 V AC 50 60 Hz Accessories USB cable 2 0 m AC adapter 1 8 m Power cable 2 0 m CD ROM Quick Start Guide PC environment OS Microsoft Windows 7 Vista XP...

Page 22: ...November 2010 3rd edition...

Reviews: