


5-1
Chapter
5
USER WIRING AND USER PIPIN
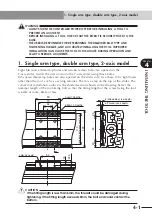
1. Cable carrier type
w
WARNING
ALWAYS TURN OFF THE CONTROLLER BEFORE WIRING AND PIPING TO PREVENT
ELECTRICAL SHOCKS.
1. Cable carrier type
A cable carrier is mounted as a standard between the X and Y axes. When 3rd-axis are
used, a cable carrier is also provided between the Y and Z axes, and when using 4th-axis,
a cable carrier is also provided between the Z and R axes. Lay the wiring and piping to
the tool using these ducts. A 0.3sq 10-core flexible cable is wired from the X-axis wiring
box to the final axis' wiring box, and can be used freely. The wiring and piping methods
for a 2-axis arm type are explained below as an example.
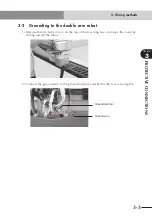
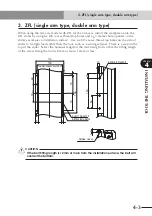
1-1 Wiring/piping to the single arm robot
c
CAUTION
Wiring layout must be designed in the unoccupied area.
1) Remove the outer lids on the cable carrier by using a flat-tip screwdriver. The outer
lids do not have to be removed if the connectors are not attached to the wiring
materials.
Summary of Contents for NXY
Page 2: ......
Page 6: ......
Page 22: ......
Page 26: ...2 4 MEMO ...
Page 28: ......
Page 32: ...3 4 MEMO ...
Page 34: ......
Page 38: ...4 4 MEMO ...
Page 40: ......
Page 48: ......