background image

NU1  

Owner’s Manual

23

Using USB Flash Memory

This instrument features several functions which handle the Song files, as listed below.

Formatting USB flash memory

Copying a User MIDI file from the instrument to USB flash memory

Deleting Song file from the instrument or from USB flash memory

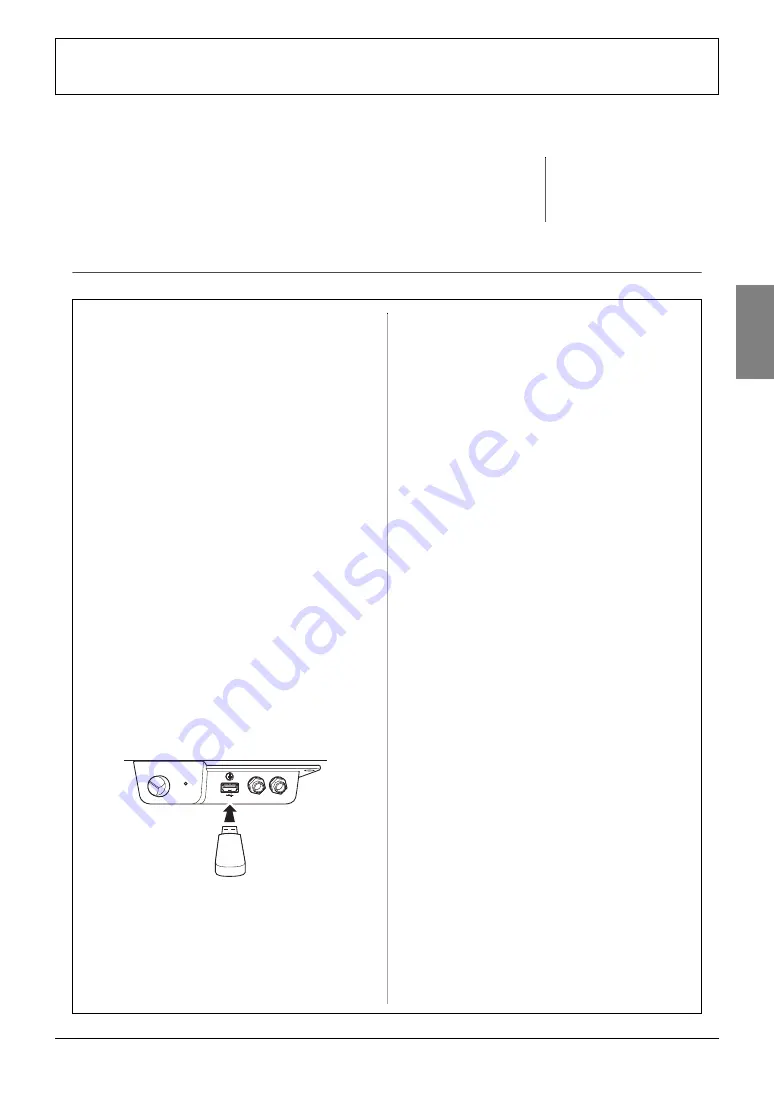
Connecting USB flash memory

NOTE

File mode cannot be called up in the fol-
lowing situations.
• During Song playback/pause (page 18)
• Record mode (page 21)

Precautions when using the [USB TO 
DEVICE] terminal

This instrument features a built-in [USB TO DEVICE] 

terminal. When connecting a USB flash memory to the 
terminal, be sure to handle the USB flash memory with 

care. Follow the important precautions below.

NOTE

For more information about the handling of USB flash memory, refer to the owner’s 
manual of the USB flash memory.

Compatible USB flash memories

The instrument does not necessarily support all com-
mercially available USB flash memories. Yamaha can-

not guarantee operation of USB flash memories that 

you purchase. Before purchasing a USB flash memory 
for use with this instrument, please visit the following 

web page: 

http://download.yamaha.com/

NOTE

Other USB devices such as a computer keyboard or mouse cannot be used.

Connecting USB flash memory

When connecting a USB flash memory to the [USB TO 

DEVICE] terminal, make sure that the connector on the 

device is appropriate and that it is connected in the 
proper direction.

NOTICE

• When connecting a USB cable, make sure it is less than 

3 meters.

• Though the instrument supports the USB 1.1 standard, 

you can connect and use a USB 2.0 storage device with 
the instrument. However, note that the transfer speed is 
that of USB 1.1.

Using USB Flash Memory

By connecting the instrument to USB flash memory, 

you can save data you’ve created to the connected USB 

flash memory, as well as read data from it.

Number of USB flash memories which 
can be used

Only one USB flash memory can be connected to the 

[USB TO DEVICE] terminal.

Formatting USB flash memory

When accessing USB flash memory, a message may 

appear prompting you to format the device/media. If 
so, execute the Format operation (page 24).

NOTICE

The format operation overwrites any previously existing 
data. Make sure that the media you are formatting does 
not contain important data.

To protect your data (write-protect)

To prevent important data from being inadvertently 

erased, apply the write-protect provided with the USB 

flash memory. If you are saving data to the USB flash 
memory, make sure to disable write-protect.

Connecting/removing USB flash memory

Before removing the USB flash memory from the 

[USB TO DEVICE] terminal, make sure that the instru-

ment is not accessing data (such as in the Save, Copy 
and Delete operations).

NOTICE

Avoid frequently connecting/disconnecting the USB 
flash memory too often. Doing so may result in the oper-
ation of the instrument “freezing” or hanging up. While 
the instrument is accessing data (such as during Save, 
Copy, Delete, Load and Format operations) or is mount-
ing the USB flash memory (shortly after the connection), 
do NOT unplug the USB connector. Doing so may cor-
rupt the data on either or both devices.

MAX

PHONES 

USB TO DEVICE

MIN

MASTER VOLUME

Summary of Contents for NU1

Page 1: ...using this instrument be sure to read PRECAUTIONS on pages 6 7 Achten Sie darauf vor Einsatz dieses Instruments die VORSICHTSMASSNAHMEN auf Seiten 6 7 durchzulesen Avant d utiliser cet instrument lis...

Page 2: ...ly believe that our products and the production methods used to produce them meet these goals In keeping with both the letter and the spirit of the law we want you to be aware of the following Battery...

Page 3: ...llow instructions could void your FCC authorization to use this product in the USA 3 NOTE This product has been tested and found to comply with the requirements listed in FCC Regulations Part 15 for C...

Page 4: ...ng the latest technology was used to capture the luxurious sounds of Yamaha s flagship CFX a full sized concert grand piano The powerful bass and bright penetrating midrange sound of the original CFX...

Page 5: ...Controls and Terminals 8 Playing the Keyboard 9 Using the Pedals 11 Using Headphones Optional 12 I A Control Intelligent Acoustic Control 12 Advanced Functions Basic Operations and More 13 Selecting a...

Page 6: ...injury or cause damage to the instrument itself Before moving the instrument remove all connected cables to prevent damage to the cables or injury to anyone who might trip over them When setting up th...

Page 7: ...t for your personal use This product incorporates and bundles computer programs and contents in which Yamaha owns copyrights or with respect to which it has license to use others copyrights Such copyr...

Page 8: ...ter value Note that the display turns dark after the value is set This display also indicates various messages with the three characters For details refer to page 30 Music Rest pages 9 and 10 Fallboar...

Page 9: ...haz ard The type of AC power cord provided with the instrument may be different depending on the country in which the instrument was purchased In some areas a plug adaptor may be provided to match the...

Page 10: ...gh volume level for a long period of time to prevent hearing damage 6 Press the switch again to turn off the power The power lamp turns off CAUTION A small amount of electrical current remains even af...

Page 11: ...half pedal effect The smaller the value the shallower the half pedal point The larger the value the deeper the half pedal point Setting range 2 A 5 0 C6 4 E6 Default Setting 0 Sostenuto Pedal Center...

Page 12: ...nt Even when the volume is low it permits both low sounds and high sounds to be clearly heard Note that the I A Con trol is effective only from the sound output of the instrument speakers To turn on o...

Page 13: ...isplay Voice name Descriptions 1 Grand Piano 1 Recorded samples from a full concert grand piano Perfect for clas sical compositions as well as any other style that requires acoustic piano 2 Grand Pian...

Page 14: ...usly Selecting the Beat While holding down METRONOME press one of the C3 F3 keys The selected value is shown on the display while both controls are held Only the first beat is accented with a bell sou...

Page 15: ...REVERB A6 C7 Default setting 2 Medium NOTE The touch type is restored to the default setting when the power is turned off NOTE This setting does not change the weight of the keyboard but only the res...

Page 16: ...ent along with other instruments or recorded music During the operation described below you can check the Pitch value shown on the display To tune up in roughly 0 2Hz steps While holding down FUNCTION...

Page 17: ...in actual vocal harmonies such as choirs and a cappella singing 3 D5 Pure Minor 4 D 5 Pythagorean This scale was devised by the famous Greek philosopher and is created from a series of perfect fifths...

Page 18: ...format commonly used by computers This instrument can play 44 1kHz 16bit stereo WAV files Audio Songs recorded on this instrument are saved in this for mat User Songs and External Songs Songs recorde...

Page 19: ...ng or one recorded on another device To adjust the volume of the Audio Song hold down DEMO SONG and press one of the C1 G2 keys Rewind Fast forward During playback press or to move back or forth throu...

Page 20: ...er Code If the Song cannot be called up you may need to select the appropriate Character Code from the following two settings International For playing back Songs with names using western European cha...

Page 21: ...nt MIDI Song S 00 S 99 User Song in USB flash memory MIDI Song A 00 A 99 User Song in USB flash memory Audio Song When the selected Song contains already recorded data You can confirm it by checking t...

Page 22: ...Song number indicating that the Record mode is disen gaged NOTICE While dashes appear in the display in succession never turn off the power or disconnect the USB flash memory Doing so may delete all S...

Page 23: ...Though the instrument supports the USB 1 1 standard you can connect and use a USB 2 0 storage device with the instrument However note that the transfer speed is that of USB 1 1 Using USB Flash Memory...

Page 24: ...O DEVICE terminal 2 For the Copy source select a User Song in this instrument For detailed instructions refer to page 18 3 While holding FUNCTION press PLAY STOP On the display SAu appears for a while...

Page 25: ...on press 4 Press to execute the Delete operation Dashes appear in succession on the display indicating that the Delete is being executed When the operation is completed End appears on the display NOTI...

Page 26: ...o Song volume page 19 AUX IN Noise Gate on off page 28 Initializing the Backup data While holding down the C7 key turn on the power CLr appears on the display then the Backup data with the exception o...

Page 27: ...efer to About MIDI on page 29 e AUX IN L L R R jack By connecting the stereo cables to these jacks the sound of another audio equip ment can be reproduced via the speakers of this instrument CAUTION W...

Page 28: ...evice first turn on the power to the instrument then to the external device Reverse this order when you turn the power off Also before turning the power on or off to all components set all volume leve...

Page 29: ...piano part should be assigned to MIDI Channels 1 and 2 of the Song Local Control on off Normally playing the keyboard will control the internal tone generator This situation is called Local Control O...

Page 30: ...nction has occurred in the instrument Contact your nearest Yamaha dealer or authorized dis tributor EEE A malfunction has occurred in the instrument Contact your nearest Yamaha dealer or authorized di...

Page 31: ...s normal and no cause for concern Sound is not heard on a par ticular key Keyboard may not function normally if the key was pressed when the power was turned on Turn off the power and turn it again to...

Page 32: ...ipe again with a dry cloth For stubborn stains on the white keys use a piano cleaner sold separately When using such a cleaner be careful not to allow the cleaner to touch the black keys After use mak...

Page 33: ...ce Yes Polyphony Number of Polyphony Max 256 Preset Number of Voices 5 Effects Type Reverb Yes Recording Playback MIDI Songs Recording Number of Songs 10 Number of Tracks 1 Data Capacity max approx 1...

Page 34: ...lume 10 Mean Tone 17 Message List 30 Metronome 14 MIDI 27 29 MIDI Basics 5 MIDI recording 21 MIDI Reference 5 MIDI Song 18 Music Rest 9 N Noise Gate 28 O Optional Accessories 33 P Pedal 11 Pitch 16 Pl...

Page 35: ...Operation Guide While holding down the button on the control panel press one of the corresponding keys shown below to select songs or set parameters z Metronome Volume page 14 x Metronome Time Signat...

Page 36: ...t le Traitement des d chets d quipements lectriques et lectroniques Le symbole sur les produits l emballage et ou les documents joints signifie que les produits lectriques ou lectroniques usag s ne do...

Page 37: ...comprobante permanente de su compra para facilitar la identificaci n en caso de robo N do modelo N de serie bottom_es Das Typenschild dieses Produkts befindet sich an der Unterseite des Ger ts Die Se...

Page 38: ......

Page 39: ...EECE Philippos Nakas S A The Music House 147 Skiathou Street 112 55 Athens Greece Tel 01 228 2160 SWEDEN Yamaha Music Europe GmbH Germany filial Scandinavia J A Wettergrens Gata 1 Box 30053 S 400 43 G...

Page 40: ...WZ13580 U R G Digital Musical Instruments Division 2011 Yamaha Corporation 112POAP 01A0 Printed in China Yamaha Global Site http www yamaha com Yamaha Manual Library http www yamaha co jp manual...

Reviews: