35
MW10
Preparing to Record
1.
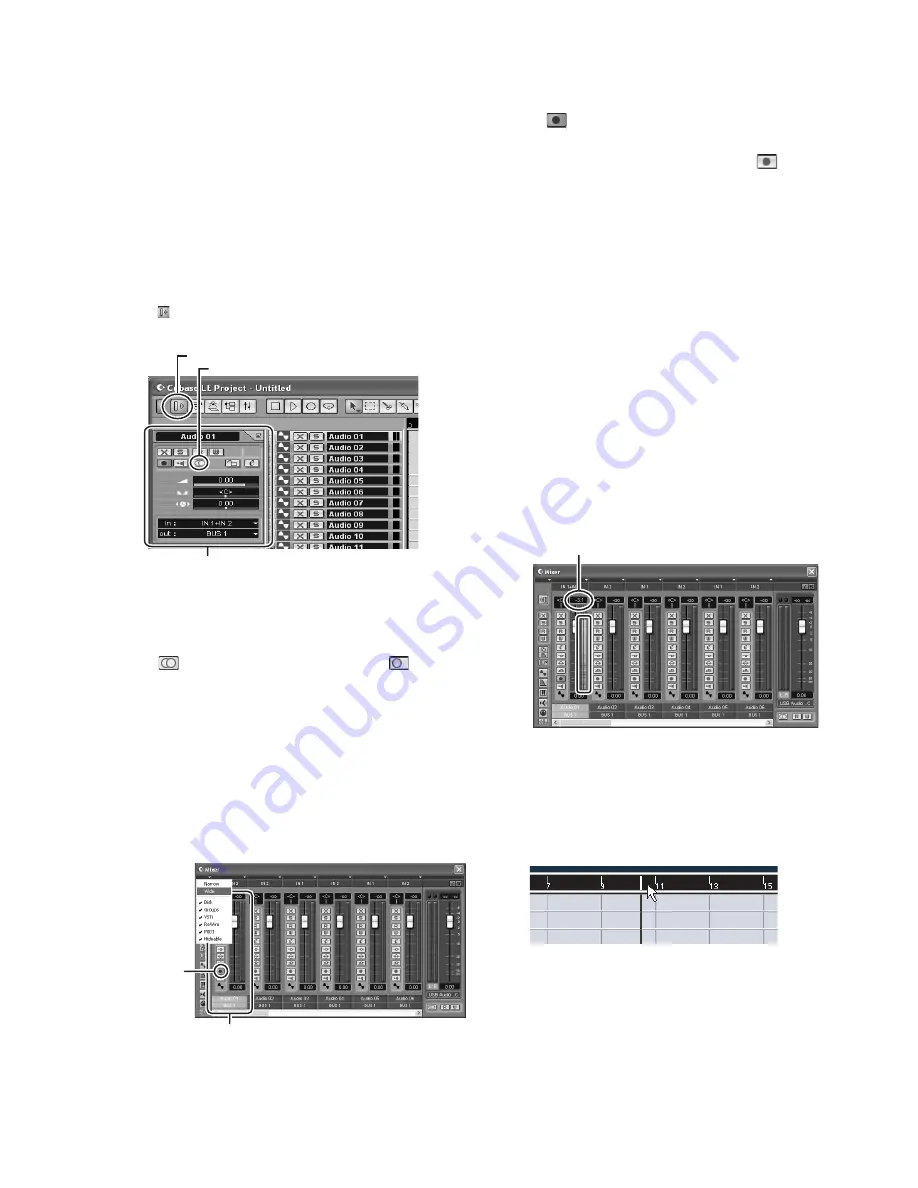
Click in the track list (the area in which the
track names are displayed) to select a track
to record on.
For this example select [Audio 01]. The various
settings for the selected track are available in the
Inspector on the left side of the display.
[Note]
If the Inspector is not showing, click the [Show Inspector]
button ( ) in the upper left area of the project window.
2.
Use the [Stereo Switch] buttons in the
Inspector to select stereo or monaural
operation for the track:
(
) for stereo operation and (
) for
monaural.
3.
Select [Mixer] from the [Devices] menu to
open the mixer window.
Click the arrow in the upper left corner of the mixer
window and select [Wide] to increase the width of
the mixer’s channel strips. Leave the mixer window
open until you have finished recording for easy
access.
Channel strip
[Record Enable]
button
[Show Inspector] button
Inspector
[Stereo Switch] button
4.
Make sure that the [Record Enable] button
(
) on the left side of the channel strip
is on.
If the [Record Enable] button is off (
), click it to
turn it on. The input signal level will be displayed on
the channel strip level meter while the [Record
Enable] button is on.
5.
While watching the mixer window level
meter, adjust the MW10 GAIN control and
channel fader so that the meter never goes
above 0.0 dB.
* Make it to MAX at the inspection.
[Note]
•
The MW10 ST master fader does not affect the output
level sent to the computer.
•
The Cubase LE channel strip fader only affects the
playback output level from Cubase LE.(Make it to
default(0) at the inspection.)
The maximum level encountered is displayed numerically
in the peak level display at the top of the channel strip.
6.
Specify the point at which you want to start
recording via the ruler at the top of the
project window.
Click the black area of the ruler to move the project
cursor (the vertical black line) to that position.
7.
Open the [Transport] menu and turn [Start
Record at Left Locator] off.
Peak level display


