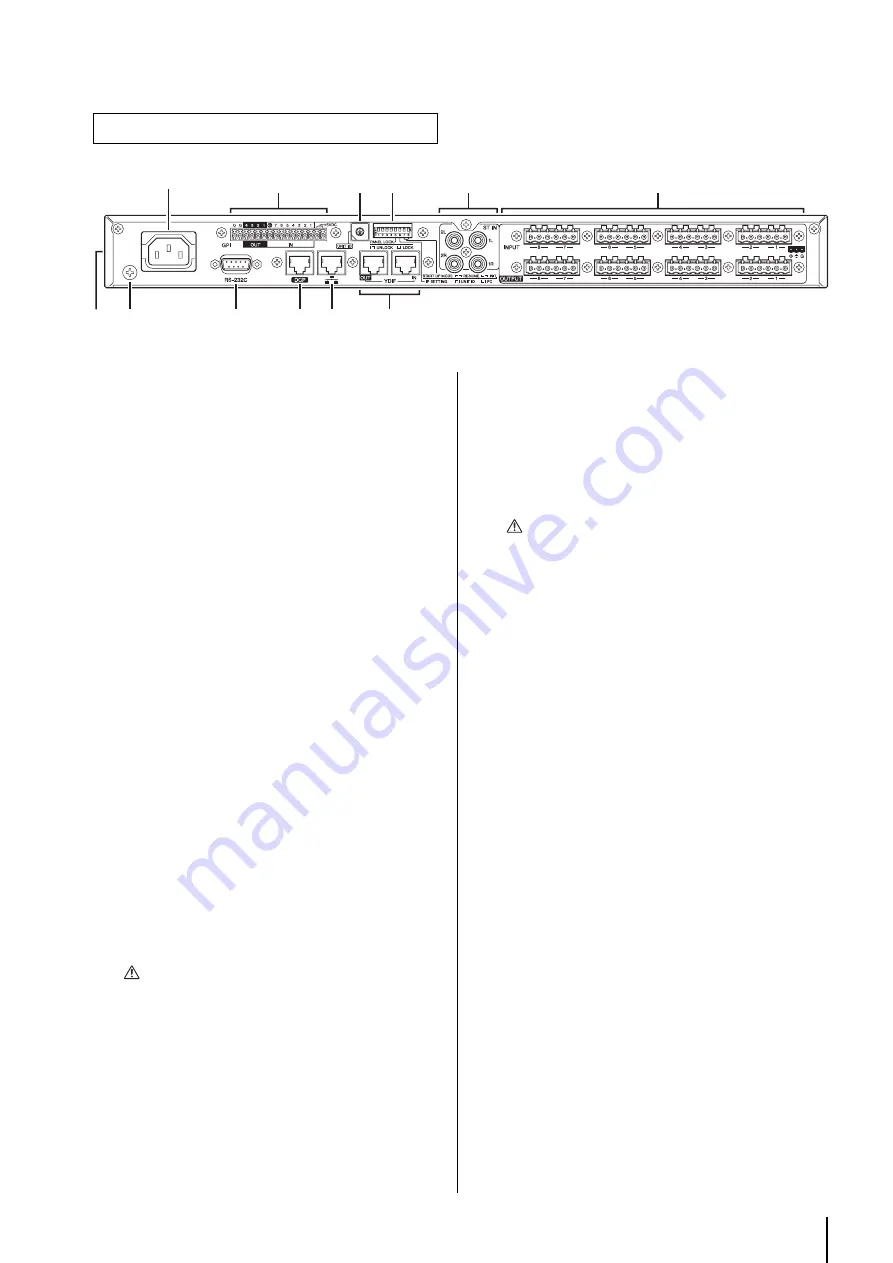
Controls and Connectors
MTX3 Owner’s Manual
9
q
AC IN connector
Use the included power cord to supply power to this connec-
tor. First, connect the power cord to this device, and then
insert the power cord plug into the AC outlet.
w
Ground screw
The supplied power cord has a three-prong plug that will
ground the device when plugged into an appropriately
grounded three-prong type AC mains outlet. In some cases,
you may be able to reduce hum or interference by also con-
necting this screw to ground.
e
[GPI] connector
This Euroblock connector allows input and output of control
signals via GPI (General Purpose Interface).
The MTX3 provides seven ports of analog/digital input, one
port of digital input, and four ports of output. The IN-1–7
terminals detect voltage changes from 0V to 5V. The IN-8
terminal alone su24V input; voltages in the range of
2.5–24V are detected as High, and voltages below 2.5V are
detected as Low. The OUT 1–4 terminals are open collector
outputs; they will change between open or closed
(GROUND). The +5VDC terminals has an output voltage of
5V. Use the included Euroblock plugs to make connections
(see “Euroblock plug connection” on page 11 for details).
For details on connections and usage, refer to “Connecting
via the [GPI] connector” on page 17.
r
[RC-232C] connector
Support for this connector is planned for the future.
t
[DCP] connector
Use this connector to daisy-chain separately sold control
panels such as the DCP1V4S to control the MTX3. Use a
CAT5e or better Ethernet straight cable that has all eight pins
connected.
Up to eight control panels can be connected to one MTX3.
The total length of the cables from the MTX3 to the last con-
trol panel must not exceed 200 meters.
y
NETWORK connector
This is an Ethernet connector that supports AutoMDI/MDI-
X. It can either be connected directly to a computer, or via a
network switch to communicate with a computer, peripheral
device, or external controller. Use a CAT5e or better Ether-
net STP cable (shielded twisted pair cable).
u
[UNIT ID] rotary switch
When multiple devices are connected within the same net-
work, this switch specifies the ID by which MTX3 devices
are individually distinguished.
DIP switches 1 and 2 described below specify the upper
digit, and this rotary switch specifies the lower digit,
together allowing you to set the UNIT ID to one of 63 possi-
bilities in the range of 01 to 3F.
Rear Panel
q
u i
!1
!0
w
r
t y
o
e
!2
NOTE
The MTX3 has some connectors that are shaped identically but
have a completely different function (e.g., [DCP] connector, NET-
WORK connector, [YDIF] connector). Make the appropriate con-
nections as instructed by the explanation for each connector.
Otherwise, you risk damaging your equipment.
CAUTION
Do not input a voltage higher than 5V to the IN-1–7
pins. Doing so may damage your equipment.
CAUTION
• Do not connect a control panel to any connector
other than the MTX3’s [DCP] connector. Since the
control panel is not electrically compatible, such con-
nections may cause fire or malfunction.
• Never connect any device to the [DCP] connector
other than the separately sold DCP or other control
panel. Doing so may damage the other device or this
device.
NOTE
• Do not use a UNIT ID of “00” (DIP switches 1 and 2 OFF
and the rotary switch at 0).
• You’ll need to restart the device after changing the setting
of the [UNIT ID] rotary switch.
Summary of Contents for MTX3
Page 1: ...EN Owner s Manual...
Page 26: ...MTX3 Owner s Manual 26...


