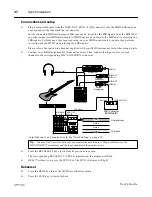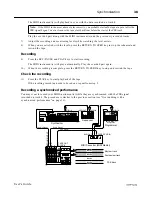
23
Recording Functions
User’s Guide
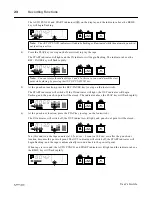
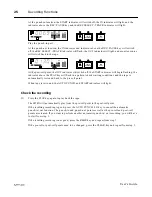
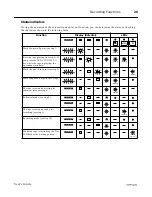
The AUTO PUNCH and START indicators (
^
) on the display and the indicator above the REHE
key will begin flashing.
4)
Press the PLAY key (or step on the footswitch) to play the tape.
The START indicator will light and the IN indicator will begin flashing. The indicator above the
REC/PAUSE key will flash rapidly.
5)
At the punch-in location, press the REC/PAUSE key (or step on the footswitch).
The START indicator will switch off, the IN indicator will light, the OUT indicator will begin
flashing, and the punch-in point will be stored. The indicator above the PLAY key will flash rapidly.
6)
At the punch-out location, press the PLAY key (or step on the footswitch).
The IN indicator will switch off, the OUT indicator will light, and punch-out point will be stored.
Ten (10) counts on the tape counter (at 9.5 cm/sec - 5 counts at 4.8 cm/sec) after the punch-out
location becomes the post-roll point. The OUT indicator will switch off, the START indicator will
begin flashing, and the tape is automatically rewound back to the pre-roll point.
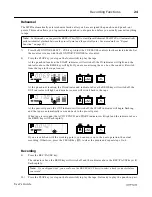
When tape is rewound, the AUTO PUNCH and START indicators will light and the indicator above
the REHE key will flash rapidly.
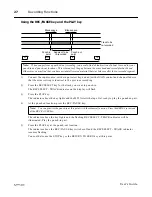
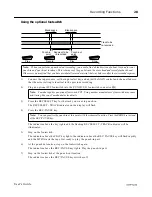
Note:
The AUTO PUNCH indicator will either be flashing or illuminated while the automatic punch-in/
out function is active.
Note:
You can reverse the order of steps 3 and 4. In this case, you would mark the start
point while playing by pressing the AUTO PUNCH I/O key.
TAPE
9.5
+9
6
3
0
3
6
10
-20
+9
6
3
0
3
6
10
-20
1
2
3
4
L
R
START
AUTO PUNCH
PLAY
REC/PAUSE
REHE
TAPE
9.5
+9
6
3
0
3
6
10
-20
+9
6
3
0
3
6
10
-20
1
2
3
4
L
R
IN
START
AUTO PUNCH
PLAY
REC/PAUSE
REHE
OUT
TAPE
9.5
+9
6
3
0
3
6
10
-20
+9
6
3
0
3
6
10
-20
1
2
3
4
L
R
IN
AUTO PUNCH
PLAY
REC/PAUSE
REHE
OUT
TAPE
9.5
+9
6
3
0
3
6
10
-20
+9
6
3
0
3
6
10
-20
1
2
3
4
L
R
AUTO PUNCH
PLAY
REC/PAUSE
REHE
TAPE
9.5
+9
6
3
0
3
6
10
-20
+9
6
3
0
3
6
10
-20
1
2
3
4
L
R
START
AUTO PUNCH
PLAY
REC/PAUSE
REHE

