background image

43 

En

Troubleshooting

Eng

lish

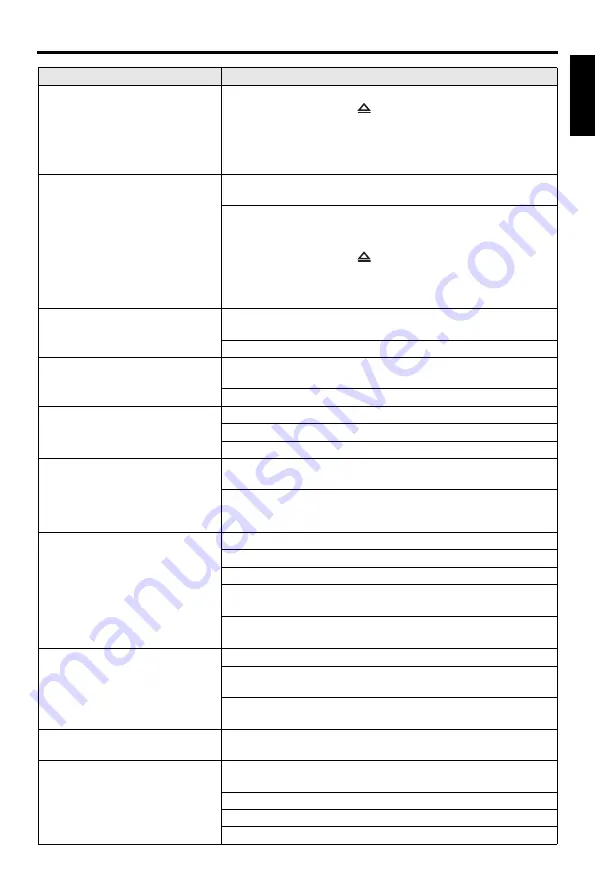
No picture is displayed when 
you do not use progressive 
scan connections (using the 
component video jacks)

Follow the steps below to turn off the progressive scan.
1.

Press 

OPEN/CLOSE


(

)

 on the front panel or press and hold 

7

 on the remote control to open the disc tray.

2.

Press 

2

 on the remote control.

3.

Press 

ZOOM

 on the remote control to deactivate the progressive 

scan.

Completely distorted picture, 
black/white picture, or no 
picture

Check that the disc is compatible with this unit (see “Playable disc 
formats” on page 4)
.

Check that the TV type of this unit is set to match that of the disc and 
your TV (see “Setting a color system for your TV” on page 14). Follow 
the steps below to change the setting of [TV TYPE].
1.

Press 

OPEN/CLOSE


(

)

 on the front panel or press and hold 

7

 on the remote control to open the disc tray.

2.

Press 

3

 on the remote control.

3.

Press 

AUDIO

 on the remote control.

Distorted picture

Occasionally, a small amount of picture distortion may appear 
depending on the disc being played back. This is not a malfunction.

Check the video connection.

Picture freezes momentarily 
during playback

Check the disc for fingerprints/scratches and clean it with a soft cloth 
wiping from center to edge.

For WMV/DivX

®

, lowering the bit rate may improve the problem.

HD JPEG pictures cannot be 
displayed

Check that [HD JPEG] is set to [ON] (see page 37).

The disc reading time may exceed 30 seconds.

MP3 music and HD JPEG pictures cannot be played simultaneously.

The screen size looks 
unnatural, or the caption is 
displayed only partially on the 
TV monitor or is not displayed 
at all

Check that the TV setting of this unit matches the screen size of your 
TV (see “Setting the TV display” on page 33).

Change the screen size and the aspect ratio of your TV.

No sound or distorted sound

Adjust the volume.

Check that the speakers are connected correctly.

Check the audio connection.

For MP3/WMA, check that the sampling rate and bit rate are 
compatible with this unit (see “Specifications” on page 48).

For WMV/DivX

®

,


record the file onto your USB device at a lower 

bit rate.

No audio at digital output

Check the digital connections.

If you are playing a DTS source, check that your receiver can decode 
DTS, and that [DIGITAL OUTPUT] is set to [ALL] (see page 32).

Check that the audio format of the selected audio language matches 
your receiver capabilities.

No sound during DivX

®

 movie 

playback

The audio code may not be supported by this unit.

This unit does not respond to 
the remote control

Aim the remote control directly at the remote control sensor on the front 
panel.

Reduce the distance of the remote control from this unit.

Replace the batteries in the remote control.

Reinsert the batteries with their polarities (+/– signs) as indicated.

Problem

Solution

Summary of Contents for DV-S6165

Page 1: ...DV S6165 DVD PLAYER LECTEUR DVD U DV S6165 2008 All rights reserved Yamaha Corporation Printed in China 3139 245 30151 00cv_DV S6165_U fm Page 1 Monday June 9 2008 3 26 PM Black process 45 0 240 0 LPI ...

Page 2: ...et 10 Protect the power cord from being walked on or pinched particularly at plugs convenience receptacles and the point where they exit from the apparatus 11 Only use attachments accessories specified by the manufacturer 12 Use only with the cart stand tripod bracket or table specified by the manufacturer or sold with the apparatus When a cart is used use caution when moving the cart apparatus co...

Page 3: ...nt generates uses radio frequencies and if not installed and used according to the instructions found in the users manual may cause interference harmful to the operation of other electronic devices Compliance with FCC regulations does not guarantee that interference will not occur in all installations If this product is found to be the source of interference which can be determined by turning the ...

Page 4: ...vents this might damage the finish Use a clean dry cloth 12 Use only the voltage specified on this unit Using this unit with a higher voltage than specified is dangerous and may cause fire damage to this unit and or personal injury Yamaha will not be held responsible for any damage resulting from use of this unit with a voltage other than as specified 13 Do not attempt to modify or fix this unit C...

Page 5: ...ubtitle and disc menu languages DVD Video only 16 Playback Operation 17 Basic operation 17 Selecting a track chapter 17 Searching backward forward 17 Repeat Shuffle functions 17 Repeat Shuffle playback 17 Repeating a section within a chapter track 18 Operations for video playback DVD VCD SVCD 18 Using the disc menu 18 Playback in slow motion 18 Zooming pictures in out 18 Resuming playback from the...

Page 6: ...e model Information for Users on Collection and Disposal of Old Equipment and used Batteries These symbols on the products packaging and or accompanying documents mean that used electrical and electronic products and batteries should not be mixed with general household waste For proper treatment recovery and recycling of old products and used batteries please take them to applicable collection poi...

Page 7: ...models Remote control Two batteries AAA R03 UM 4 for the remote control RCA stereo cable Composite video cable For U S A Canada Central and South America Australia Asia and Korea models Remote control Two batteries AAA R03 UM 4 for the remote control Audio video cable This unit is designed to support the region management system Check the regional code number on the DVD disc package If the number ...

Page 8: ...mat CD R RW DVD R RW R DL and DVD R RW R DL cannot be played unless finalized Progressive JPEG copyright protected WMA and WMV files cannot be played with this unit This unit is not compatible with WMV Advanced profile Only the first session of DVD R RW R DL and DVD R R DL can be played Discs without logos shown left are not guaranteed to function Some discs cannot be played depending on disc char...

Page 9: ...rved DivX DivX Ultra Certified and associated logos are trademarks of DivX Inc and are used under license HDMI the HDMI logo and High Definition Multimedia Interface are trademarks or registered trademarks of HDMI Licensing LLC Patent information This product incorporates copyright protection technology that is protected by U S patents and other intellectual property rights Use of this copyright p...

Page 10: ...ts up when an HDMI component is connected and signals output via the HDMI jack of this unit 5 PROGRESSIVE indicator Lights up when this unit is in the progressive mode see page 34 6 Front panel display Shows the current status of this unit 7 Remote control sensor Receives infrared signals from the remote control see page 13 8 PLAY p Starts playback 9 PAUSE Pauses playback Frame by frame playback s...

Page 11: ...onnect to the coaxial input jack of your AV receiver see page 9 6 VIDEO OUT COMPONENT Y PB CB PR CR jacks Connect to the component input jacks of your AV receiver see page 10 7 VIDEO OUT S VIDEO jack Connect to the S video input jack of your AV receiver see page 10 8 VIDEO OUT VIDEO jack Connect to the composite video input jack of your AV receiver see page 10 9 AV terminal Europe and Russia model...

Page 12: ...ns the disc tray 7 Numeric buttons 0 9 Selects numbered items in the currently displayed menu 8 SUBTITLE Selects the subtitle language see pages 20 and 22 9 ZOOM Enlarges or shrinks the video image see pages 18 and 22 0 ON SCREEN Accesses or exits from the on screen display OSD menu of this unit see page 19 q SET UP Accesses or exits from the setup menu of this unit see pages 14 and 27 w 33l Moves...

Page 13: ...duces a distorted sound or no sound at all Make sure to select the appropriate audio format from the menu screen on the disc Pressing AUDIO on the remote control once or more may change not only the audio languages but also the audio format The selected format appears on the TV screen for several seconds If you want to enjoy Dolby Digital and DTS formats you must connect this unit to an AV receive...

Page 14: ...deo signals on separate wires for luminance Y and chrominance C Connect the VIDEO OUT S VIDEO jack of this unit to an S video input jack of your AV receiver and then to that of your TV using a commercially available S video cable Composite video jack C Connect the VIDEO OUT VIDEO jack of this unit to a video input jack of your AV receiver and then to that of your TV using the supplied composite vi...

Page 15: ...tions if the connected component does not output audio signals see Audio connections on page 9 This unit is not compatible with HDCP incompatible HDMI or DVI components You need a commercially available HDMI DVI conversion cable when you connect this unit to other DVI components In this case the HDMI jack of this unit does not output any audio signals Depending on the connected DVI component black...

Page 16: ...page 23 Remote control jacks This unit has remote control input output jacks If your AV receiver is a Yamaha product and has the capability to transmit SCENE control signals you can use the SCENE function Connect the REMOTE CONTROL IN jack of this unit to a remote control output jack of your receiver using a commercially available monaural 3 5 mm mini plug cable so that this unit starts playback a...

Page 17: ...rrectly in accordance with your local regulations Using the remote control Use the remote control within 6 m approximately 20 ft of this unit and point it toward the remote control sensor Do not spill water or other liquids on the remote control Do not drop the remote control Do not leave or store the remote control in the following types of conditions places of high humidity such as near a bath p...

Page 18: ... the video signals of NTSC discs and output them in PAL format NTSC Select this if the connected TV is an NTSC system TV It will change the video signals of PAL discs and output them in NTSC format MULTI Select this if the connected TV is compatible with both NTSC and PAL formats such as a multi system TV The output format will be in accordance with the video signals of the disc 5 Select an item a...

Page 19: ... select your own preferred language for the setup menu This setting remains once selected 1 Press SET UP 2 Press 2 3 to select GENERAL SETUP PAGE 3 Press 5 a to highlight OSD LANGUAGE and then press 3 4 Press 5 a to select a language and then press ENTER 5 Press SET UP to exit from the menu VIDEO SETUP PAGE TV TYPE TV DISPLAY 4 3 PAN SCAN PROGRESSIVE 4 3 LETTER BOX PICTURE SETTING 16 9 BLACK LEVEL...

Page 20: ... options below and then press 3 AUDIO audio language SUBTITLE subtitle language DISC MENU disc menu language 4 Press 5 a to select a language and then press ENTER 5 Repeat steps 3 4 for other language settings 6 Press SET UP to exit from the menu To select a language not in the list 1 Select OTHERS in AUDIO SUBTITLE or DISC MENU and then press ENTER 2 Use the numeric buttons 0 9 to enter the 4 dig...

Page 21: ...e sound is muted Frame by frame playback can be done by pressing PAUSE on the front panel repeatedly 6 To resume normal playback press 3 8 again 7 To stop playback press 7 Selecting a track chapter 1 Press l22 33l or use the numeric buttons 0 9 to select a track chapter number 2 During repeated playback press l22 33l to replay the same track chapter Searching backward forward 1 Press and hold l22 ...

Page 22: ...ou load the disc To select a playback feature or item Use 2 3 5 a or the numeric buttons 0 9 and then press ENTER to start playback To access or exit from the menu Press MENU Playback in slow motion You can play back video in slow motion 1 During playback press 5 for reverse slow motion or a for forward slow motion 2 During slow motion press 5 a repeatedly to select the desired speed 3 To resume n...

Page 23: ...input the number time or press 5 a to make a selection and then press ENTER Playback changes to the selected time title chapter track Changing the Title Chapter Track DVD VCD 1 Press 5 a to select TITLE CHAPTER DVD or TRACK VCD 2 Press ENTER 3 Select a title chapter or track number using the numeric buttons 0 9 Time search DVD VCD 1 Press 5 a to select TT TIME CH TIME DVD or DISC TIME TRACK TIME V...

Page 24: ...udio language format and subtitle language To select an audio language format Press AUDIO repeatedly to select an audio language and or format To select a subtitle language Press SUBTITLE repeatedly to select a subtitle language Using the playback control PBC menu For a VCD with a playback control PBC feature version 2 0 only 1 Press MENU to toggle between PBC ON and PBC OFF If you select PBC ON t...

Page 25: ...G on page 37 Depending on the picture size HD JPEG images may appear smaller in size Selecting a folder and track file 1 Press 5 a to select a folder and then press ENTER to open the folder 2 Press 5 a to select a track file 3 Press ENTER Playback starts from the selected file to the end of the folder 1 Load a picture disc JPEG KODAK Picture CD or FUJICOLOR CD For JPEG the picture menu appears on ...

Page 26: ...rs on the TV screen 2 Select an MP3 music track 3 During MP3 music playback select a JPEG picture file from the TV screen and then press ENTER The picture files are played back one after another until the end of the folder 4 To quit simultaneous playback press MENU and then press 7 Some files cannot be played correctly depending on disc characteristics or recording conditions This function is not ...

Page 27: ... readers and portable audio players Some devices may not work properly If Device not supported appears on the TV screen when you connect the USB device follow the procedure below Set this unit to the standby mode and then turn it on again Disconnect the device when this unit is in the standby mode then connect it again and turn on this unit Connect the AC adapter if the adapter is supplied with th...

Page 28: ...nit As a precaution it is recommended that the files are made backup copies You cannot access the USB mode while LOADING is displayed on the TV screen If you disconnect the USB device or open the disc tray of this unit the playback mode is automatically switched to the disc mode This unit can display up to 648 files However less than 648 files may be displayed if some files are not playable with t...

Page 29: ...AGE ANALOG OUTPUT STEREO LT RT 31 DIGITAL AUDIO DIGITAL OUTPUT OFF ALL PCM ONLY 32 LPCM OUTPUT 48KHz 96KHz 32 HDMI AUDIO ON OFF 32 NIGHT MODE ON OFF 33 VIDEO SETUP PAGE TV TYPE PAL Europe Russia Australia and Asia models NTSC U S A Canada Central and South America and Korea models MULTI 33 TV DISPLAY 4 3 PAN SCAN 4 3 LETTER BOX 16 9 33 PROGRESSIVE OFF ON 34 PICTURE SETTING STANDARD BRIGHT SOFT 34 ...

Page 30: ...l KOREAN Korea model etc 37 PARENTAL 1 KID SAFE 2 G 3 PG 4 PG 13 5 PGR 6 R 7 NC17 8 ADULT 37 VR LIST ORIGINAL LIST PLAY LIST 38 DATA DISC NAV WITHOUT MENU WITH MENU 38 DIVX SUBTITLE except Korea model GROUP1 GROUP2 GROUP3 GROUP4 GROUP5 38 PBC ON OFF 39 AUTO STANDBY ON OFF 39 PASSWORD CHANGE 40 DEFAULT RESET 40 Model Setting item Europe ENGLISH DANSK DEUTSCH ESPAÑOL FRANÇAIS ITALIANO NEDERLANDS NOR...

Page 31: ...age and menu items appear on your TV 2 Press 2 3 to select the desired setup page 3 Press 5 a to highlight the desired menu item Menu items and setting items appear If setting items do not appear the selected menu item has submenus In this case press ENTER and then repeat step 3 4 Press 3 5 Press 5 a to select the desired setting item and then press ENTER If the parameter appears press 2 3 to adju...

Page 32: ... are made backup copies Discs incompatible with CDDA standard are not guaranteed to function Copy protected music discs incompatible with CDDA standard are not recordable Tracks protected by SCMS Serial Copy Management System are not recordable If USB current protection active Device not supported appears on the TV screen the device is not usable with this unit because the power consumption of the...

Page 33: ...e page in TRACK In this case press 5 a to select or and then press ENTER to scroll through pages You can also select or deselect all the tracks by selecting Select All or Deselect All 9 Press 2 to return to SPEED 10Press 5 a to highlight Start and then press ENTER To cancel the recording highlight CANCEL and then press ENTER Recording cannot be started in the following conditions the connected USB...

Page 34: ...to highlight NEXT on the program menu and then press ENTER 5 Repeat steps 3 4 to input another track chapter number To remove a track 6 Use 2 3 5 a to select the track you want to remove 7 Press ENTER to remove this track from the program menu To start program playback 8 Use 2 3 5 a to highlight START on the program menu and then press ENTER Playback starts for the selected tracks in the programme...

Page 35: ...o On Demand registration code that allows you to rent and purchase videos using the DivX VOD service For more information visit https vod divx com 1 In GENERAL SETUP PAGE press 5 a to highlight DIVX R VOD CODE and then press 3 The registration code appears 2 Press ENTER to exit y To purchase or rent the videos from DivX VOD service at https vod divx com use the registration code and download the v...

Page 36: ...able are converted to the sampling rate of 48 kHz 96KHz Select this to play back discs recorded at the sampling rate of 96 kHz If the 96 kHz disc is copy protected the digital output is automatically converted to the sampling rate of 48 kHz 48 kHz PCM data streams are output at 48 kHz 4 Press 5 a to select a setting and then press ENTER Turning the HDMI audio on off When you connect this unit to a...

Page 37: ...etails see Setting a color system for your TV on page 14 Setting the TV display Set the aspect ratio of this unit to match your TV The format you select must be available on the disc Otherwise the TV display setting will not affect the picture during playback Select TV DISPLAY in VIDEO SETUP PAGE 4 3 PAN SCAN Select this if the aspect ratio of your TV is 4 3 and you want both sides of the picture ...

Page 38: ...ect PROGRESSIVE Europe and Russia models only When COMPONENT is set to RGB see page 36 you cannot select PROGRESSIVE You can turn off the progressive scan without using the setup mode if no picture is displayed See No picture is displayed when you do not use progressive scan connections using the component video jacks in Troubleshooting on page 43 Adjusting picture settings This unit comes with th...

Page 39: ... effect if TV TYPE is set to PAL Select BLACK LEVEL in VIDEO SETUP PAGE ON Select this to improve the visibility of the black color OFF Select this for the standard black level setting This function is only available for composite video S video output Turning the closed caption on off Closed captions are data hidden in the video signals of specific discs and are invisible without the use of a spec...

Page 40: ...o 16 9 see page 33 when playing back 4 3 image SUPERWIDE Select to display a 4 3 image on the 16 9 screen with non linear stretching center position of screen is stretched less than the sides 4 3 PILLAR BOX Select to display a 4 3 image on the 16 9 screen without stretching When playing a disc recorded in the 16 9 image the image is displayed in its original aspect ratio 16 9 without pillar boxes ...

Page 41: ... JPEG pictures with standard quality You can select HD JPEG when the HDMI video signals with 720p 1080i and 1080p are output You cannot select HDMI SETUP when JPEG including HD JPEG pictures are displayed Press 7 twice to stop playback if necessary before pressing SET UP Audio subtitle and disc menu These menus contain various language options for the audio subtitles and disc menus recorded on the...

Page 42: ...the disc This feature is only available when a play list has been created 2 Press 5 a to highlight a setting and then press ENTER To play back a disc in VR format 3 Press SET UP to close the setup menu 4 Press 3 8 to begin to play back the disc with the setting you selected Selecting the data disc menu Data disc navigator can be set only if the disc was recorded with a menu It allows you to displa...

Page 43: ...ame extensions are supported note that these files are not shown within the disc menu srt sub ssa smi The filename of the movie file has to be repeated at the beginning of the filename for the external subtitle file Selecting the PBC playback control function You can set playback control PBC to on or off This function is available only on Video CD 2 0 with the playback control PBC feature Select P...

Page 44: ...0 000 4 Enter the new six digit password 5 Enter the new six digit password again to confirm the password 6 Press ENTER to confirm your new password The new six digit password is now valid Resetting the system You can reset all options and your personal settings to the initial factory settings excluding PASSWORD PARENTAL and DISC LOCK 1 In PREFERENCE PAGE press 5 a to highlight DEFAULT and then pr...

Page 45: ... Norwegian 7879 Tatar 8484 Burmese 7789 Irish 7165 Norwegian Bokmål 7866 Telugu 8469 Castilian 6983 Italian 7384 Norwegian Nynorsk 7878 Thai 8472 Catalan 6765 Japanese 7465 Nyanja 7889 Tibetan 6679 Chamorro 6772 Javanese 7486 Nynorsk Norwegian 7878 Tigrinya 8473 Chechen 6769 Kalaallisut 7576 Occitan post 1500 7967 Tonga Tonga Islands 8479 Chewa 7889 Kannada 7578 Old Bulgarian 6785 Tsong 8483 Chich...

Page 46: ...disc is defective by trying another disc If you have recorded a JPEG MP3 or WMA disc yourself check that your disc contains at least ten JPEG picture files or five MP3 WMA music tracks Check the region code see Region codes on page 3 For MP3 WMA check that the sampling rate and bit rate are compatible For JPEG check that the resolution is compatible see Specifications on page 48 For WMA WMV check ...

Page 47: ...e the problem HD JPEG pictures cannot be displayed Check that HD JPEG is set to ON see page 37 The disc reading time may exceed 30 seconds MP3 music and HD JPEG pictures cannot be played simultaneously The screen size looks unnatural or the caption is displayed only partially on the TV monitor or is not displayed at all Check that the TV setting of this unit matches the screen size of your TV see ...

Page 48: ... devices Set this unit to the standby mode and then turn it on again Disconnect your USB device when this unit is in the standby mode then connect it again and turn on this unit Connect the AC adapter if the adapter is supplied with your USB device If Device not supported appears on the TV screen check whether your USB device is supported by this unit see Supported USB devices on page 23 If USB cu...

Page 49: ...d the USB device In case the above message appears press ENTER to cancel the recording If Disc error appears on the TV screen check the disc for fingerprints scratches and clean it with a soft cloth wiping from center to edge In case the above message appears press ENTER to cancel the recording If Copy protected appears on the TV screen check that the track is not protected by SCMS Serial Copy Man...

Page 50: ...g your personal content and easy to use tools from DivX com DivX Ultra DivX Ultra Certified products provide enhanced playback of advanced media features supported by the DivX Media Format Key features include interactive video menus subtitles alternate audio tracks video tags and chapter points DMF DivX Media Format The DivX Media Format supports advanced media features adding controls for an int...

Page 51: ...ts PBC you can enjoy interactive type software as well as software having a search function Play list A list of selected titles to be played back in a specific order This option is only available with VR format and must be created beforehand Progressive scan It displays all the horizontal lines of a picture at one time as a signal frame This system can convert the interlaced video from DVD into pr...

Page 52: ... WMV 720 x 480 720 x 576 pixels or less DivX JPEG 3072 x 2048 pixels or less TV STANDARD Number of lines PAL 625 NTSC 525 Vertical frequency PAL 50 Hz NTSC 60 Hz Playback Multi standard PAL NTSC CONNECTIONS Video output RCA Phono x 1 yellow S video output Mini DIN 4 pins x 1 Component video output Y output RCA Phono x 1 green PB CB PB output RCA Phono x 1 blue PR CR PR output RCA Phono x 1 red SCA...

Page 53: ...DV S6165 DVD PLAYER LECTEUR DVD U DV S6165 2008 All rights reserved Yamaha Corporation Printed in China 3139 245 30151 00cv_DV S6165_U fm Page 1 Monday June 9 2008 3 26 PM Black process 45 0 240 0 LPI ...

Reviews: