background image

68

 En

Customizing this unit (MANUAL SETUP)

Use this feature to manually adjust the basic speaker 
settings. Most of the “BASIC MENU” parameters are set 
automatically when you run the automatic setup.

y

Set “TEST TONE” to “ON” to output the test tone for the 
“SPEAKER SET”, “SP LEVEL” and “SP DISTANCE”.

Speaker settings

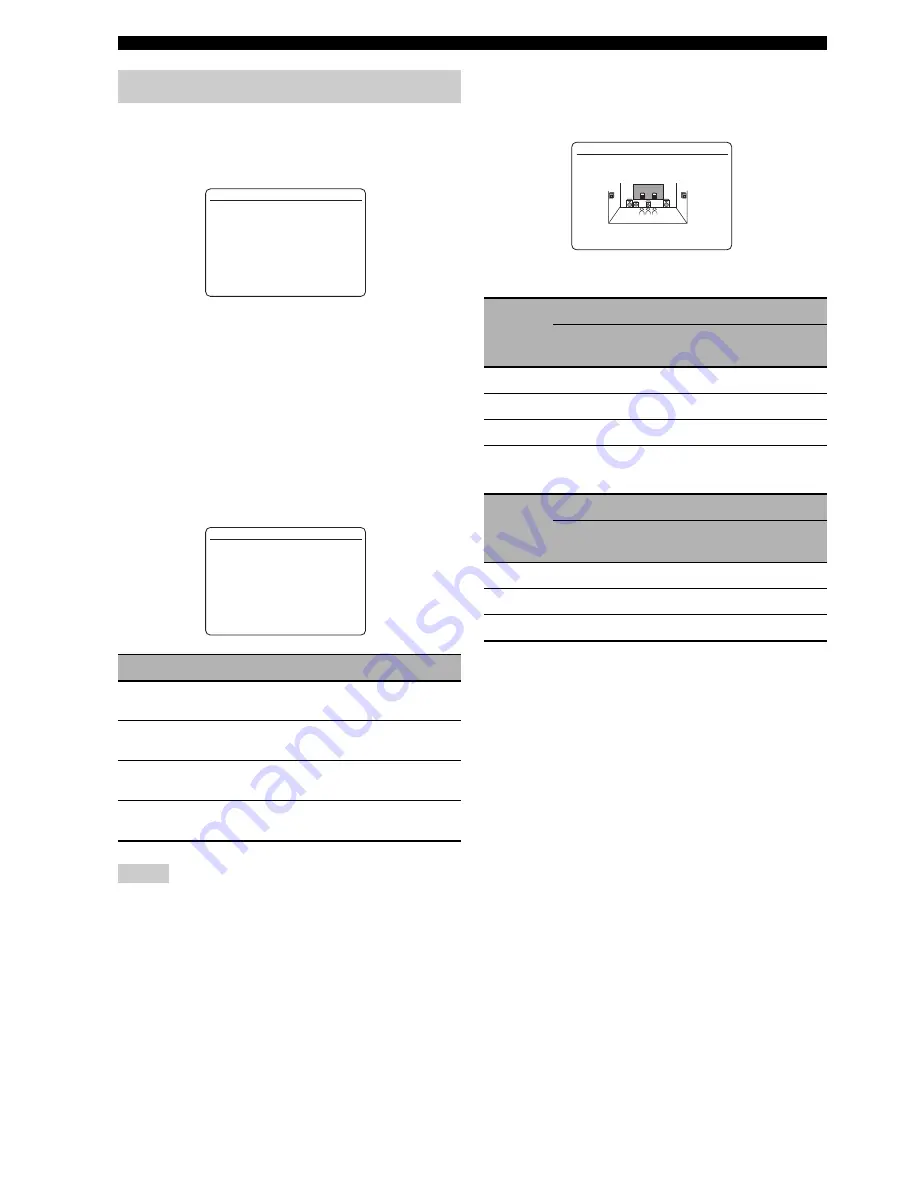
A)SPEAKER SET

y

To select the desired parameter, press 

9

k

 / 

n

 repeatedly.

Extra speaker assignment   

EXTRA SP ASSIGN

Selects the function of the speakers connected to the 
EXTRA SP terminals.

• This parameter shares the value with the “EXTRA SP 

ASSIGN” parameter in “AUTO SETUP” (see page 32).

• If you select “ON” in “BI-AMP” (see page 97), you cannot 

select “PRESENCE” in “EXTRA SP ASSIGN”.

• After changing the “EXTRA SP ASSIGN” setting, carry out 

“AUTO SETUP” again (see page 31).

LFE/bass out

LFE/BASS OUT

Use this feature to select the speakers that output the LFE 
(low-frequency effect) and the low-frequency signals.

LFE signals output

Low-frequency signals output

*1

Output(s) the low-frequency signals of the front 
channels and other speakers set to “SMALL”.

*2

Always output the low-frequency signals of the front 
channels.

*3

Output the low-frequency signals if the speakers are set 
to “LARGE”.

*4

Outputs the low-frequency signals of the speakers set to 
“SMALL” or “NONE”.

1 BASIC MENU

Choice

Descriptions

FRONT B

Select this setting when you use another front 
speaker system in the main room (see page 42).

ZONE B

Select this setting when you use another front 
speaker system in another room (see page 42).

PRESENCE

Select this setting when you use the presence 
speakers (see page 13).

NONE

Select this setting when you do not use the 
EXTRA SP terminals.

Notes

[]/[]:
[ENTER]:

[

p

1 BASIC MENU

A)SPEAKER SET

B)SP LEVEL

C)SP DISTANCE

D)TEST TONE

Up/Down

Enter

.

X
X
X
X
X
X
X
X
X
XXXX[]/[]:Up/DownXXXXX
XXXX[

p

]/[

[

]:EnterXXXXXXX

X

[

p

A)SPEAKER SET

EXTRA SP ASSIGN

>FRONT B  ZONE B

PRESENCE NONE

Choice

Subwoofer(s) and speakers

Subwoofer(s)

Front 

speakers

Other 

speakers

BOTH

Output

No output

No output

SWFR

Output

No output

No output

FRONT

No output

Output

No output

Choice

Subwoofer(s) and speakers

Subwoofer(s)

Front 

speakers

Other 

speakers

BOTH

*1

*2

*3

SWFR

*4

*3

*3

FRONT

No output

*1

*3

A)SPEAKER SET

  LFE/BASS OUT

SWFR  FRONT >BOTH

Summary of Contents for DSP-AX863SE

Page 1: ...DSP AX863SE DSP AX863SE AV Amplifier OWNER S MANUAL B ...

Page 2: ...e unit during a lightning storm 14 Do not attempt to modify or fix this unit Contact qualified Yamaha service personnel when any service is needed The cabinet should never be opened for any reasons 15 When not planning to use this unit for long periods of time i e vacation disconnect the AC power plug from the wall outlet 16 Install this unit near the AC outlet and where the AC power plug can be r...

Page 3: ... fi sound 51 Adjusting the tonal quality 51 Using iPod 52 Controlling iPod 52 Using Bluetooth components 54 Pairing the Bluetooth adapter and your Bluetooth component 54 Playback of the Bluetooth component 54 Recording 55 Advanced sound configurations 56 Changing sound field parameter settings 56 Selecting decoders 61 Customizing this unit MANUAL SETUP 63 Using SET MENU 67 1 BASIC MENU 68 2 VOLUME...

Page 4: ...ity High definition digital audio format signals capability HDCP High bandwidth Digital Content Protection System licensed by Digital Content Protection LLC Analog video to HDMI digital video up conversion composite video S video component video HDMI digital video capability for monitor out Analog video up scaling from 480i NTSC 576i PAL or 480p 576p to 720p 1080i or 1080p DOCK terminal DOCK termi...

Page 5: ...ed trademarks of HDMI Licensing LLC x v Color x v Color is a trademark of Sony Corporation SILENT CINEMA is a trademark of Yamaha Corporation Notice About this manual y indicates a tip for your operation Some operations can be performed by using either the buttons on the front panel or the ones on the remote control In case the button names differ between the front panel and the remote control the...

Page 6: ... manganese batteries together Read the packaging carefully as these different types of batteries may have the same shape and color If the batteries have leaked dispose of them immediately Avoid touching the leaked material or letting it come into contact with clothing etc Clean the battery compartment thoroughly before installing new batteries Do not throw away batteries with general house waste d...

Page 7: ...r cable x 1 Select a monaural RCA cable DVD player x 1 Select DVD player equipped with coaxial digital audio output jack and composite video output jack Video monitor x 1 Select a TV monitor video monitor or projector equipped with a composite video input jack Video cable x 2 Select an RCA composite video cable Digital coaxial audio cable x 1 y You can also connect two subwoofers to this unit In t...

Page 8: ... OUTPUT SPEAKERS DVD SUBWOOFER FRONT SB 8CH SUB WOOFER SUR BACK SURROUND SINGLE CENTER CENTER FRONT 8CH SURROUND DVD DTV CBL S VIDEO VIDEO DTV CBL DVR DVR MONITOR OUT VCR OUT IN IN OUT 1 2 DVD DVD CD DTV CBL OPTICAL COAXIAL DVD DVR OUT SURROUND BACK BI AMP SURROUND SINGLE CENTER FRONT A FRONT B ZONE B PRESENCE DTV CBL DVD MD CD R MD CD R PHONO GND CD MD CD R IN PLAY OUT REC DTV CBL DVR VCR OUT IN ...

Page 9: ...VD MD CD R MD CD R PHONO GND CD MD CD R IN PLAY OUT REC DTV CBL DVR VCR OUT IN IN OUT MONITOR OUT R L R L R L R L 6 5 4 3 2 1 IN2 IN3 IN1 EXTRA SP Y PR PB Y PR PB A B C TUNER Make sure that this unit and the DVD player are unplugged from the AC wall outlets DVD DIGITAL INPUT COAXIAL jack DVD VIDEO jack VIDEO MONITOR OUT jack DVD AUDIO AUDIO M DIGITAL INPUT SPEAKERS SB 8CH FRONT 8CH DVD DVD CD DTV ...

Page 10: ...D player for further information The default assigned SCENE templates 1 You must connect a cable TV or a satellite tuner to this unit in advance See page 22 for details 2 You must connect an FM AM DAB tuner to this unit in advance See page 23 for details y You can change the assigned SCENE template for the SCENE buttons See page 36 for details Step 3 Press SCENE 1 button Check the type of the conn...

Page 11: ...SCENE templates P 36 Creating your original SCENE templates P 39 Using various input sources Basic controls of this unit P 41 Using your iPod with this unit P 52 Using the Bluetooth components P 54 Using various sound features Using various sound field programs P 47 Using the pure direct mode for high fidelity sound P 51 Customizing the sound field programs P 56 Adjusting the parameters of this un...

Page 12: ...MP SURROUND SINGLE CENTER FRONT A FRONT B ZONE B PRESENCE DTV CBL DVD MD CD R MD CD R PHONO GND CD MD CD R IN PLAY OUT REC DTV CBL DVR VCR OUT IN IN OUT MONITOR OUT R L R L R L R L 6 5 4 3 2 1 IN2 IN3 IN1 EXTRA SP Y PR PB Y PR PB A B C TUNER AC OUTLET SWITCHED 100W MAX 0 4A MAX 6 7 8 9 0 1 2 3 4 5 Name Page 1 AUDIO jacks 21 DIGITAL INPUT OUTPUT jacks 17 23 2 MULTI CH INPUT jacks 25 3 PRE OUT jacks...

Page 13: ...urround back left and right speakers The surround back speakers supplement the surround speakers and provide more realistic front to back transitions Subwoofer s The use of a subwoofer with a built in amplifier such as the Yamaha Active Servo Processing Subwoofer System is effective not only for reinforcing bass frequencies from any or all channels but also for reproducing the high fidelity sound ...

Page 14: ...nctions and settings of each speaker are the same as those for the 7 1 channel speaker layout see page 11 Surround left and right speakers Connect the surround speakers to the SURROUND speaker terminals even if you place the surround speakers behind the listening position For the smooth and unbroken sound field behind the listening position place the surround left and right speakers farther back c...

Page 15: ...adjust the vertical position of dialogues with using the presence speakers see page 57 To use the presence speakers connect the speakers to the EXTRA SP terminal see page 14 and set EXTRA SP ASSIGN to PRESENCE see pages 32 and 68 FR PR PL C FL 0 5 to 1 m 1 to 3 ft 1 8 m 6 ft or higher Speaker indications FL Front left FR Front right C Center PL Front presence left PR Front presence right 0 5 to 1 ...

Page 16: ... 6Ω MIN before using this unit see page 27 4 ohm speakers can be also used as the front speakers For details about the speaker impedance setting see page 95 Note AC OUTLET SWITCHED 100W MAX 0 4A MAX R L AUDIO MULTI CH INPUT PRE OUT DOCK VIDEO COMPONENT VIDEO HDMI DIGITAL INPUT REMOTE OUT DIGITAL OUTPUT SPEAKERS DVD SUBWOOFER FRONT SB 8CH SUB WOOFER SUR BACK SURROUND SINGLE CENTER CENTER FRONT 6CH ...

Page 17: ... L 6 5 4 3 2 IN2 IN3 IN1 EXTRA SP Surround speakers EXTRA SP terminals see page 14 Left SINGLE Center speaker Left Right Front speakers FRONT A Left Right Subwoofers optional AUDIO MULTI CH INPUT PRE OUT HDMI DIGITAL INPUT SPEAKERS SUBWOOFER FRONT SB 8CH SUB WOOFER SUR BACK SURROUND SINGLE CENTER CENTER FRONT 6CH SURROUND 1 2 DVD DVD CD DTV CBL OPTICAL COAXIAL DVD DVR OUT SURROUND BACK BI AMP SURR...

Page 18: ...speakers support bi amplification To make the bi amplification connections use the FRONT and SURROUND BACK BI AMP terminals as shown below To activate the bi amplification connections set BI AMP to ON in ADVANCED SETUP see page 97 When you make the conventional connection make sure that the shorting bars are put into the terminals appropriately Refer to the instruction manuals of the speakers for ...

Page 19: ...als with up to 96 kHz of sampling frequency Video jacks This unit has three types of video jacks Connection depends on the availability of input jacks on your video monitor VIDEO jacks For conventional composite video signals transmitted via composite video cables S VIDEO jacks For S video signals separated into the luminance Y and chrominance C video signals transmitted on separate wires of S vid...

Page 20: ... 480p 60 Hz 576p 50 Hz 720p 60 Hz 50 Hz 1080i 60 Hz 50 Hz 1080p 60 Hz 50 Hz 24 Hz Default input assignment of HDMI input jacks HDMI jack and cable plug y We recommend that you use an HDMI cable shorter than 5 meters 16 feet with the HDMI logo printed on it Use a conversion cable HDMI jack DVI D jack to connect this unit to other DVI components Do not disconnect or connect the cable or turn off the...

Page 21: ...put at one of the HDMI IN jacks cannot be output from analog video output jacks The analog component video signals with 480i NTSC 576i PAL of resolution are converted to the S video or composite video signals and output at the S VIDEO MONITOR OUT and VIDEO MONITOR OUT jacks The analog component video signals with 1080p of resolution are only output at the COMPONENT VIDEO MONITOR OUT jacks Use the ...

Page 22: ...arly If the connected video monitor is compatible with the automatic audio and video synchronization feature automatic lip sync feature this unit adjusts the audio and video timing automatically see page 75 Connect the video monitor to the HDMI OUT jack of this unit to use the feature Connecting a TV monitor or projector Make sure that this unit and other components are unplugged from the AC wall ...

Page 23: ... input at the DIGITAL INPUT COAXIAL jack Connecting a DVD player Connecting other components Notes Make sure that this unit and other components are unplugged from the AC wall outlets AC OUTLET SWITCHED 100W MAX 0 4A MAX R L AUDIO MULTI CH INPUT PRE OUT DOCK VIDEO COMPONENT VIDEO HDMI DIGITAL INPUT REMOTE OUT DIGITAL OUTPUT SPEAKERS DVD SUBWOOFER FRONT SB 8CH SUB WOOFER SUR BACK SURROUND SINGLE CE...

Page 24: ... in Video in Video out Audio out Video in Component video out DVD recorder or PVR S video out HDMI out Audio in R L AUDIO MULTI CH INPUT PRE OUT DOCK VIDEO COMPONENT VIDEO HDMI DIGITAL INPUT DIGITAL OUTPUT SPEAKERS DVD SUBWOOFER FRONT SB 8CH SUB WOOFER SUR BACK SURROUND SINGLE CENTER CENTER FRONT 8CH SURROUND DVD DTV CBL S VIDEO VIDEO DTV CBL DVR DVR MONITOR OUT VCR OUT IN IN OUT 1 2 DVD DVD CD DT...

Page 25: ...oosting transformer or an MC head amplifier When you connect both the DIGITAL INPUT OPTICAL jack and the DIGITAL INPUT COAXIAL jack to an audio component the priority is given to the DIGITAL INPUT COAXIAL jack Notes R L AUDIO MULTI CH INPUT HDMI DIGITAL INPUT REMOTE OUT DIGITAL OUTPUT SPEAKERS FRO SB 8CH SUB WOOFER CENTER FRONT 8CH SURROUND DVD DVD CD DTV CBL OPTICAL COAXIAL DVD DVR SURROUND BACK ...

Page 26: ...acks depending on the settings for SPEAKER SET see page 68 1 FRONT PRE OUT jacks Front channel output jacks 2 SURROUND PRE OUT jacks Surround channel output jacks 3 SUR BACK PRE OUT jacks Surround back channel output jacks When you only connect one external amplifier for the surround back channel connect it to the SINGLE jack When BI AMP is set to ON this unit outputs the front channel audio signa...

Page 27: ... you connect at least a 5 1 channel speaker system before using this feature 1 The analog audio input jacks assigned as FRONT in MULTI CH see page 78 Connecting a Yamaha iPod universal dock or Bluetooth adapter This unit is equipped with the DOCK terminal on the rear panel that allows you to connect a Yamaha iPod universal dock such as YDS 10 sold separately or Bluetooth adapter such as YBA 10 sol...

Page 28: ...deo camera to this unit The audio signals input at the DOCK terminal on the rear panel take priority over the ones input at the VIDEO AUX jacks To reproduce the source signals input at these jacks select V AUX as the input source REMOTE OUT Remote control in Infrared signal receiver or Yamaha component Using the VIDEO AUX jacks on the front panel Caution Be sure to turn down the volume of this uni...

Page 29: ...ROL and then press CSTANDBY ON to turn on this unit This unit turns on and the advanced setup menu appears in the front panel display 3 Rotate the EPROGRAM selector to select SP IMP SP IMP and the current speaker impedance setting 8Ω MIN appear in the front panel display 4 Press DTONE CONTROL repeatedly to select 6Ω MIN 5 Press CSTANDBY ON to save the new setting and turn off this unit The setting...

Page 30: ...efore this unit can reproduce sound You can also turn on this unit by pressing JSCENE or 4SCENE buttons Set this unit to the standby mode Press CSTANDBY ON or DSTANDBY to set this unit to the standby mode In the standby mode this unit consumes a small amount of power in order to receive infrared signals from the remote control Turning this unit on and off ...

Page 31: ...s up when a DTS 96 24 signal is input to this unit 8 MUTE indicator and VOLUME level indicator The MUTE indicator flashes while the MUTE function is on see page 44 Indicates the current volume level 9 Input signal indicators Lights up when this unit is reproducing PCM Pulse Code Modulation or DSD Direct Stream Digital digital audio signals 0 Decoder indicators The respective indicator lights up wh...

Page 32: ... 69 in SPEAKER SET The remote control transmits a directional infrared ray Be sure to aim the remote control directly at the remote control sensor on this unit during operation Infrared window 1 Outputs infrared control signals Aim this window at the component you want to operate Transmit indicator 2 Flashes while the remote control is sending infrared signals Display window 6 Shows the name of th...

Page 33: ...ppropriately Headphones are disconnected from this unit This unit and the video monitor are turned on This unit is selected as the video input source of the video monitor The connected subwoofer is turned on and the volume level is set to about half way or slightly less The crossover frequency controls of the connected subwoofer is set to the maximum The room is sufficiently quiet y If you connect...

Page 34: ...set the AUTO SETUP parameters to the initial factory settings RELOAD or UNDO is available only when you have previously run AUTO SETUP and confirmed the results RELOAD or UNDO is not available when you change the setting of BI AMP in the advanced setup see page 97 or EXTRA SP ASSIGN in BASIC MENU see page 68 6 Press 9l h to select the desired setting of EQ Parametric equalizer type EQ Parametric e...

Page 35: ...he number of speakers connected to this unit in the following order Front Back Subwoofer Speaker distance DIST Displays the speaker distance from the listening position in the following order Closest speaker distance Farthest speaker distance Speaker level LVL Displays the speaker output level in the following order Lowest speaker output level Highest speaker output level The signal output at the ...

Page 36: ...14 Press 9ENTER to confirm your selection The following screen appears Disconnect the optimizer microphone from this unit to exit from SET MENU The optimizer microphone is sensitive to heat Keep it away from direct sunlight and do not place it on top of this unit y If you change speakers speaker positions or the layout of your listening environment run AUTO SETUP again to recalibrate your system A...

Page 37: ...rors in that warnings do not cancel the AUTO SETUP procedure 1 Make sure the pointer is pointing at WARNING and then press 9ENTER to display the detailed information about the warning The number on the right of WARNING indicates the number of warning messages 2 Press 9l h repeatedly to toggle between the warning displays y For details about each warning message see the AUTO SETUP section in Troubl...

Page 38: ...l starts to flash and the name of the currently assigned SCENE template appears in the front panel display 2 Rotate the IINPUT selector or set the operation mode selector to FAMP and then press 9l h to select the desired template 3 Press the JSCENE or 4SCENE button again to confirm the selection The selected SCENE template is assigned to the SCENE button Once the desired SCENE templates are assign...

Page 39: ...e 1 2 3 4 Radio Listening CD Hi fi Listening CD Listening CD Music Listening Dock Listening DVD Live Viewing DVD Movie Viewing DVD Viewing Disc Hi fi Listening Music Disc Listening Disc Listening DVR Viewing TV Viewing Action Game Playing RPG Playing DVD V AUX PHONO DTV CBL TUNER DOCK CD DVD DVR Video sources DVD video Recorded video TV programs Video games iPod or Bluetooth component Radio progra...

Page 40: ...Stereo Select this SCENE template when you play back music sources on your DVD player as the background music CD Hi fi Listening CD Pure Direct Select this SCENE template when you enjoy the high fidelity sound of the music discs on your CD player CD Listening CD STEREO 7ch Stereo Select this SCENE template when you play back music discs on your CD player CD Music Listening CD STEREO 2ch Stereo Sel...

Page 41: ... the desired SCENE templates are assigned to the corresponding 4SCENE buttons you need to set the input source of the SCENE template on the remote control See page 40 for details You can create a customized SCENE template for each SCENE button and if you create another customized SCENE template this unit overwrites the old customized SCENE template with the new one The newly created template is on...

Page 42: ...y 1 Press and hold the 4SCENE button and the desired input selector button 5 The transmit indicator 2 flashes twice 2 Keep holding down the buttons pressed in step 2 until OK appears in the display window 6 on the remote control If the setting of the input source is not successful NG appears in the display window 6 In this case repeat the setting procedure Using the remote control for the SCENE fe...

Page 43: ... sound field program The name of the selected sound field program appears in the front panel display See page 47 for details about sound field programs Sound field programs cannot be selected when the component connected to the MULTI CH INPUT jacks is selected as the input source see page 42 y Choose a sound field program based on your listening preference not merely on the name of the program Whe...

Page 44: ...ker set changes as follows FRONT A and B or FRONT B setting is not available when EXTRA SP ASSIGN is set to PRESENCE or NONE see page 68 Turn off the volume level of this unit when you switch the front speaker setting Using the Zone B feature When you set EXTRA SP ASSIGN to ZONE B see page 68 you can use the speakers connected to the EXTRA SP speaker terminals in another room Zone B Press ASPEAKER...

Page 45: ...You can select the amount of time that the current status is displayed in the OSD by using the OSD AMP parameter in OPTION MENU see page 79 To turn off the status screen press LDISPLAY again The OSD signal is not output at the DVR and VCR VIDEO OUT jacks and will not be recorded Before performing the following operations set the operation mode selector on the remote control to FAMP Selecting audio...

Page 46: ...source For example you can enjoy listening to classical music while viewing beautiful scenery from the video source on the video monitor Press the input selector buttons 5 on the remote control to select a video source and then an audio source y You can also select MULTI CH as the audio source see page 42 Set the operation mode selector to FAMP and then press PMULTI CH IN Set the BGV parameter in ...

Page 47: ...source channels in the input signal front surround LFE For example a multi channel soundtrack with 3 front channels 2 surround channels and LFE is displayed as 3 2 0 1 BITRATE The number of bits passing a given point per second FLAG Flag data encoded in DTS Dolby Digital or PCM signals that cue this unit to automatically switch decoders Surround EX etc Note SET MENU AUTO SETUP MANUAL SETUP A SIGNA...

Page 48: ...he front panel display changes as shown below The SLEEP indicator flashes while you are switching the amount of time for the sleep timer Once the sleep timer is set the SLEEP indicator lights up in the front panel display and the display returns to the selected sound field program Canceling the sleep timer Press MSLEEP on the remote control repeatedly until SLEEP OFF appears in the front panel dis...

Page 49: ...unit does not apply any sound field programs y Select a sound field program based on your listening preference not merely on the name of the program etc For audio music sources y For audio music sources we also recommend that you use the Pure Direct mode see page 51 The available sound field parameters differ depending on the settings of the speakers DIALG LIFT is available only when EXTRA SP ASSI...

Page 50: ...eld has been suitable for action games such as car racing and FPS games It uses the reflection data that limits the effects range per channel in order to offer a powerful playing environment with a being there feeling by enhancing various effects tones while maintaining a clear sense of directions Roleplaying Game This sound field has been suitable for role playing and adventure games It combines ...

Page 51: ...n after long hours of viewing Mono Movie This program is provided for reproducing monaural video sources such as a classic movie in an atmosphere of a good old movie theater The program produces the optimum expansion and reverberation to the original audio to create a comfortable space with a certain sound depth Note Program Descriptions 2ch Stereo Use this program to mix down multi channel source...

Page 52: ...ILENT CINEMA activates automatically whenever you connect headphones to the PHONES jack while listening to sound field programs see page 47 When activated the SILENT CINEMA indicator lights up in the front panel display SILENT CINEMA does not activate when the component connected to the MULTI CH INPUT jacks is selected as the input source see page 42 SILENT CINEMA is not effective when the Pure Di...

Page 53: ... program displaying the OSD adjusting the SET MENU parameters except for level settings operating video functions video conversion etc The Pure Direct mode is automatically canceled whenever this unit is turned off y The front panel display turns on momentarily when an operation is performed Use this feature to adjust the balance of bass and treble for the front left and right speaker channels y S...

Page 54: ...nit as long as this unit is turned on You can also select whether this unit charges the battery of the stationed iPod or not when this unit is in the standby mode by selecting the STANDBY CHARGE parameter in INPUT MENU see page 77 The DOCK indicator turns on while this unit charges the battery of the connected iPod when this unit is in the standby mode You can control your iPod when V AUX is selec...

Page 55: ...Pod menu and then press 9ENTER to begin playback of the selected song Choices Playlists playlists Artists artists Albums albums Songs songs Genres genres Composers composers Settings settings Playlists Songs Artists Albums Songs Albums Songs Songs Genres Artists Albums Songs Composers Albums Songs Settings Shuffle Repeat Shuffle Shuffle Use this feature to set this unit to play songs or albums in ...

Page 56: ... display y To cancel the pairing press 8BAND again If the Bluetooth adapter is not connected to the DOCK terminal of this unit No BT adapter appears in the front panel display 4 Check that the Bluetooth component detects the Bluetooth adapter If the Bluetooth component detects the Bluetooth adapter YBA 10 YAMAHA example appears in the Bluetooth device list 5 Select the Bluetooth adapter in the Blu...

Page 57: ...r a composite video signal you can only record an S video or a composite video signal on your VCR The analog audio signals input at the DOCK terminal can be output at the analog AUDIO OUT REC jacks for recording Check the copyright laws in your country to record from CDs radio etc Recording of copyrighted material may infringe copyright laws y Do a test recording before you start an actual recordi...

Page 58: ...ge 58 When you set a sound field parameter to a value other than the initial factory settings an asterisk mark appears by the sound field parameter name in the OSD Repeat steps 3 and 4 as necessary to change other sound field program parameter settings The available sound field parameters for some of the sound field programs may be displayed on more than one page in the OSD In this case press 9k n...

Page 59: ...ected sound field program is too weak You cannot recognize any difference between the sound field programs Decrease the value of DSP LEVEL The sound is vague You feel that the additional sound effect is excessive Control range 6 dB to 3 dB Adjusting the vertical dialogue position DIALG LIFT Use this feature to adjust the vertical position of the dialogues in movies The ideal position of the dialog...

Page 60: ...from the source sound by adjusting the delay between the direct sound and the first reflection heard by the listener The smaller the value the closer the sound source seems to the reflection face y When you adjust the initial delay parameters we also recommend that you adjust the corresponding room size parameters likewise This adjustment is especially effective for the CINEMA DSP programs Control...

Page 61: ...justment is especially effective for the CINEMA DSP programs Control range 0 1 to 2 0 LIVENESS S LIVENESS SB LIVENESS Liveness Surround and surround back sound field liveness Adjusts the reflectivity of the virtual walls in the hall by changing the rate at which the early reflections decay The early reflections of a sound source decay much faster in a room with acoustically absorbent wall surfaces...

Page 62: ... direct sound and the beginning of the reverberation sound The larger the value the later the reverberation sound begins A later reverberation sound makes you feel as if you are in a larger acoustic environment Control range 0 to 250 ms REV LEVEL Reverberation level Adjusts the volume of the reverberation sound The larger the value the stronger the reverberation becomes Control range 0 to 100 Soun...

Page 63: ...y when BASS and TREBLE are set to 0 dB see page 51 Select OFF not to bypass the decoders the DSP processors and the tone control circuitry when BASS and TREBLE are set to 0 dB When multi channel signals Dolby Digital and DTS are input they are downmixed to 2 channels and output from the front left and right speakers The low frequency signals of the front left and right channels are redirected to t...

Page 64: ...nly Pro Logic IIx Music and Pro Logic II Music panorama Sends stereo signals to the surround speakers as well as the front speakers for a wraparound effect Choices OFF ON DIMENSION PLIIx Music and PLII Music only Pro Logic IIx Music and Pro Logic II Music dimension Adjusts the sound field either towards the front or towards the rear Control range 3 towards the rear to 3 towards the front Initial s...

Page 65: ... frequency signals 68 FRONT SP Selects the size of the front speakers 69 CENTER SP Selects the size of the center speaker 69 SUR L R SP Selects the size and number of the surround speakers 69 SUR B L R SP Selects the size and number of the surround back speakers 69 CROSS OVER Selects the crossover frequency of all the speakers set to SML or SMALL in SPEAKER SET see page 69 70 SUBWOOFER PHASE Switc...

Page 66: ...er this unit outputs the test tone while making adjustments of GEQ or not 73 B LFE LEVEL SPEAKER Adjusts the speaker LFE level 74 HEADPHONE Adjusts the headphone LFE level 74 C DYNAMIC RANGE SPEAKER Adjusts the amount of the dynamic range compression of the speakers 74 HEADPHONE Adjusts the amount of the dynamic range compression of the headphones 74 D LIPSYNC HDMI AUTO Selects whether this unit a...

Page 67: ...es input at the MULTI CH INPUT jacks 78 INPUT CH Selects the number of channels input from an external decoder 78 FRONT Selects the analog jacks at which the front channel signals from an external decoder are input when you set INPUT CH to 8CH 78 Menu Parameter Functions Page A DISPLAY SET DIMMER Adjusts the brightness of the front panel display 79 OSD SHIFT Adjusts the vertical position of the OS...

Page 68: ... on the power of this unit 81 DECODER MODE Designates the default decoder mode for the input sources connected to the DIGITAL INPUT jacks when you turn on the power of this unit 81 EXTD SUR Designates the extended decoder mode for the input sources connected to the DIGITAL INPUT jacks when you turn on the power of this unit 81 E HDMI SET S AUDIO Selects whether to play back HDMI audio signals on t...

Page 69: ...tedly and then press 9ENTER to select and enter the desired menu The following displays are examples where SOUND MENU is selected 5 Press 9k n repeatedly and then press 9ENTER to select and enter the desired submenu The following display is an example where LFE LEVEL is selected 6 Press 9k n to select the desired parameter and then 9l h to change the parameter settings Press 9h to increase the val...

Page 70: ... the front channels and other speakers set to SMALL 2 Always output the low frequency signals of the front channels 3 Output the low frequency signals if the speakers are set to LARGE 4 Outputs the low frequency signals of the speakers set to SMALL or NONE 1 BASIC MENU Choice Descriptions FRONT B Select this setting when you use another front speaker system in the main room see page 42 ZONE B Sele...

Page 71: ...ll Note Choice Descriptions LARGE Select this setting when the center speaker is large SMALL Select this setting when the center speaker is small NONE Select this setting when you do not use the center speaker The center channel signals are directed to the front left and right speakers A SPEAKER SET FRONT SP SMALL LARGE A SPEAKER SET CENTER SP NONE SMALL LARGE Choice Descriptions LARGE Select this...

Page 72: ... 0 dB Control step 0 5 dB Initial setting FR L FR R SWFR PR L PR R 0 dB CNTR SUR L SUR R SBL SBR 1 0 dB y If your subwoofer can adjust the output volume and the crossover frequency set the volume to about half way or slightly less and set the crossover frequency to the maximum Set TEST TONE to ON to output the test tone for the SPEAKER LEVEL setting see page 71 The available speaker channels diffe...

Page 73: ... SPEAKER SET SP LEVEL and SP DISTANCE settings y If you use a handheld sound pressure level meter hold at arm s length and point upwards so that the meter is in the listening position With the meter set to the 70 dB scale and to C SLOW calibrate each speaker to 75 dB This function is automatically turned off if you exit from BASIC MENU Choice Functions meters m Adjusts speaker distances in meters ...

Page 74: ...level This feature is useful to avoid the unexpected loud sound by mistake For example the original volume range is 80 0 dB to 16 5 dB However when MAX VOL is set to 5 0 dB the volume range becomes 80 0 dB to 5 0 dB Control range 30 0 dB to 15 0 dB 16 5 dB Control step 5 0 dB When this unit is in the auto setup procedure the volume level is automatically set to 0 dB regardless of the current MAX V...

Page 75: ...r can be adjusted only when GEQ is selected in EQ TYPE SELECT Test tone TEST Use this feature to make adjustments of GEQ while listening to a test tone To select TEST press 9k n repeatedly in the graphic equalizer screen 3 SOUND MENU Choice Functions AUTO PEQ Uses the parametric equalizer adjusted in AUTO SETUP see page 32 GEQ Adjusts the built in 7 frequency band graphic equalizer so that the ton...

Page 76: ...mic range compression to be applied to your speakers or headphones This setting is effective only when this unit is decoding bitstream signals Speakers SPEAKER Adjusts the dynamic range compression for the speakers Headphones HEADPHONE Adjusts the dynamic range compression for the headphones Note p p B LFE LEVEL SPEAKER 0dB HEADPHONE 0dB Up Down Adjust Choice Functions MIN AUTO MIN Adjusts the dyn...

Page 77: ...n the value of the audio delay that this unit sets automatically and the value of the audio delay that you set in AUTO This unit stores the value of offset and applies the value to other automatic lip sync compatible video monitors Manual delay MANUAL Use this feature to adjust the delay of the sound output manually to synchronize audio with video images when you set HDMI AUTO to OFF Control range...

Page 78: ...PTICAL OUT to 1 for the digital recording component that you connect to the DIGITAL OUTPUT jack You cannot select a specific item more than once for the same type of jack An asterisk appears to the right of the input output jack names that have been changed from their previous settings The currently assigned input source for the selected input output jack appears in the OSD Current DTV CBL in the ...

Page 79: ...utput at the audio ZONE OUT jacks Decoder mode DECODER MODE Use this feature to switch the decoder activation mode When you select DTS and digital audio signals are input this unit always activates the DTS decoder and only plays back the DTS digital audio signals DECODER MODE is only available when the digital audio input jacks HDMI OPTICAL and or COAXIAL are assigned to the selected input source ...

Page 80: ...Input channels INPUT CH Use this setting to select the number of channels input from an external decoder see page 25 Choices 6CH 8CH If the connected component outputs discrete 6 channel audio signals Select 6CH If the connected component outputs discrete 8 channel audio signals Select 8CH Also set FRONT see below to the analog audio jacks at which the front left and right channel signals output f...

Page 81: ...D SETUP to set the parameters in VIDEO SET to the factory presets see page 97 Video conversion VIDEO CONV Use this feature to set whether to convert the video signals input at the VIDEO S VIDEO and COMPONENT VIDEO jacks 5 OPTION MENU Note Choice Functions ON Displays the OSD unceasingly during an operation 10S Turns off the OSD 10 seconds after you perform a certain operation 30S Turns off the OSD...

Page 82: ...ppears on the left of the available video signal resolution s If this unit cannot detect the available video signal resolution s of the connected video monitor set MON CHK see page 97 to SKIP and then set HDMI RES again This unit does not convert between 480 line video signals and 576 line video signals HDMI aspect ratio HDMI ASPECT Use this feature to select the adjustment of aspect ratio for ana...

Page 83: ...e see page 77 for the input sources connected to the DIGITAL INPUT jacks when you turn on the power of this unit Extended surround EXTD SUR Use this feature to designate the extended decoder mode see page 75 for the input sources connected to the DIGITAL INPUT jacks when you turn on the power of this unit Choice Functions OFF Turns off the MEMORY GUARD feature ON Protects sound field program param...

Page 84: ...I out jack only when this unit is turned on even if S AUDIO is set to OTHER Available audio video signals depend on the specification of the connected video monitor Refer to the instruction manual of each connected component Choice Functions DSP AX863SE Plays back HDMI audio signals on this unit The HDMI audio signals input at the HDMI input jacks of this unit are not output to the HDMI component ...

Page 85: ...hen the operation mode selector is set to FTV For details see the TV column on page 84 Remote control features Controlling this unit a TV or other components Notes V AUX DOCK ENTER DISPLAY AUDIO MENU TITLE TV MUTE TV INPUT MUTE 4 3 2 ENT 10 0 9 5 1 AV TV 1 2 3 4 7 6 8 RETURN ON OFF CLEAR LEARN RENAME MACRO REC INFO EON MODE PTY SEEK START VOLUME STRAIGHT PURE DIRECT A B C D E PRESET CH SET MENU SR...

Page 86: ...order Tape deck Tuner 1 AV POWER Power 1 Power 1 Power 1 VCR power 2 Power 1 Power 1 Power 1 Power 1 Power 1 2 TITLE Title Title Title Title Band 3 ENTER Menu enter Menu select Menu select PRESET CH k Menu up Menu up Menu up Preset up 1 to 8 PRESET CH n Menu down Menu down Menu down Preset down 1 to 8 A B C D E l Menu left Menu left Menu left Preset down A to E A B C D E h Menu right Menu right Me...

Page 87: ...is component control area You can control other components by setting the appropriate remote control codes Codes can be set up for each control area For a complete list of available remote control codes refer to List of remote control codes at the end of this manual The following table shows the default component Library component category and the remote control code for each control area Remote c...

Page 88: ...NTER to set the number OK appears in the display window 6 on the remote control if setting was successful NG appears in the display window 6 on the remote control if the setting was unsuccessful In this case start over from step 3 y If you continuously want to set up another code for another component press the input selector button 5 or 6SELECT k n repeatedly to select the component then repeat s...

Page 89: ... 10 cm 2 to 4 in apart from the other remote control on a flat surface so that their infrared transmitters are aimed at each other 3 Press CLEARN using a ballpoint pen or similar object LEARN and the name of the selected control area e g DVD appear alternately in the display window 6 on the remote control Do not press and hold CLEARN If you hold it down for more than 3 seconds the remote enters th...

Page 90: ...or other components are weak when the distance between the two remote controls is too great or too small when the remote control infrared windows are not facing each other at the appropriate angle when the remote control is exposed to direct sunlight when the function to be programmed is continuous or uncommon You can change the name of the input source that appears in the display window 6 on the ...

Page 91: ...series of operations with the press of a single button For example when you want to play a CD normally you would turn on the components select the CD input and press the play button to start playback The macro programming feature lets you perform all of these operations simply by pressing the CD macro button The buttons listed as macro buttons below are factory set with macro programs You can also...

Page 92: ... an input source The remote control code set up for 5DTV CBL takes priority over the one for 5PHONO 3 Playback can be started for any Yamaha remote control compatible CD player CD recorder DVD player or DVD recorder When using macros to operate other components you will need to program the play button on the control area of that component see page 87 or set a remote control code see page 85 Pressi...

Page 93: ...ly in the display window 6 on the remote control AGAIN appears in the display window 6 if you press a button other than a macro button 3 Press the buttons for the functions you want to include in the macro operation in sequence You can set up to 10 steps 10 functions After you have set 10 steps FULL appears and the remote control automatically exits the macro mode The following example is for prog...

Page 94: ...unctions for controlling the amplifier functions of this unit L ALL Clears all learned functions M ALL Clears all programmed macros RNAME Clears all renamed source names FCTRY Clears all remote functions and returns the remote to the factory settings 3 Press and hold CCLEAR again for about 3 seconds WAIT appears in the display window 6 If clearing was successful C OK appears in the display window ...

Page 95: ...nd then press the button you want to clear for about 3 seconds C OK appears in the display window 6 if clearing was successful Once C OK appears in the display window 6 on the remote control release the ballpoint pen or similar object used to press CCLEAR to exit the clearing mode The remote control returns to the learning mode y If you continuously want to clear another function repeat step 3 If ...

Page 96: ...u want to clear for about 3 seconds C OK appears in the display window 6 on the remote control if clearing was successful y If you continuously want to clear another function repeat step 2 Once you clear a programmed function the button reverts to the factory setting or to the manufacturer setting if you have set remote control codes 3 Press CMACRO again to exit the macro programming mode C NG app...

Page 97: ... the selected parameter appears in the front panel display 4 Press DTONE CONTROL repeatedly to change the selected parameter setting 5 Press CSTANDBY ON to save the new setting and set this unit to the standby mode y The settings you made are reflected next time you turn on this unit Speaker impedance SP IMP Use this feature to set the speaker impedance of this unit so that it matches that of your...

Page 98: ...the setting mode will be automatically canceled In this case start over from step 1 3 Press 9ENTER The four digit code set for the selected input area appears in the display window 6 on the remote control 4 Press the numeric buttons A to enter the four digit remote control code for the input area you want to use Remote control AMP ID codes Select one of the following codes to set the remote contro...

Page 99: ...y of the SCENE control signals If noises are output when you operate the SCENE function set SCENE IR to OFF Monitor check MON CHK Use this feature to activate or deactivate the monitor check function of this unit When this parameter is set to YES this unit receives the information of the available video signal resolutions from the video monitor connected via HDMI and you can only select the resolu...

Page 100: ...iate input source with the INPUT selector on the front panel or the input selector buttons on the remote control 41 42 Speaker connections are not secure Secure the connections 14 The front speakers to be used have not been selected properly Select the front speakers by pressing ASPEAKERS on the front panel repeatedly 42 The volume is turned down Turn up the volume The sound is muted Press GMUTE o...

Page 101: ...A SP ASSIGN to FRONT B 68 No sound from the center surround or surround back speakers when the FRONT B speakers are activated EXTRA SP ASSIGN is set to ZONE B Set EXTRA SP ASSIGN to FRONT B 68 Presence speaker settings are not available in SET MENU EXTRA SP ASSIGN is set to a setting other than PRESENCE Set EXTRA SP ASSIGN to PRESENCE 68 No sound is heard from the subwoofer LFE BASS OUT in SET MEN...

Page 102: ...from the AC wall outlet and then plug it in again after about 30 seconds No sound is heard from the connected HDMI component The HDMI component does not accept the multi channel audio signals Convert the multi channel audio signals to the 2 channel audio signals at the source component such as a DVD player CHECK SP WIRES appears in the front panel display Speaker cables are short circuited Make su...

Page 103: ... correctly using List of remote control codes at the end of this manual 85 Try setting another code of the same manufacturer using List of remote control codes at the end of this manual 85 The library code of the remote control and the remote control ID of this unit do not match Match the remote control ID of this unit with the corresponding remote control library code 96 Even if the remote contro...

Page 104: ...unit Station your iPod back in a Yamaha iPod universal dock such as YDS 10 sold separately connected to the DOCK terminal of this unit 25 Unable to play This unit cannot play back the songs currently stored on your iPod Check that the songs currently stored on your iPod are playable Store some other playable music files on your iPod Status message Cause Remedy See page Searching The Bluetooth adap...

Page 105: ... back channel signal is detected Connect the surround back speaker to the LEFT SURROUND BACK SPEAKERS terminal if you only have one surround back speaker 14 E 5 NOISY Background noise is too loud Try running AUTO SETUP in a quiet environment Turn off noisy electric equipment like air conditioners or move them away from the optimizer microphone E 6 CHECK SUR Surround back speakers are connected tho...

Page 106: ...ons for proper polarity or 14 W 2 OVER 24m 80ft The distance between the speaker and the listening position is over 24 m 80 ft Bring the speaker closer to the listening position W 3 LEVEL ERROR The difference of volume level among speakers is excessive Readjust the speaker installation so that all speakers are set in locations with similar conditions Check the speaker connections 14 Use speakers o...

Page 107: ... press CSTANDBY ON on the front panel 1 Press CSTANDBY ON on the front panel to set this unit to the standby mode 2 Press and hold DTONE CONTROL and then press CSTANDBY ON to turn on this unit This unit turns on and the advanced setup menu appears in the front panel display 3 Rotate the EPROGRAM selector to select INIT 4 Press DTONE CONTROL repeatedly to select ALL y Select CANCEL to cancel the in...

Page 108: ...und sound system that gives you completely independent multi channel audio With 3 front channels front L R and center and 2 surround stereo channels Dolby Digital provides 5 full range audio channels With an additional channel especially for bass effects called LFE Low Frequency Effect the system has a total of 5 1 channels LFE is counted as 0 1 channel By using 2 channel stereo for the surround s...

Page 109: ...ES decoder that enables 6 1 channel reproduction by adding the surround back channel to the existing 5 1 channel format DTS Express DTS Express is an advanced audio technology for the optional feature on Blu ray Disc or HD DVD which offers high quality low bit rate audio optimized for network streaming and Internet applications DTS Express is used for the Secondary Audio feature of Blu ray Disc or...

Page 110: ...mber of times the signal is sampled per second is called the sampling frequency while the degree of fineness when converting the sound level into a numeric value is called the number of quantized bits The range of rates that can be played back is determined based on the sampling rate while the dynamic range representing the sound level difference is determined by the number of quantized bits In pr...

Page 111: ... a room with virtually any size at all This ability to create sound fields at will is exactly what Yamaha has done with the digital sound field processor CINEMA DSP Since the Dolby Surround and DTS systems were originally designed for use in movie theaters their effect is best felt in a theater having many speakers designed for acoustic effects Since home conditions such as room size wall material...

Page 112: ...ork PHONO MM 5 mV to OUT REC 81 dB or more CD etc Effect Off 250 mV to Front L R 100 dB or more Residual Noise IHF A Network Front L R 150 µV or less Channel Separation 1 kHz 10 kHz PHONO shortened to Front L R 60 dB 55 dB or more CD etc 5 1 kΩ shortened to Front L R 60 dB 45 dB or more Volume Control MUTE 80 dB to 16 5 dB Tone Control Front L R BASS Boost Cut 10 dB 50 Hz BASS Turnover Frequency 3...

Page 113: ...ound field program 47 CHANNEL Audio information 45 Charge on standby Input menu 77 CHECK PRNS Automatic setup warning message 104 CHECK SP WIRES 14 CHECK SUR Automatic setup error message 103 CINEMA DSP indicator 29 CLASSICAL Sound field category 47 Clear settings Remote control 92 CLEAR Remote control 92 Completed Bluetooth status message 102 COMPONENT VIDEO jacks 17 Compressed Music Enhancer 49 ...

Page 114: ...window 30 INIT Advanced setup 97 INIT DLY Sound field parameter 58 INIT VOL Volume menu 72 Initial configuration Option menu 81 Initial delay Sound field parameter 58 Initial volume Volume menu 72 INPUT CH Input menu 78 Input channel and speaker indicators 30 Input channel indicators 30 INPUT MENU Manual setup 76 Input menu Manual setup 65 INPUT RENAME Input menu 77 Input rename Input menu 77 Inpu...

Page 115: ...gram 48 ROOM SIZE Sound field parameter 59 Room size Sound field parameter 59 S S VIDEO jacks 17 S Audio HDMI set 82 S INIT DLY Sound field parameter 58 S LIVENESS Sound field parameter 59 S ROOM SIZE Sound field parameter 59 SAMPLING Audio information 45 SB INI DLY Sound field parameter 58 SB LEVEL Sound field parameter 61 SB LIVENESS Sound field parameter 59 SB ROOM SIZE Sound field parameter 59...

Page 116: ...V controlling by remote control 83 TV monitor connection 20 U Unable to play iPod status message 102 UNIT Speaker distance 71 Unit Speaker distance 71 Unknown iPod iPod status message 102 Unplug HP Automatic setup error message 103 Unprocessed input sources 50 USER CANCEL Automatic setup error message 103 V VCR connection 22 VIDEO AUX jacks 26 VIDEO CONV Video settings 79 Video conversion Video se...

Page 117: ...Repairs performed by the customer himself or by an unauthorised third party 2 Inadequate packaging or mishandling when the product is in transit from the customer Please note that it is the customer s responsibility to ensure the product is adequately packaged when returning the product for repair 3 Misuse including but not limited to a failure to use the product for its normal purpose or in accor...

Page 118: ...panel SILENT CINEMA PHONES TONE CONTROL STRAIGHT PURE DIRECT SCENE AUDIO SELECT EFFECT PROGRAM INPUT STANDBY ON 1 2 3 4 OPTIMIZER MIC R L AUDIO OPTICAL VIDEO AUX VIDEO SVIDEO VOLUME SPEAKERS C D E F G H I J A B ...

Page 119: ...RECT A B C D E PRESET CH SET MENU SRCH MODE LEVEL SLEEP STEREO MULTI CH IN MULTI CH IN SUR DECODE PARAMETER CLASSICAL LIVE CLUB ENTERTAIN ENHANCER MOVIE TV SOURCE AMP SELECT DVD VCR DVR PHONO DTV CBL CD MD CD R TUNER POWER POWER SCENE POWER STANDBY 4 3 2 0 9 5 1 7 6 8 STEREO SUR DECODE PARAMETER CLASSICAL LIVE CLUB ENTERTAIN ENHANCER MOVIE TV VOL TV CH C B A BAND MEMORY 1 2 3 4 R P Q O N M L K J I...

Page 120: ...DIO 0184 SONIC FRONTIERS 0184 SONY 0027 SYMPHONIC 0332 TAG MCLAREN 0184 TANDY 0059 TECHNICS 0056 THORENS 0184 THULE 0184 UNIVERSUM 0184 VICTOR 0099 WARDS 0184 YAMAHA 2300 2301 CD RECORDER KENWOOD 0653 MARANTZ 0653 PHILIPS 0653 YAMAHA 2400 DVD PLAYER ACOUSTIC SOLUTIONS 0757 ALBA 0744 AMSTRAD 0740 APEX DIGITAL 0699 0744 0782 0821 0823 0857 1127 BLAUPINKT 0744 BLUE PARADE 0598 BUSH 0740 CENTREX 0699 ...

Page 121: ...0 0200 0227 0276 0685 1248 KREISELMEYER 0200 LABGEAR 1323 LOGIX 1044 LORENZEN 0326 MAGNAVOX 0749 0751 MANHATTAN 0482 1044 1110 MARANTZ 0227 MEDIASAT 0880 MEMOREX 0751 METRONIC 0111 MITSUBISHI 0776 MOTOROLA 0896 MYRYAD 0227 NEXT LEVEL 0896 NOKIA 0482 0750 0778 1154 1250 1750 OCTALTV 1032 ORBITECH 1127 PACE 0482 0874 1202 1350 PANASONIC 0274 0728 0874 1347 PANDA 0482 PAYSAT 0751 PHILIPS 0160 0227 04...

Page 122: ...036 0078 0119 0183 0263 JENSEN 0788 KEC 0207 KTV 0057 0207 KAISUI 0036 KAPSCH 0190 KARCHER 0637 KATHREIN 0583 KENDO 0064 KENWOOD 0057 KNEISSEL 0286 0462 KOLIN 0080 0135 0207 KORPEL 0064 KOYODA 0036 L S ELECTRONIC 0835 LG 0057 0064 0087 0135 0205 0741 LXI 0074 0081 0181 0183 0205 LEYCO 0064 0291 LIESENK TTER 0064 LOEWE 0539 LUXOR 0383 0388 M ELECTRONIC 0036 0064 0131 0132 0136 0190 0314 0373 0401 0...

Page 123: ...0796 0860 2900 PROJECTOR 2901 PROJECTOR 2904 PROJECTOR YAPSHE 0277 YOKO 0064 0291 ZENITH 0044 0119 0205 0490 VCR ASA 0064 0108 ADMIRAL 0075 ADVENTURA 0027 AIKO 0305 AIWA 0027 0064 0334 0375 0379 AKAI 0068 0342 AKIBA 0099 ALBA 0099 0305 0342 0379 AMERICA ACTION 0305 AMERICAN HIGH 0062 AMSTRAD 0027 ANAM 0064 0253 0267 0305 0507 ANAM NATIONAL 0253 1589 ANITECH 0099 ASHA 0267 ASUKA 0064 AUDIOVOX 0064 ...

Page 124: ...PS 0062 0108 0645 1108 1208 PHONOLA 0108 PILOT 0064 PIONEER 0069 0094 0108 POLK AUDIO 0108 PROFITRONIC 0267 PROLINE 0027 PROSCAN 0087 1087 PROTEC 0099 PULSAR 0066 PYE 0108 QUASAR 0062 1062 QUELLE 0108 RCA 0062 0069 0087 0267 0834 1062 1087 RADIOSHACK 0027 RADIOLA 0108 RADIX 0064 RANDEX 0064 REALISTIC 0027 0062 0064 0074 0075 0131 REOC 0375 REPLAYTV 0641 0643 REX 0068 ROADSTAR 0064 0099 0267 0305 R...

Page 125: ...763 B SILENT CINEMA PHONES TONE CONTROL STRAIGHT PURE DIRECT SCENE AUDIO SELECT EFFECT PROGRAM INPUT STANDBY ON 1 2 3 4 OPTIMIZER MIC R L AUDIO OPTICAL VIDEO AUX VIDEO SVIDEO VOLUME SPEAKERS C D E F G H I J A B 00_cd_DSP AX863SE AX763_B book Page 1 Monday January 21 2008 4 18 PM Black process 45 0 240 0 LPI ...

Page 126: ...ET CH SET MENU SRCH MODE LEVEL SLEEP STEREO MULTI CH IN MULTI CH IN SUR DECODE PARAMETER CLASSICAL LIVE CLUB ENTERTAIN ENHANCER MOVIE TV SOURCE AMP SELECT DVD VCR DVR PHONO DTV CBL CD MD CD R TUNER POWER POWER SCENE POWER STANDBY 4 3 2 0 9 5 1 7 6 8 STEREO SUR DECODE PARAMETER CLASSICAL LIVE CLUB ENTERTAIN ENHANCER MOVIE TV VOL TV CH C B A BAND MEMORY 1 2 3 4 R P Q O N M L K J I H G F E D C B A 0 ...

Reviews: