


60
C
Select the section you want to record.
.....................................
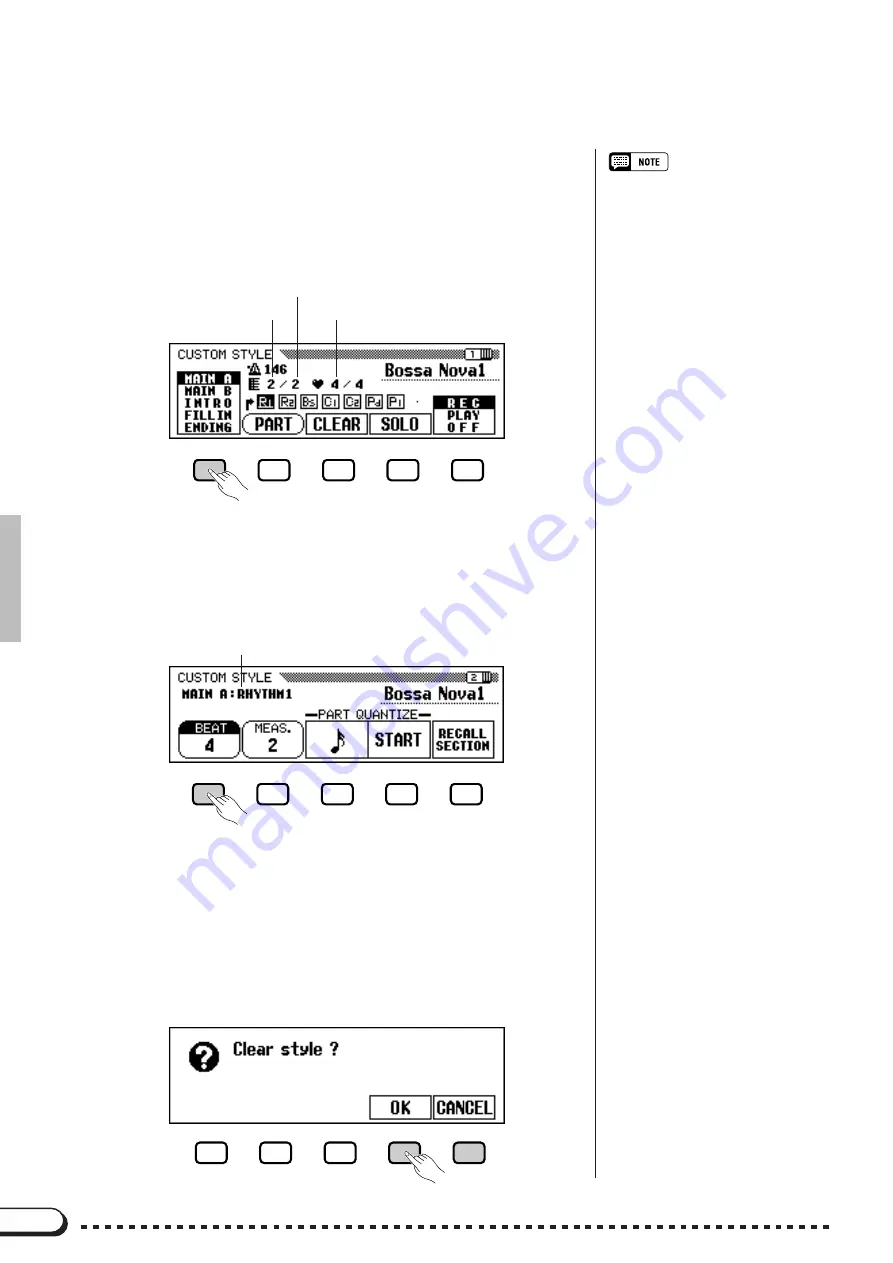
In the CUSTOM STYLE display page 1, press the first LCD button
as many times as necessary to select the section you want to program
first: MAIN A, MAIN B, INTRO, FILL IN, or ENDING. The MAIN A
section is initially selected.
Custom Style
○ ○ ○ ○ ○ ○ ○ ○ ○ ○ ○ ○ ○ ○ ○ ○ ○ ○ ○ ○ ○ ○ ○ ○ ○ ○ ○ ○ ○ ○ ○ ○ ○ ○ ○ ○ ○ ○ ○ ○ ○ ○ ○ ○ ○ ○
• In the CUSTOM STYLE, MAIN A,
MAIN B, INTRO, FILL IN or ENDING
are referred to as “section”, and
RHYTHM 1/2, BASS, CHORD 1/2,
PAD or PHRASE 1/2 are referred to as
“part”.
• Only one pattern can be created for
each INTRO, FILL IN and ENDING
section.
• Whether the “A” or “B” variations of the
INTRO, FILL IN and ENDING sections
are used as the source pattern de-
pends on whether the MAIN A or MAIN
B section was selected when the Cus-
tom Style function was engaged. (As
for FILL IN, “FILL IN from A to A”, or
“FILL IN from B to B” is used.)
V
Change the time signature and number of meas-
ures, if required.
.................................................................................................
If you want to create a style in a different time signature than the cur-
rent style, or change the number of measures in the selected section,
Press the PAGE
[
>
]
button to go to CUSTOM STYLE display page 2.
Current recording section and part
Use the
BEAT
LCD button to select a different time signature, or the
data dial or
[–/+]
buttons once the
BEAT
parameter has been selected. As
soon as you choose to change the beat value, the “
Clear style ?
”
prompt will appear, since you will have to completely clear all sections
and parts of the style and start recording from scratch if you change the
time signature. Press
OK
to clear the style, or
CANCEL
to abort. Once
the style has been cleared you can select a new time signature as re-
quired: 2, 3, 4, or 5.
Beat of the selected style
Current measure number of
the selected section
Total measure number of
the selected section


