background image

YDP-135 Owner’s Manual

32

Keyboard Stand Assembly

ENGLISH

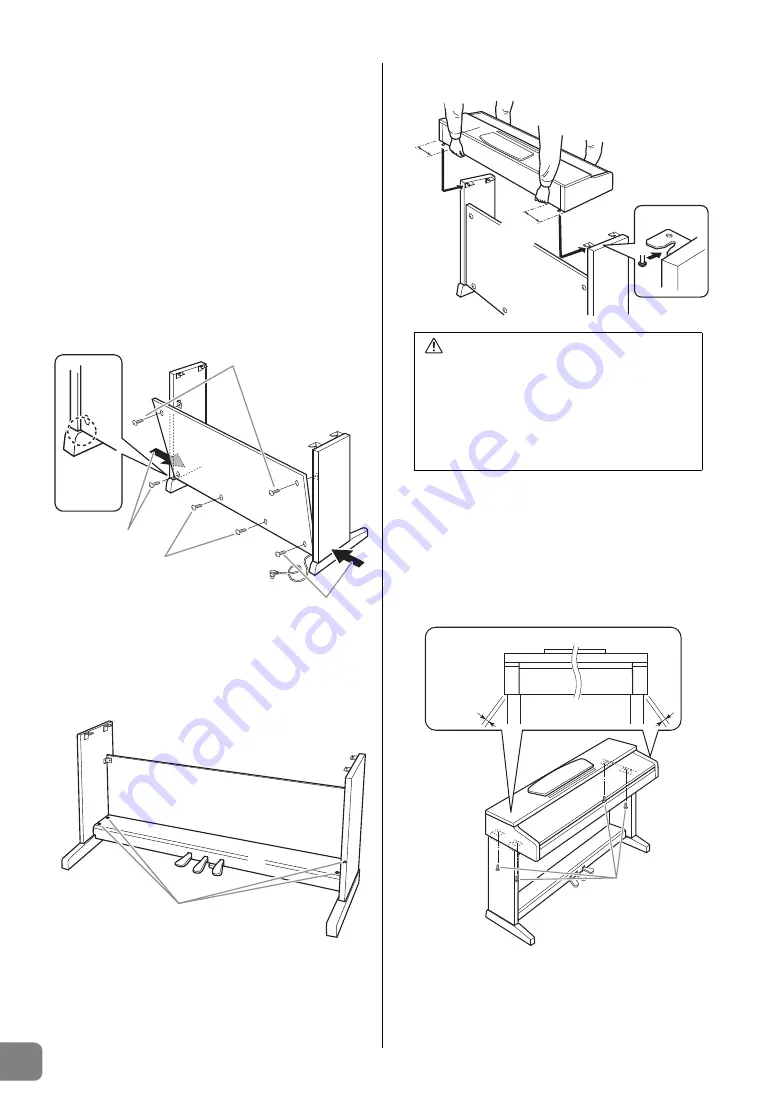
2

Attach B.

Depending on the model of digital piano you 
purchased, the surface color of one side of B may be 
different from the other side. In this case, position B so 
that the side of the surface color similar to D and E 
faces the player.

2-1

Place the lower side of B on each foot of D and E, 
then attach the upper side to D and E.

2-2

Attach the top of B to D and E by finger-tightening 
the thin screws 

3

 (4 × 12mm).

2-3

While pushing the lower part of D and E from 
outside, secure the bottom ends of B using two 
tapping screws 

4

 (4 × 20mm).

2-4

Insert the other two tapping screws 

4

 (4 × 20mm) 

into the other two screw holes to secure B.

2-5

Securely tighten the screws on the top of B that 
were attached in Step 2-2.

3

Securely tighten the screws on C that were 
attached in Step 1-3.

4

Mount A.

5

Secure A.

5-1

Adjust the position of A so that the left and right 
ends of A will project beyond D and E equally 
when seen from the front.

5-2

Secure A by tightening the short screws 

2


(6 × 16mm) from the front.

R

L

B

D

E

2-2, 2-5

2-1

2-3

2-4

2-3

Place the 
bottom ends 
of the rear 
panel on 
each foot.

B

C

3

CAUTION

• Since your fingers can become pinched 

between the main unit and the rear or side 

panels, be extra careful so as not to drop the 

main unit.

• Do not hold the keyboard in any position other 

than the position shown in the illustration.

A

B

D

E

At least 
10 cm

At least 
10 cm

Be sure to place your hands at least 
10 cm from either end of the main unit 
when positioning it.

5-1

5-2

A

Projection 
of A

Summary of Contents for Arius YDP-135

Page 1: ...YDP 135 For information on assembling the keyboard stand refer to the instructions at the end of this manual Owner s Manual EN ...

Page 2: ...2 ENGLISH YDP 135 Owner s Manual ...

Page 3: ...g of old products please contact your local municipality your waste disposal service or the point of sale where you purchased the items For business users in the European Union If you wish to discard electrical and electronic equipment please contact your dealer or supplier for further information Information on Disposal in other Countries outside the European Union This symbol is only valid in th...

Page 4: ...le parts Do not open the instrument or attempt to disassemble or modify the internal components in any way If it should appear to be malfunctioning discontinue use immediately and have it inspected by qualified Yamaha service personnel Do not expose the instrument to rain use it near water or in damp or wet conditions or place containers on it containing liquids which might spill into any openings...

Page 5: ...the volumes of all components at their minimum levels and gradually raise the volume controls while playing the instrument to set the desired listening level Do not insert a finger or hand in any gaps on the key cover or instrument Also take care that the key cover does not pinch your finger Never insert or drop paper metallic or other objects into the gaps on the key cover panel or keyboard Do no...

Page 6: ...leaning the instrument use a soft dry or slightly damp cloth Do not use paint thinners solvents cleaning fluids or chemical impregnated wiping cloths During extreme changes in temperature or humidity condensation may occur and water may collect on the surface of the instrument If water is left the wooden parts may absorb the water and be damaged Make sure to wipe any water off immediately with a s...

Page 7: ... Transposition 20 Fine tuning the Pitch 20 Using the Metronome 21 Adjusting the Keyboard Touch Touch Sensitivity 22 Recording Your Performance 23 Recording Your Performance 23 Playing Back Recorded Performance Data 24 Erasing Recorded Performance Data 24 Connecting MIDI Instruments 25 About MIDI 25 MIDI Applications 25 Connecting the Digital Piano to a Computer 26 Transmitting Song Data between th...

Page 8: ... Yamaha digital piano features a special GHS Graded Hammer Standard keyboard with matte black keytops The GHS keyboard offers natural grand piano type playability by simulating the heavier touch of the low range and the lighter touch of the high range across the keyboard The matte black keytops enhance the piano s luxurious and graceful appearance AWM Stereo Sampling This digital piano sounds much...

Page 9: ...ct a desired preset song for playback They also enable you to change the Voice or tempo 6 REC button page 23 Allow you to record your performance 7 PLAY button page 24 Play back your recorded performance 8 MASTER VOLUME control page 11 Adjust the volume level using this control 9 FUNCTION pages 20 28 While holding down the DEMO SONG and PIANO VOICE buttons press the specified keys to set the MIDI ...

Page 10: ... or other serious damage to the instrument If this happens turn off the power immediately and unplug the power cord from the AC outlet Then have the instrument inspected by qualified Yamaha service personnel Music Rest To raise the music rest 1 Pull the music rest up and toward yourself as far as it will go 2 Flip down the two metal supports at the left and right on the rear of the music rest 3 Lo...

Page 11: ...he power indicator turns off WARNING Be sure to use an appropriate AC outlet Be sure to use a specified power adaptor Using a different power adaptor may cause malfunction overheating or fire CAUTION A small amount of electrical current remains even after the Standby On switch has been turned off If you plan not to use the instrument for an extended period of time or if there is a possibility of l...

Page 12: ...f standard stereo headphones If you are using only one pair of headphones you can plug them into either jack The speakers are automatically shut off when a plug is inserted into either of these jacks CAUTION Do not listen to the instrument at a high volume level through headphones for a long period of time or your hearing may be damaged PHONES Standard stereo phone plug Bottom of the keyboard ...

Page 13: ... then returns to the first demo song and repeats until you stop it Selecting a demo song While a demo song is playing press the or button to select and play the next or previous demo song To select a particular demo song from the six Voice demo songs simultaneously hold down the DEMO SONG button and press one of the C1 F1 keys 2 Press the DEMO SONG button to stop playback Demo songs Original songs...

Page 14: ...g that you want to play back from the included 50 Greats for the Piano book The number of each piano preset song is assigned to the C2 C 6 keys 2 While holding down the DEMO SONG button press one of the C2 C 6 keys to select and play the desired song The selected piano song starts playing Starting with the selected song the playback of the piano preset songs will continue in the following sequence...

Page 15: ... following sequence any other songs loaded from the computer followed by the demo songs and the 50 piano preset songs The sequence then returns to the initial songs loaded from the computer and repeats until you stop it While a song is playing press the or button to change to the next or previous song 2 Press the DEMO SONG button to stop playback Selecting a Song Playback Channel If a song loaded ...

Page 16: ... the volume level while playing the keyboard Voice On this instrument a Voice means a tone or tonal color C 1 D 1 C1 D1 E1 F1 Lowest key Key Voice Name Description C1 Grand Piano 1 Recorded samples from a concert grand piano Perfect for classical compositions as well as any other style that requires acoustic piano C 1 Grand Piano 2 Spacious and clear piano with bright reverb Good for popular music...

Page 17: ...a note or chord on the keyboard and press the sostenuto pedal while the note s are held those notes will sustain as long as you hold the pedal as if the damper pedal had been pressed but all subsequently played notes will not be sustained This makes it possible to sustain a chord for example while other notes are played staccato Soft Left pedal The soft pedal reduces the volume and slightly change...

Page 18: ...g down the PIANO VOICE button The depth range is from 0 through 20 While holding down the PIANO VOICE button press the A4 key to set the reverb to the depth most suitable for the selected Voice Key Reverb Type Description C2 Room This setting adds a continuous reverb effect to the sound similar to the acoustic reverberation you would hear in a room C 2 Hall1 For a bigger reverb sound use the Hall ...

Page 19: ...e following settings for Voices 1 and 2 in Dual mode Setting the octave You can shift the pitch up and down in octave steps for Voice 1 and Voice 2 independently Depending on which Voices you combine in Dual mode the combination may sound better if one of the Voices is shifted up or down an octave While holding down the PIANO VOICE button press one of the C5 F5 keys Setting the balance You can adj...

Page 20: ...and F 3 To restore the normal pitch While holding down the DEMO SONG and PIANO VOICE buttons press the C3 key Fine tuning the Pitch You can fine tune the pitch of the entire instrument This function is useful when you play the digital piano along with other instruments or CD music Setting the pitch Hz Hertz This unit of measurement refers to the frequency of a sound and represents the number of ti...

Page 21: ...the tempo value in steps of one Press and hold down the METRONOME button and press the C 5 key Decreasing the tempo value in steps of one Press and hold down the METRONOME button and press the B4 key Increasing the tempo value in steps of ten Press and hold down the METRONOME button and press the D5 key Decreasing the tempo value in steps of ten Press and hold down the METRONOME button and press t...

Page 22: ...opriate keyboard touch for the Voices songs or your taste This setting does not change the weight of the keyboard While holding down the PIANO VOICE button press one of the A6 C7 keys to select the desired touch sensitivity 2 4 7 1 3 5 6 9 11 8 10 12 14 16 19 15 17 18 20 13 Lowest key C1 G2 The volume level increases as you press higher keys Key Touch Sensitivity Setting Description A6 Fixed The v...

Page 23: ...e recorded You can save the recorded user song to a computer You can also load the user song data from a computer and play it back on this instrument See page 26 1 Make all the initial settings such as Voice and time signature Make the Voice settings pages 16 and 19 time signature page 21 and any other desired settings reverb etc as necessary Use the MASTER VOLUME control to adjust the volume to a...

Page 24: ...aying back the instrument automatically returns to the previous mode To stop playback in the middle of a song press the PLAY button Erasing Recorded Performance Data You can erase the recorded user song 1 Press the REC button to engage the Record Ready mode The REC button indicator flashes Press the REC button again if you wish to cancel the clear operation 2 Erase the song Press the PLAY button t...

Page 25: ...to find out what MIDI data and commands your devices can transmit or receive You need a dedicated MIDI cable optional to make a MIDI connection MIDI cables are available at most musical instrument stores MIDI Applications MIDI functions enable you to transfer performance data between MIDI devices load song data from a connected computer to your instrument and transmit and save user song data to a ...

Page 26: ...ion that enables MIDI signals to be transmitted between the sequence software on the computer and the connected MIDI instrument For more information refer to the user s manual that came with the USB interface device Transmitting Song Data between the Computer and the Digital Piano In addition to the demo songs and the 50 piano preset songs stored in this instrument you can play data for another so...

Page 27: ...d in this instrument You can transfer the backup data between the instrument and a computer The following items will be stored in flash memory on this instrument This data will be kept after you turn off the power to the instrument Initializing the settings If this instrument somehow becomes disabled or malfunctions turn off the power to the instrument then perform the initialization procedure Whe...

Page 28: ...l Voices to be played directly from the keyboard This status is called Local Control On since the internal tone generator is controlled locally by its own keyboard Local control can be turned Off however so that the keyboard of this digital piano does not play the internal Voices but the appropriate MIDI information is still transmitted via the MIDI OUT connector when notes are played on the keybo...

Page 29: ...atedly toggles between Program Change On and Off Control Change On Off MIDI Control Change data refers to MIDI information related to performance expression such as damper pedal information You can transmit MIDI Control Change data from this instrument to control the operation of the connected MIDI device For example if you operate this instrument s damper pedal this instrument will transmit MIDI ...

Page 30: ...kers or headphones is audible The noise may be due to interference caused by the use of a mobile phone in close proximity to this instrument Turn off the mobile phone or move it further away from this instrument The overall volume is low or no sound is heard The Master Volume is set too low Set it to an appropriate level using the MASTER VOLUME control Make sure a pair of headphones is not connect...

Page 31: ...tighten up all screws upon completing assembly of each unit To disassemble reverse the assembly sequence given below Remove all parts from the package and make sure you have all of the items 1 Attach finger tighten C to D and E 1 1 Untie and straighten out the bundled pedal cord Don t discard the vinyl tie You will need it later in step 6 1 2 Align D and E with each end of C 1 3 Attach D and E to ...

Page 32: ...es to secure B 2 5 Securely tighten the screws on the top of B that were attached in Step 2 2 3 Securely tighten the screws on C that were attached in Step 1 3 4 Mount A 5 Secure A 5 1 Adjust the position of A so that the left and right ends of A will project beyond D and E equally when seen from the front 5 2 Secure A by tightening the short screws 2 6 16mm from the front R L B D E 2 2 2 5 2 1 2 ...

Page 33: ...ug disappears from view Otherwise the pedal may not function properly 6 1 6 3 6 2 M I D I Insert the cord all the way until the metal part of the plug disappears from view Are there any parts left over Review the assembly procedure and correct any errors Is this instrument clear of doors and other movable fixtures Move the instrument to an appropriate location Does this instrument make a rattling ...

Page 34: ...MIDI Data Format 6 MIDI Implementation Chart 6 MIDI IN OUT 9 Music Rest 25 Musicsoft Downloader 26 O Options 30 P PEDAL 9 17 33 PHONES 9 12 PIANO VOICE 9 16 PLAY 9 24 Playing Back Recorded Performance Data 24 POWER 9 11 Preset songs 50 Piano Preset Songs 14 Program Change 29 R REC 9 23 Recording your Performance 23 Reverb 18 S SMF 26 Soft Pedal 17 Song 13 Song Playback Channel 15 Songs Loaded from...

Page 35: ...WM Stereo Sampling Polyphony Number of Polyphony max 64 Preset Number of Voices 6 Effects Types Reverb Yes Part Dual Yes Songs Preset Number of Preset Songs 6 Demo Songs 50 Piano Preset Songs Recording Number of Songs 1 Number of Tracks 1 Data Capacity One Song 65 KB approx 11 000 notes Recording Function Yes Data Format Playback Original Format Standard MIDI File SMF Format 0 Recording Original F...

Page 36: ...U R G Digital Musical Instruments Division 2011 Yamaha Corporation WZ44620 105AP A0 ...

Reviews: