background image

14

Memory Bank Recall

1.  Press the [

V/M

] key to enter the Memory Mode.

2.  Press and hold the [

#BAND

] key, then press the [▲] or [▼] key to select the desired 

Memory Bank (“BANK 1” through “BANK10”).

3.  Press the [

V/M

] key.

• 

Only memory channels assigned in the current memory Bank will be available.

• 

When the multiple memory channels are assigned in one memory bank, press the 
the [▲] or [▼] key to select the desired memory channel.

• 

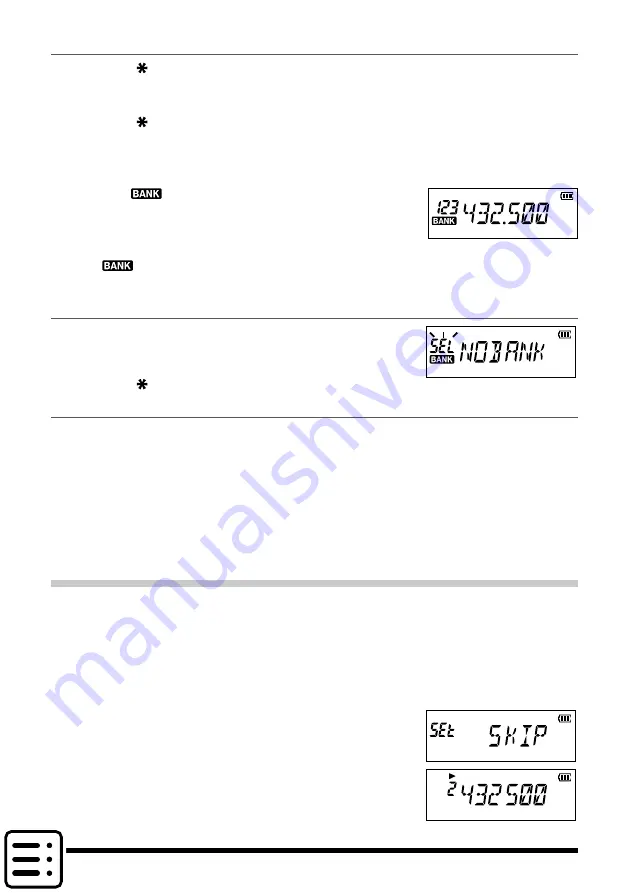
The “

” indication will appear at the left side of 

the frequency display while operating within a Mem-
ory Bank.

• 

The memory channel number appears above the 

” icon.

• 

To change to another Memory Bank, press and hold the [

#BAND

] key.

Returning To Memory mode from Memory Bank operation

1.  While in the Memory Bank Mode, press and hold the 

[

#BAND

] key, and then press the [▲] or [▼] key to select 

NO BANK

”.

2.  Press the [

V/M

] key to return to Memory Mode.

Removing a Memory channel from a Memory Bank

1.  Recall the Memory Bank that contains the memory channel to delete.
2.  Press the [▲] or [▼] key to select the Memory channel to delete, then press and 

hold the [

#BAND

] key.

3.  Press and hold the Function key to remove the memory channel.

• 

If assigned memory channels still remain in the Memory Bank, the display will re-
turn to a Memory Bank channel.

• 

If there is no assigned memory channel in the Memory Bank, the display will return 
to the Memory mode.

How to Skip (Omit) a Channel during Memory Scan Operation

The “Skip Memory Channel” may be skipped during the memory scanning. When the 
“Skip Memory Channels” is set, the specified memory channels may be skipped during 
the memory scanning.
1.  Recall the memory channel to specify.
2.  Press and hold the Function key, then press the [▲] or [▼] key to select Set Mode “

35 SKIP

”.

3.  Press the Function key.

4.  Press the [

p

] or [

q

] to select the “

SKIP

5.  Press the 

PTT

 switch to return to normal operation.

• 

The “

u

” icon will appear above the memory channel 

number, indicating it is to be ignored during scanning.

Summary of Contents for FT-4XE

Page 1: ...VHF UHF DUAL BAND FM TRANSCEIVER FT 4XR FT 4XE Advance Manual Clicking tapping at the at the bottom left of the current browsing page will return to the contents page at any time...

Page 2: ...s from a Remote Station Standby Operation 8 Using the Pager Answer Back 8 Notification of a Call from a Remote Station by the Bell Function 9 Convenient Functions 10 VOX Operation 10 VFO Split Mode 10...

Page 3: ...W feature 16 Priority Revert Mode 17 ARTS Automatic Range Transponder System 18 Basic ARTS Setup and Operation 18 ARTS Polling Time Options 19 ARTS Alert Beep Options 19 CW Identifier Setup 19 DTMF Op...

Page 4: ...he selected tone will be muted and signals not containing the selected tone will be heard DCS appears Enables the digital code squelch function The DCS code may be selected from 104 codes from 023 to...

Page 5: ...Set Mode Selecting 36 SQL TYP 1 Press the or to select the TSQL 2 Press the Function key 3 Press the or to select the 38 TN FRQ 4 Press the Function key The receive R tone frequency setting screen wi...

Page 6: ...nction key Entering the Set Mode Selecting 36 SQL TYP 1 Press the or to select the DCS 2 Press the Function key 3 Press the or to select the 10 DCS COD 4 Press the Function key The receive R DCS code...

Page 7: ...or q key Press the Function key Entering the Set Mode Selecting 23 PAG CDR 1 Press the numeric key to input the first element of the code from 01 to 50 The icon is moved to the second element of the...

Page 8: ...transmit a call to the specific station Receiving pager code calls from a Remote Station Standby Operation When the Pager function is activated and a call is received with a corresponding Code PAGING...

Page 9: ...or q key Press the Function key Entering the Set Mode Selecting 6 BELL 1 Press the or to select the desired number of times 1 8 times or continuous the Bell rings OFF 1T 3T 5T 8T CONT continuous 2 Pr...

Page 10: ...received or vice versa Press and hold the Function key Press the p or q key Press the Function key Entering the Set Mode Selecting 42 VFO SPL 1 Press the or to select the VSP ON 2 Press the PTT switc...

Page 11: ...Function key The character input screen is displayed 4 Use the numeric key to input the characters Inputting characters Example quickly Pressing the 2 key each time switches the following characters 2...

Page 12: ...annel directly z z In the memory only mode the following functions will not operate Changing the VFO mode Press the V M key Memory Tune Press the BAND key Program Memory scan Press the Function key an...

Page 13: ...Channels Memory Bank 4 Club Channels Memory Bank 3 All Amateur Band Channels Memory Bank 1 144 MHz Amateur Band Channels Memory Bank 2 430 MHz Amateur Band Channels Registering to Memory Banks 1 Pres...

Page 14: ...y channel from a Memory Bank 1 Recall the Memory Bank that contains the memory channel to delete 2 Press the or key to select the Memory channel to delete then press and hold the BAND key 3 Press and...

Page 15: ...channels must be within the same frequency band The lower and upper limit memory channels must not register the lower and upper channels in reverse Performing Programmable Memory Channel Scan The pro...

Page 16: ...ual reception stops and signal receiver switches to priority memory channel The transceiver returns to the previous frequency quickly and continues to receive mode when there is no signal Dual Receive...

Page 17: ...witch to transmit the specified priority memory channel Press and hold the Function key Press the p or q key Press the Function key Entering the Set mode Selecting 25 PRI RVT 1 Press the or key to sel...

Page 18: ...e PTT switch is pressed the transceiver may be programmed to transmit a CW ID every 10 min utes If you move out of range for more than one minute four pollings the transceiver will sense that no signa...

Page 19: ...irms a station is with in range but does not re confirm with beeps thereafter Display is the same function as OFF ALWAYS Each time a polling transmission is received from the other station the alert b...

Page 20: ...ress and hold the Function key Press the p or q key Press the Function key Entering the Set mode Selecting 12 DT SET The DTMF memory channel number blinks 1 Press the or key to select DTMF memory chan...

Page 21: ...DTMF Memory The DTMF code registered in the DTMF memory channel is automatically trans mitted Even after releasing the PTT switch the transmission continues until the DTMF code is completed The transc...

Page 22: ...ey to change the setting 4 Press the PTT switch to save the new setting and return to normal operation On some setting screens pressing the PTT switch does not exit from Set mode In this case press an...

Page 23: ...de transmission delay time 50MS 250MS 450MS 750MS 1000MS 12 DT SET Selects the DTMF auto dialer memory channel and edits the DTMF code Maximum 16 digits d1 d9 13 DT SPD Sets the DTMF code transmission...

Page 24: ...QL TYP Selects the Tone Encoder and or Decoder mode OFF R TONE T TONE TSQL REV TN DCS PAG ER 37 STEP Sets the frequency steps AUTO 5 0 6 25 10 0 12 5 15 0 20 0 25 0 50 0 100 0 k European version only...

Page 25: ...ther station every 15 or 25 seconds when in range For more details see ARTS Alert Beep Options 3 AR INT Selects the Polling Interval during ARTS operation 25 SEC 25 seconds Polling interval 15 SEC 15...

Page 26: ...ays battery DC voltage 10 DCS COD Sets the DCS CODE RX and TX 104 standard DCS codes are available Default setting is 023 R receive 023 T Transmit See Setting the DCS CODE for details 11 DT DLY Sets t...

Page 27: ...ng signals BSY ON Turns the TX BUSY lamp ON BSYOFF Turns the TX BUSY lamp OFF 17 LED TX Turns the TX BUSY lamp ON OFF while transmitting signals TX ON Turns the TX BUSY lamp ON TX OFF Turns the TX BUS...

Page 28: ...ng the Pager Answer Back for details 23 PAG CDR Specify the receive personal Enhanced CTCSS Paging code Set the pager code for receive to be called by other stations 01 05 50 01 47 50 Set the receive...

Page 29: ...numeric key to input the 4 digits password key Moves the cursor to the right key Moves the cursor to the left 3 Press the PTT switch to save the setting and return to normal operation 28 RF SQL A spec...

Page 30: ...mode settings BUSY The scanner will halt on a signal it encounters Scanning will resume one second after the other station signal ceases trans mitting In the case of constant carrier signals like Weat...

Page 31: ...r details 39 TOT Set the transceiver to automatically return to receive mode after transmitting continuously for a certain period of time The TOT function limits inadvertent transmission of unnecessar...

Page 32: ...tic transmit receive switching based on voice input to a VOX compatible headset or internal external microphone With the VOX system enabled you do not need to press the PTT switch in order to transmit...

Page 33: ...switch on does not matter 4 Press the or key on each transceiver to select F6 CLONE then press the Function key momentarily When the Clone mode is successfully activated in this step CLONE message wil...

Page 34: ...sion frequency on a ham radio band z z Is the voltage of the battery pack correct Check the remaining charge on the battery pack The keys or PTT do not respond z z Is the Keypad Lock or PTT Lock on Th...

Page 35: ...without the permission of YAESU MUSEN CO LTD YAESU MUSEN CO LTD Tennozu Parkside Building 2 5 8 Higashi Shinagawa Shinagawa ku Tokyo 140 0002 Japan YAESU USA 6125 Phyllis Drive Cypress CA 90630 U S A...

Reviews: