Yaesu FD-160 III Instruction Manual Download Page 10

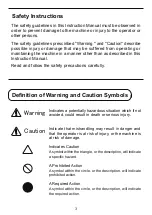
INDICATE CUTTING LENGTH

A

F

SET THE CUTTING LENGTH

INCREASE NUMBER

DECREASE NUMBER

(exp. A-100mm)

4 digits

4 digits

CUT and STAND BY

CUT and STAND BY

REMOVE THE FILM

REMOVE THE FILM

FILM FEED

FILM FEED

LIGHTING

SET AUTO / MANUAL

LIGHTING OFF

LED LAMP

MANUAL MODE

MANUAL MODE

AUTO MODE

AUTO MODE

Make sure that LED LAMP is off.

When the POWER SWITCH turn on, setting mode will be previous used

  setting.

Every time pressing START BUTTON, cutting piece is ready one by one.

AUTO MODE (LED LAMP is on )

MANUAL MODE (LED LAMP is off )

Make sure that LED LAMP is on.

If the LED LAMP is off, press the AUTO/MANUAL BUTTON to turn it on.

Press START BUTTON and cut a film.

After removing the film ready, another one will come out automatically.

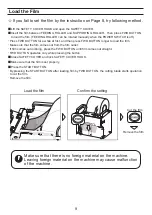
This machine can be set manual mode or auto mode.

Setting the Mode

Make sure that cutting length is displayed.

The cutting length will be displayed as A, b, C, d, E, F with 3 digits, or 4

  digit number.

If cutting length is not displayed, press SELECT BUTTON more than few

  seconds to display cutting length.

Set the cutting length.

Set the desired length by pressing the 

/

BUTTON.

Memorize seven different length by using SELECT BUTTON.

Select the desired cutting length.

  (A-F:20mm-999mm, 4 digit number: 20mm-9999mm)

The length can be set in 1mm by 

+/−

BUTTON, or press the button longer

  to fast forward.

The length will be memorized automatically after 3 seconds.

If you turn the POWER SWITCH off right after you set the length, it will

   not be memorized.
Caution: Some of usable films may not cut as depends on the material.

               Please have a cutting test before starting the operation.

Set the Film Length

10

Summary of Contents for FD-160 III

Page 1: ...AUTO FILM DISPENSER FD 160 FD 200 FD 300 INSTRUCTION MANUAL...

Page 2: ...your Safety please always keep this Instruction Manual for reference retraining and trouble shooting Contents P2 Please Read Before Use P3 Safety Instructions Definition of Warning and Caution Symbols...

Page 3: ...a specific hazard A Prohibited Action A symbol within the circle or the description will indicate prohibited action Definition of Warning and Caution Symbols The safety guidelines in this Instruction...

Page 4: ...Turn off the power switch and unplug the machine prior to replacing the blade unit or performing any maintenance on the machine Failure to observe this may result in serious injury Do not use this mac...

Page 5: ...e the cord is connected properly to the electrical outlet as well as the receptacle on the back of the machine A loose connection can result in high heat or fire Do not use the machine in areas where...

Page 6: ...OF CONTROL PANEL 6 Identification of Parts FEEDING ROLLER CARRYING HANDLE CASE FRONT PANEL HOOK CUTTER BLADE FRONT PANEL SAFETY COVER FILM SET ROLLER SUPPORTING ROLLER LOWER SUPPORTING ROLLER UPPER SA...

Page 7: ...CKET POWER SWITCH POWER SWITCH AC CORD INLET TORQUE LIMITER ADJUST DIAL TAPER ROLLER FILM HOLDER BRAKE ROLLER BIBBIN SHAFT SOCKET GUIDE STEP LEFT RIGHT GUIDE ROLLER AC CORD INLET SPARE FUSE REMARK FD...

Page 8: ...ER HOOK and open the SAFETY COVER Peel the film and put it on FILM GUIDE To set the film properly keep it a little loose as the drawing shows below Close SAFETY COVER gently and lock SAFETY COVER HOOK...

Page 9: ...that the film comes out from the film outlet If film comes out inclining press the FWD BUTTON until film comes out straight FWD BUTTON operates only while pressing the button Close SAFETY COVER and l...

Page 10: ...e out automatically This machine can be set manual mode or auto mode Setting the Mode Make sure that cutting length is displayed The cutting length will be displayed as A b C d E F with 3 digits or 4...

Page 11: ...gain it will resume L MODE Loop Mode A buzzer will sound when the number of setting pieces is completed You can use the mode either MANUAL or AUTO This setting is 999 pcs maximum Press SELECT BUTTON a...

Page 12: ...not accept repair and parts replacement if you do disassemble Use food grade lubricant on contact points of both upper and lower blades as shown on the right image FD 160 FD 200 TORQUE LIMITER is equi...

Page 13: ...d film jammed Hold PIN and turn ADJUST DIAL to make it strong following to the instruction below If the torque is strong it may cause shorter cutting piece than setting or failure for film feeding If...

Page 14: ...FRONT PANEL and SAFETY COVER Check the area of FEEDING ROLLER and SUPPORTING ROLLER whether there is a waste of film Remove the waste of film in order to avoid scratching any parts if you find it Clos...

Page 15: ...l purchaser owns the product when given normal wear and proper usage The limited warranty for the machine shall be for a period of 180 days form the date of purchase The spare parts such as Cutting Bl...

Page 16: ...19G24 39 8 Senju Motomachi Adachi Ku Tokyo 120 0041 Japan Phone 81 3 3888 8751 Fax 81 3 3888 1592 PLEASE VISIT OUR WEB SITE URL www yaesu1965 com YAESU KEIKOGYO CO LTD...

Reviews: