7
4. Initial installation of transducer
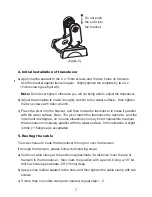
a) Apply marine sealant to the 4 x 15mm screws and the two holes on transom.
Hold the bracket against transom again
ˈ
slightly tighten the template by two 4 x
15mm screws (see figure-6).
Note:
Do not over tighten, otherwise you will not being able to adjust the transducer
DŽ
b) Adjust the template to make it roughly vertical to the water surface
ˈ
then tighten
the two screws with Allen wrench.
c) Press the pivot into the bracket, and then rotate the transducer to make it parallel
with the water surface. Note: The pivot match the transducer by ratchets
ˈ
and the
increment is12degree, so in some situations you may find it impossible to adjust
the transducer completely parallel with the water surface. In this situation a slight
incline (1~5degree) is acceptable.
5. Routing the cable
You can choose to route the transducer through or over the transom.
If through the transom, please follow the following steps:
a) hold one cable clamp at the position approximate 1/4 distance room the top of
transom to the transducer
ˈ
then mark the position with a pencil. Using a 1/8” bit,
drill tow holes approximate 3/8” (10mm) deep.
b) Apply some marine sealant to the hole, and then tighten the cable clamp with two
screws.
c) If more than one cable clamp are needed, repeat step1
ˈ
2
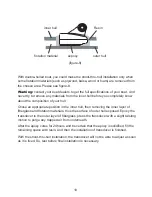
Do not push
the pivot into
the bracket
(figure-5)

