5
Tool List (not included)
- Hand drill,
- 5/32” drill bits,
- Phillips and flat-head screwdriver,
- Pencil
- Marine sealant.
- 2-part, slow-cure epoxy (for shoot-thru-hull transducer installation)
Transducer Installation
Transom installation
1. Select the mounting location
When you select a mounting location for the transducer, the flowing should be
considered in advance.
The sonar transmission / reception can be affected severely in turbulent water, so please
do not mount transducer behind strakes, rows of rivet, water intake, discharge port,
the immediate area of the propeller(s). These areas can create turbulence when
the boat moves in a high speed.
2. Mark the location and drill the mounting holes
a) Make sure the boat is level and no obvious
incline of the shipboard
DŽ
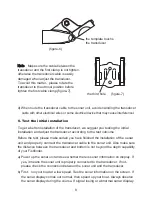
b) Hold the template against the transom
of boat
ˈ
mark two mounting holes in the
two slots. The center of two holes should
be parallel with water surface. Make sure the
distance between the bottom of template and
the lower edge of the transom is about 0~5mm.
Distance between the bottom of template and the lower edge of the transom is about
0~5mm (figure-1).
c) Using a 5/32” bit, drill 2 holes approximate 1” (25mm) deep at the marked location.
Be careful not drilling too deep then 1”.
3. Assemble the transducer
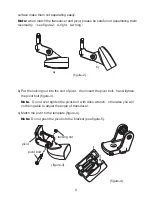
a) Slightly spread the pivot and match the transducer to the pivot. The toothed

