background image

P7

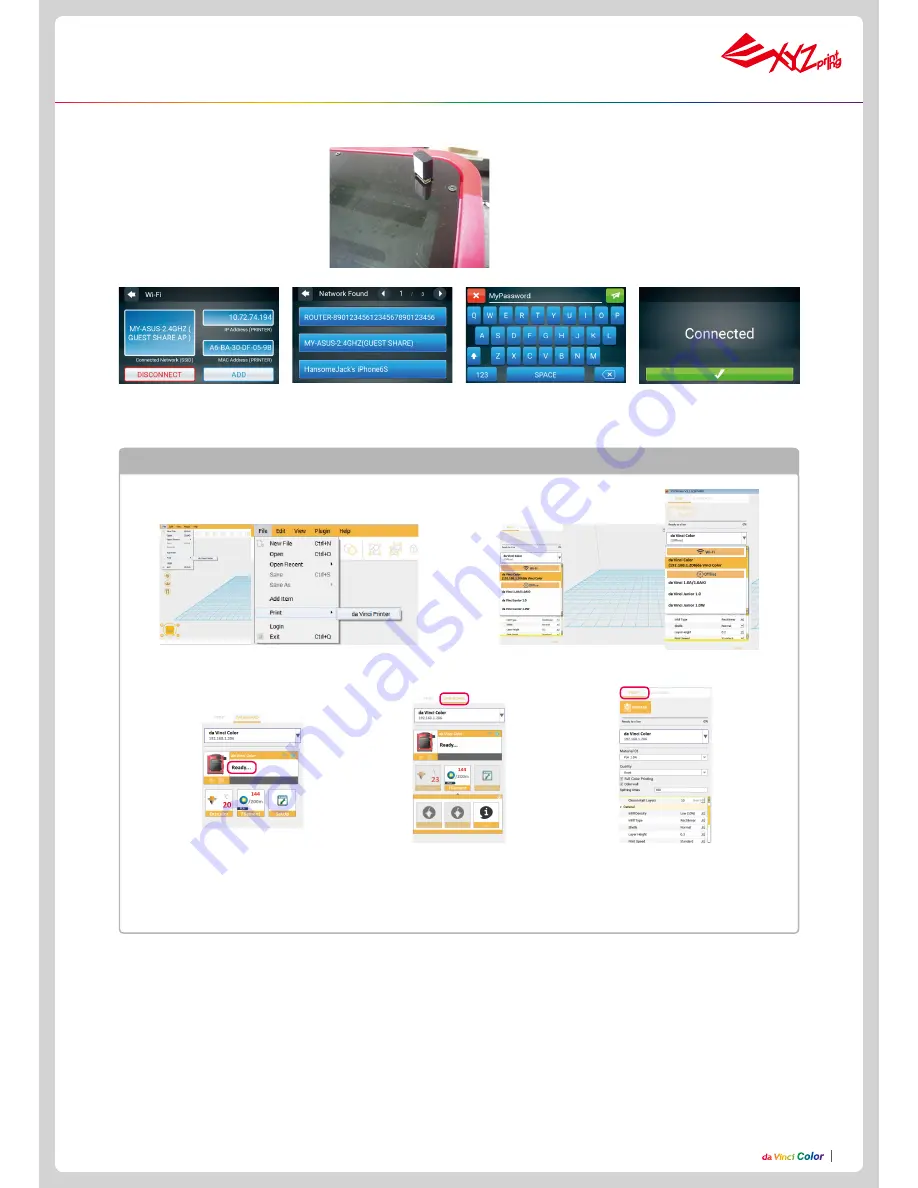
Before setting the WiFi, please insert 

the WiFi dongle into USB port on the 

top of printer.

1. Tap ADD and the printer will 

start to search for available 

access points. 

4. Confirm the connection is 

completed

2. Tap the access point to be 

used

3. Enter the password for the 

access point. 

WiFi setting


Use a USB cable to connect the printer to the computer and run the XYZmaker. 


Check if the WiFi function is activated on the computer and connect to the access point. 

1

. Run the XYZmaker. Click on File > Print > da Vinci 

Printer. 

2. Select the printer to be used. 

PRINT:  

Set printing parameters and quali

-

ty.  If only a file conversion is needed, tap 
“PREPARE”. 

DASHBOARD:  

Monitor print head 

temperature, filament used and filament 
loading / unloading. 

3.  When the software displays ”

READY

”, the 

connection is established successfully

Now, you can click on “DASHBOARD” to 
monitor the printer or “PRINT” to print a 
file. 

Use the XYZmaker to verify if the WiFi connection is established successfully 

Summary of Contents for ds Vinci Color

Page 1: ... skills and maintenance of the da Vinci Color 3D printer For more information on the da Vinci Color 3D printer and the complete XYZprinting product line please contact your local dealer or visit the official website of XYZprinting http www xyzprinting com ENG Read this user manual in the SD or USB Card before using your printer DEU Lesen Sie vor der Benutzung Ihres Druckers diese Bedienungsanleitu...

Page 2: ...ctuer une mise à jour manuelle une fois pour obtenir les dernières ressources You may use XYZmaker to initiate manual updates to the printer firmware and software When using the print er for the first time we recommend connecting to the Internet and performing manual update once to obtain the latest resources 您可以透过XYZmaker对打印机韧体及软体进行手动更新 建议您初次使用打印机时 先利用网络连线执行几 次手动更新以获得最新资源 Sie können mit XYZmaker ...

Page 3: ... moving printing parts or burn from high temperature might occur The machine becomes hot during operation and thus run in high temperature Do not touch or replace parts when they are not cooled down After startup the parts in the machine will heat up or move depending on the user s instructions During product operation do not touch or block the operation of the parts Weak odors may be generated du...

Page 4: ...mperature 15 30 C Cartridge storage temperature 15 35 C Filament storage temperature 0 38 C Precautions and Instructions of Maintenance Tools 3 1 2 4 5 The following tools are intended for use under the guidance or guard ianship of an adult only Do not allow children unfamiliar with the tools to have access to them in case of danger Accessory Checklist 1 2 3 4 11 5 6 12 7 8 1 Quick Guide 7 Top Cov...

Page 5: ...th sides and then remove the foam under the print bed Remove the tape on the body 4 in total 4 Move the printer to a table or plat form Do not move the printer by yourself as it is heavy 1 Remove the plastic wrap and PP 2 Open the front door Remove the tape from the supporting aterials and print bed 5 Remove the foam on the cartridge holder 6 ...

Page 6: ...e 9 Confirm the rubber magnet is well placed on the print bed 12 Insert the other end of the guide tube into the feed module and secure it tightly 11 Remove the cable tie and foam in front and back of the front door 8 Unpacking There is a sheet of PC film to rubber magnet with a double sided adhesive this PC film is replaceable please replace it when it s dirty or broken Note ...

Page 7: ...mport files 3cp from a USB drive to the machine for printing without a com puter This includes the functions in Home Page 1 Settings of the Print Bed Print Head Filament and Ink Next page includes WiFi Sound Statistics Language and Display The last page includes Model Version Reset and Legal Info Settings USB Printing Menu ...

Page 8: ...f the WiFi function is activated on the computer and connect to the access point 1 Run the XYZmaker Click on File Print da Vinci Printer 2 Select the printer to be used PRINT Set printing parameters and quali ty If only a file conversion is needed tap PREPARE DASHBOARD Monitor print head temperature filament used and filament loading unloading 3 When the software displays READY the connection is e...

Page 9: ...ded from the print head the filament will be successfully loaded Tap the screen to confirm and continue 1 Tap Z offset 3 Users can tap the icon to higher or lower the print bed the higher value the bigger distance and vice versa 2 Move the print head to the center of the print bed It is recommended that the space between the print head and the print bed just touch and the nozzle can move smoothly ...

Page 10: ...id not transfer well please wet the paper towel with 75 Alcohol to wipe the ink After you clean the inkjet check to see if the ink transferred 4 Press the cartridge head against the paper towel to transfer some ink onto it 3 Remove the cartridge cover 5 If the ink did not transfer well try putting the paper towel on the table and hold the ink pressed on the paper towel The da Vinci Color uses four...

Page 11: ... Cyan M Magenta and Y Yellow from left to right Cartridge Installation 1 4 2 5 3 6 We suggest you print a test page after you install the ink cartridge Please prepare a sheet of paper 2 Tap Test Page 1 Tap Calibration 1 2 3 4 Ink cleaning please wet the paper towel with 75 alcohol to wipe the ink After you clean the ink please print the test page again Drain the ink please refer to C and then prin...

Page 12: ... the most and then tap PROCEED 8 Confirm the numbers entered in the boxes and tap PROCEED 3 The printing operation will start once the print nozzle is warmed up 4 The printer will print the calibration card automatically This takes approximately 15 minutes Make sure you have loaded the filament 6 For horizontal alignment enter each color s corresponding number After entering the number tap PROCEED...

Page 13: ... objects save the file to be printed in the obj format and load it in the XYZmaker 4 The Prepare function can convert a obj file to a 3cp file Once the file is edited and adjusted click on Print to output the object The printing operation will start after the file is sliced 1 Connect the computer and printer and select da Vinci COLOR 3 You can change related settings to the desired printing result...

Page 14: ...ference will not occur in a particular installation If this equipment does cause harmful interference to radio or television reception which can be determined by turning the equipment off and on the user is encouraged to try to correct the interference by one or more of the following measures Reorient or relocate the receiving antenna Increase the separation between the equipment and receiver Conn...

Reviews: